Category: Low Maintenance Plants

  • 10 Early Spring Vegetables You Can Start Indoors Right Now

    10 Early Spring Vegetables You Can Start Indoors Right Now

    Every product is independently reviewed and selected by our editors. If you buy something through our links, we may earn an affiliate commission at no extra cost to you.

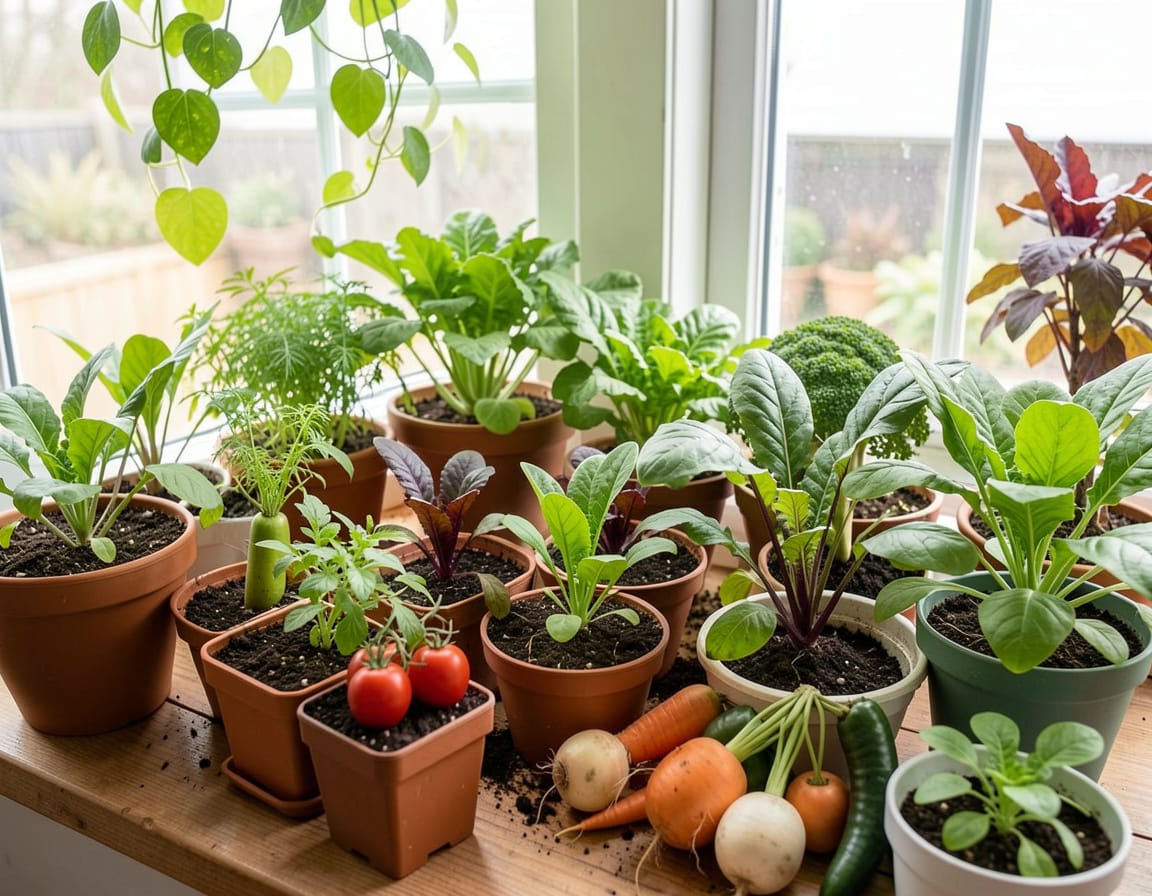
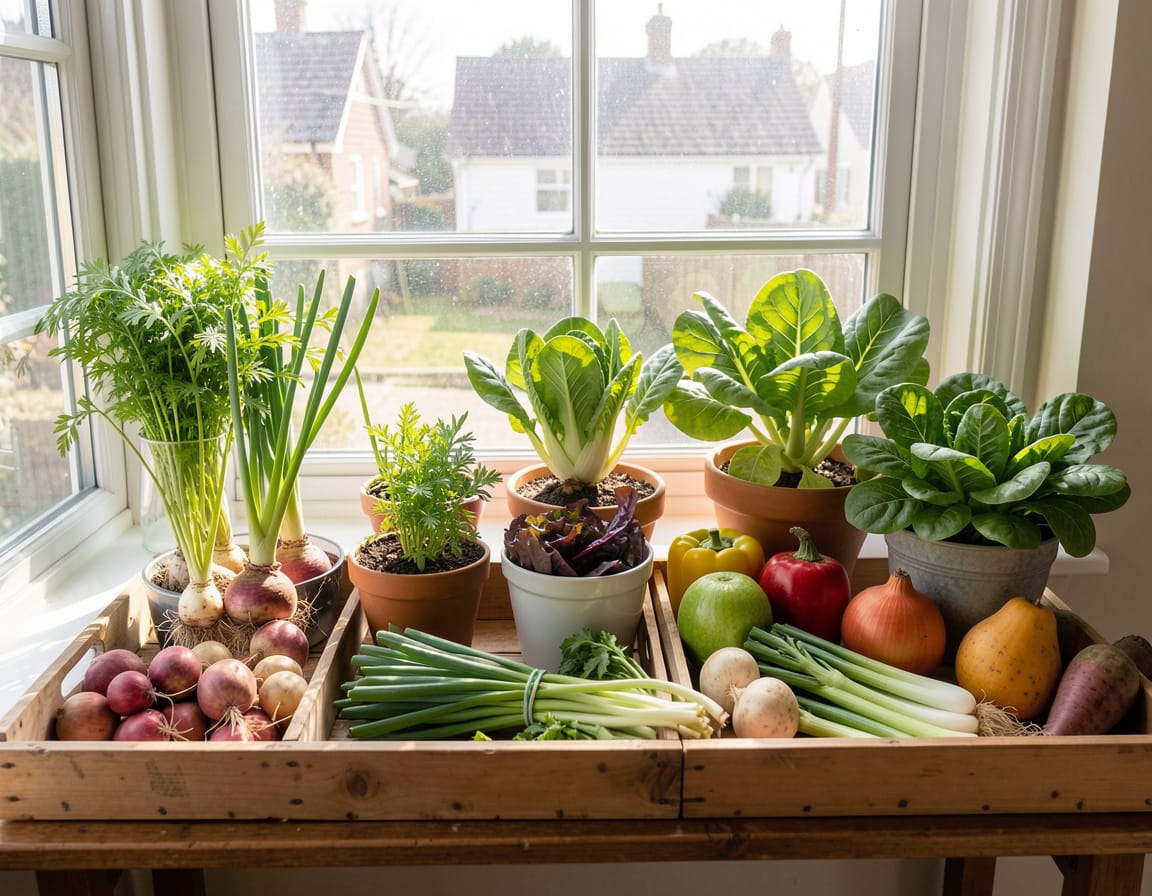
    Starting vegetables indoors in late winter or very early spring gives you a head start on the growing season especially if you live in a region where frosts linger into April or May. From my own experience setting up seed-starting systems in homes from Maine to California, the key is to focus on cool-tolerant, fast-maturing crops that can handle being transplanted as the soil warms.

    Below are 10 early spring vegetables I consistently recommend, along with practical home-growing advice for each.

    1. Lettuce

    Burpee see starting  Tray
    • Why start indoors: Germinates quickly and doesn’t mind cool temperatures, giving you early salads.
    • When to start: 4–6 weeks before your last frost date.
    • Indoor setup: Shallow trays or cell packs under bright light; soil kept consistently moist but never soggy.
    • Transplant tip: Move outdoors when plants have 4–5 true leaves and the soil is workable.

    Pro insight: I often start lettuce indoors on bright kitchen windowsills in shallow recycled containers yogurt tubs or baking trays with drainage holes work perfectly.

    2. Spinach

    • Why start indoors: Slow to germinate outdoors in cold, compacted soil.
    • When to start: 6 weeks before last frost.
    • Special note: Prefers cooler temps (55–65°F) for germination.
    • Transplant tip: Move outside early spinach tolerates light frost.

    Sustainability note: Use organic seed-starting mix and skip chemical fertilizers; spinach responds beautifully to compost-rich soil instead.

    3. Kale

    • Why start indoors: Thrives in cool weather and can go into the garden long before summer crops.
    • When to start: 6 weeks before last frost.
    • Indoor care: Give plenty of light; kale seedlings stretch easily in dim conditions.
    • Transplant tip: Harden off seedlings a week before moving outdoors.

    Pro tip: I prefer curly varieties like ‘Winterbor’ or ‘Dwarf Blue Curled’ for home gardens they’re compact and resilient against fluctuating spring temperatures.

    4. Broccoli

    • Why start indoors: Needs a long cool growing period before heat sets in.
    • When to start: 6–8 weeks before last frost.
    • Indoor setup: Deep cells or small pots; steady moisture is key.
    • Transplant tip: Move outside 2–3 weeks before your last frost, with row covers if frost threatens.

    Real-world note: Many homeowners think broccoli fails easily but most issues come from late planting. Early indoor starts make all the difference.

    5. Cauliflower

    • Why start indoors: Requires a consistent start soil that’s too cold outside slows germination.
    • When to start: 6–8 weeks before last frost.
    • Transplant tip: Plant outside once seedlings have 4–5 leaves, spacing 18–24 inches apart.

    Experience insight: Cauliflower can be finicky, but if you transplant before temps exceed 75°F, you’ll get tight, white heads without “buttoning” (tiny, premature heads).

    6. Cabbage

    • Why start indoors: Can handle cold soil but benefits from strong early roots.
    • When to start: 6–8 weeks before last frost.
    • Transplant tip: Move out once seedlings are 4 inches tall and nighttime temps stay above 25°F.

    Sustainable tip: Use biodegradable seed-start pots cabbage doesn’t like root disturbance.

    7. Swiss Chard

    • Why start indoors: Germinates inconsistently outdoors in cold soil.
    • When to start: 4 weeks before last frost.
    • Transplant tip: Move out after hard frosts pass.
    • Bonus: You’ll harvest tender leaves long before summer heat.

    Pro insight: I often start rainbow chard indoors for homeowners who want color in their early spring garden it’s both ornamental and edible.

    8. Peas

    • Why start indoors: Germinates faster in warm indoor soil than in frozen ground.
    • When to start: 3–4 weeks before last frost.
    • Transplant tip: Move outside while seedlings are still small; peas prefer cool roots.
    • Container option: If you’re a renter, peas do beautifully in deep balcony planters with a simple trellis.

    9. Beets

    • Why start indoors: Speedier and more uniform germination in controlled conditions.
    • When to start: 4–5 weeks before last frost.
    • Transplant tip: Handle gently  beets dislike having roots disturbed.
    • Container option: If you’re short on space, grow compact varieties like ‘Chioggia’ in deep containers.

    Home experience: I start beets in biodegradable cells so I can plant the whole plug outside without damaging roots.
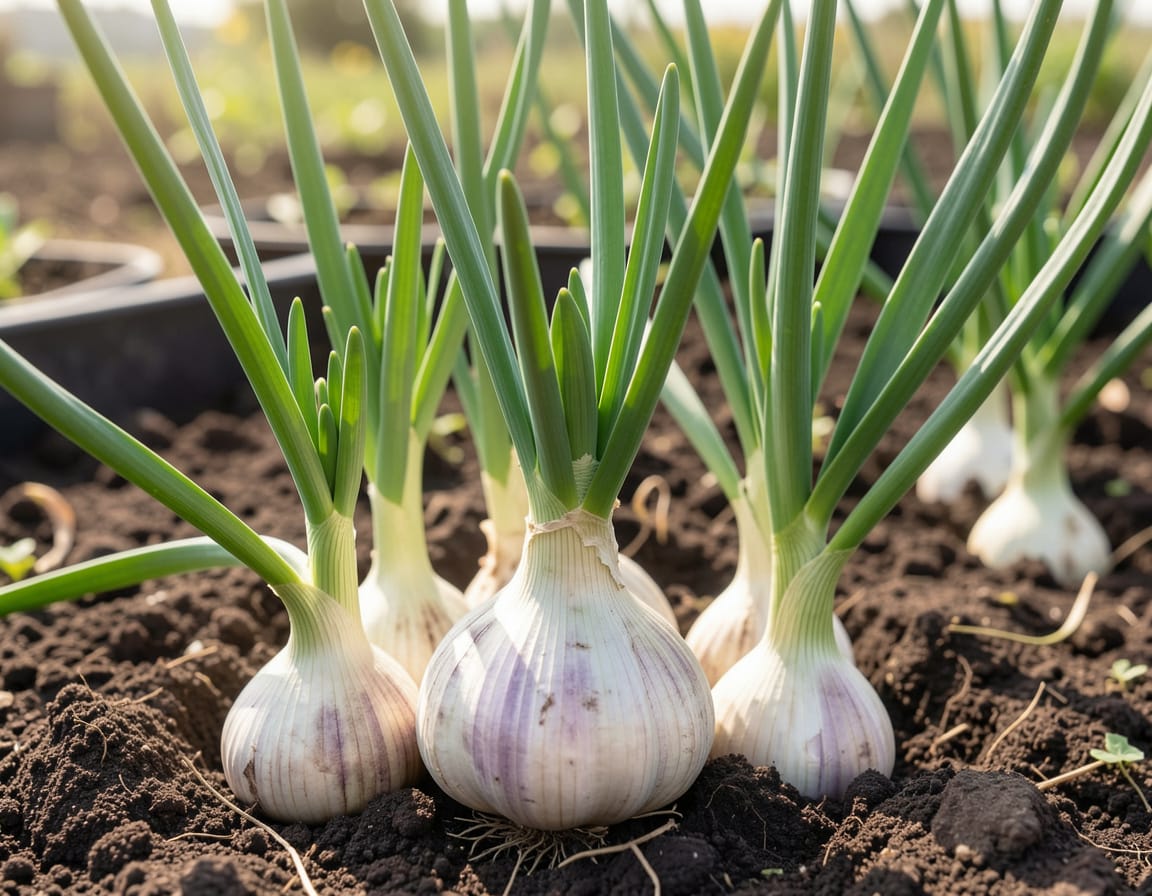
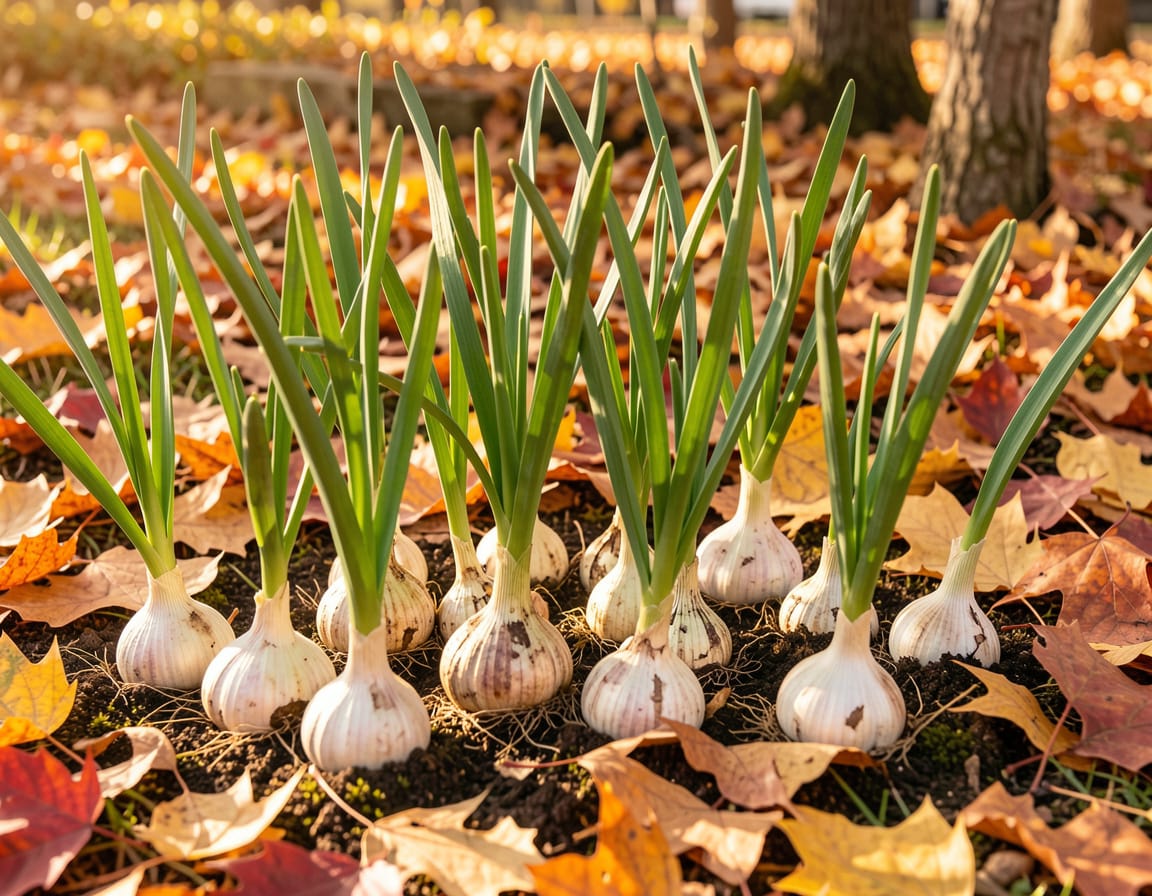
    10. Onions

    • Why start indoors: Long growing season; need early start for full bulbs.
    • When to start: 8–10 weeks before last frost.
    • Indoor setup: Use shallow trays with rich, loose soil and bright light.
    • Transplant tip: Move out once seedlings are pencil-thick and can handle cool soil.

    Pro tip: For best results, start with organic onion seeds rather than sets they adapt better and are more sustainable long-term.

    Practical Setup for U.S. Homes

    Here’s what I recommend when helping clients start early spring crops indoors:

    Tool / MaterialWhy It’s NeededEco-Friendly Option
    Seed trays or small potsContain and organize seedlingsRecycled paper cups, egg cartons
    Grow lights (LED full-spectrum)Prevent leggy seedlingsEnergy-efficient LED bars
    Organic seed-starting mixLight, sterile, good drainageMake your own with compost, coconut coir, and perlite
    LabelsIdentify varietiesWooden craft sticks or reused plastic tags
    Spray bottleGentle wateringRefillable bottle with filtered water

    Hardening Off and Transplanting

    About 7–10 days before moving plants outdoors:

    • Set trays outside for a few hours daily in a sheltered spot.
    • Gradually increase exposure to sunlight and wind.
    • Water lightly never let seedlings wilt.
    • Plant outdoors on a cloudy day or late afternoon to reduce stress.

    This transition step is critical I’ve seen many promising seedlings fail when rushed outdoors too soon.

    Sustainable, Low-Waste Habits

    • Reuse seed trays and pots each year after sanitizing.
    • Compost leftover seed-starting mix.
    • Use local compost or leaf mold instead of peat-based products.
    • Save your own seeds from open-pollinated varieties for next season.

    Final Thoughts

    Starting early spring vegetables indoors is less about fancy equipment and more about timing, light, and patience. For most U.S. regions, late February through March is the sweet spot.

    When you nurture these cool-weather crops indoors now, you’ll be harvesting fresh greens, tender roots, and crisp brassicas long before your neighbors are planting tomatoes.

    If you’re just getting started, begin with lettuce, kale, and broccoli they’re forgiving and give you visible success early on. Once you see that first tray of sturdy seedlings, it becomes a deeply satisfying rhythm you’ll look forward to every winter.

  • How to grow aloe vera at home step by step

    How to grow aloe vera at home step by step

    Every product is independently reviewed and selected by our editors. If you buy something through our links, we may earn an affiliate commission at no extra cost to you.

    Learning how to grow aloe vera at home step by step is easier than many people think and rewarding at the same time. Aloe vera is a low-maintenance succulent valued for its healing gel and air-purifying qualities. Whether you live in an apartment or have a backyard garden, this hardy plant adapts well to indoor and outdoor conditions. With the right soil, light, and watering routine, aloe vera can thrive for years. In this guide, you’ll discover simple, practical steps to grow a healthy aloe plant at home, even if you’re a complete beginner to gardening.

    Step-by-Step: How to Grow Aloe Vera at Home

    Step 1: Choose the Right Aloe Vera Variety

    bubbleboom alovera plant

    Most home gardeners grow Aloe barbadensis miller, the species prized for its clear gel and medicinal use. It’s widely available at garden centers and organic nurseries. Avoid decorative hybrids they may not produce true healing gel.

    Step 2: Pick a Proper Container

    Aloes need a well-draining pot, preferably unglazed terra-cotta or clay. These materials “breathe,” allowing moisture to evaporate and preventing root rot.

    Pro Tip: Choose a pot that’s 1–2 inches wider than the root ball and has at least one solid drainage hole. Avoid decorative pots without drainage this is the number one mistake I see in client homes.

    Step 3: Use the Right Soil Mix

    Aloe vera hates soggy soil. I’ve had the best long-term success with a succulent or cactus mix blended with organic matter.

    DIY Organic Mix Recipe:

    • 2 parts organic potting soil
    • 1 part coarse sand or perlite (for drainage)
    • 1 part compost (adds nutrients)

    This combination keeps the soil loose, breathable, and nutrient-rich without staying wet for too long.

    Step 4: Choose the Best Location

    Aloe thrives in bright, indirect sunlight. In most U.S. homes:

    • A south- or west-facing window works best.
    • In very sunny climates (like Arizona or Texas), give it filtered sunlight to avoid leaf scorch.
    • In darker spaces or apartments, supplement with a full-spectrum grow light for 6–8 hours a day.

    Step 5: Planting

    • Place a small piece of mesh or a coffee filter over the drainage hole to prevent soil loss.
    • Fill the pot about two-thirds full with your soil mix.
    • Set the aloe in place so the base of the leaves sits just above the soil line.
    • Fill around the roots with the remaining soil, pressing gently don’t bury the leaves.
    • Wait a few days before watering to let any broken roots heal.

    Step 6: Watering Routine

    Aloe vera is a desert succulent less water is always better.

    In my experience:

    • Water every 2–3 weeks in spring and summer.
    • In fall and winter, reduce to once a month or when the top 2 inches of soil are dry.
    • Always water deeply, allowing water to drain out the bottom, then empty saucers promptly.

    Never mist aloe leaves. They prefer dry air.

    Step 7: Feeding and Maintenance

    • Fertilize only once or twice a year in spring and midsummer with a diluted organic succulent fertilizer (¼ strength).
    • Remove dead or wilted leaves at the base with clean scissors.
    • Wipe leaves occasionally with a damp cloth to remove dust and help photosynthesis.

    Step 8: Propagating Aloe Vera (Making New Plants)

    Once your plant matures, it’ll produce “pups” or offsets small baby plants that grow from the base.

    To propagate:

    • Gently remove the aloe from its pot.
    • Separate the small pups with their roots intact.
    • Let them dry for a day or two to heal cuts.
    • Replant each in its own small pot using the same soil mix.

    This is a sustainable, zero-cost way to multiply your aloe collection or share with friends.

    Step 9: Seasonal Care

    • Winter: Aloe slows growth. Keep it near bright windows but away from cold drafts.
    • Summer: If moving it outdoors, acclimate gradually—start in shade, then transition to partial sun after a week.

    Common Mistakes to Avoid

    MistakeWhy It’s a ProblemExpert Tip
    OverwateringCauses root rot and mushy leavesWater deeply but infrequently
    Poor drainageSuffocates rootsAlways use pots with drainage holes
    Too little lightLeads to weak, leggy growthPlace near a bright window
    Using regular potting soilHolds too much moistureUse a succulent/cactus blend
    Cold draftsStress and leaf browningKeep above 55°F

    Sustainable Tips for Aloe Vera Care

    • Repurpose broken terra-cotta pots as top dressing to reduce soil evaporation.
    • Use rainwater or filtered water when possible aloe is sensitive to chlorine.
    • Compost old leaves or soil after repotting to minimize waste.
    • Gift propagated pups instead of buying new plants zero waste, zero plastic.

    Real-World Example

    In one client’s sunny Chicago loft, we placed three medium aloe plants along a southern window ledge in reclaimed clay pots. They thrived with biweekly watering and light dusting care. Each produced multiple offsets within six months enough for her to gift to friends and create a soothing, low-maintenance “green therapy corner.”

    FAQ: Aloe Vera Care

    1. How much sunlight does aloe vera need? At least 6 hours of bright, indirect light daily. Direct, harsh sunlight can scorch leaves, especially behind glass.

    2. Can I grow aloe vera indoors year-round? Yes. Aloe vera adapts well to indoor growing as long as it gets enough light and good drainage.

    3. How often should I repot aloe vera? Every 2–3 years, or when the plant becomes top-heavy or root-bound.

    4. Is aloe vera pet-safe? No aloe can cause stomach upset in cats and dogs. Keep it out of their reach.

    5. Can I use aloe vera gel directly from the plant? Yes, for external skin use. Cut a mature leaf near the base, let the yellow sap drain, then use the inner clear gel.

    6. What’s the best temperature range for aloe vera? Between 60–80°F. Keep it away from cold drafts and heating vents.

    Final Thoughts

    Growing aloe vera at home is a simple way to bring a living medicine plant into your daily environment. With the right pot, soil, and light, it will thrive for years cleaning the air, restoring calm, and providing a natural, renewable source of soothing gel when you need it.

    If you’re starting your first indoor plant collection, aloe vera is one of the most forgiving and sustainable options to begin with.

  • What is the best month to plant garlic

    What is the best month to plant garlic

    Every product is independently reviewed and selected by our editors. If you buy something through our links, we may earn an affiliate commission at no extra cost to you.

    Knowing what is the best month to plant garlic can make a significant difference in the size, flavor, and overall success of your harvest. Garlic is a hardy crop, but timing plays a crucial role in helping the cloves establish strong roots before extreme weather sets in. While garlic is often associated with cool seasons, planting too early or too late can affect bulb development. Gardeners across different climates follow varied planting schedules, making the choice even more important. In this guide, we’ll break down the ideal planting window and explain how proper timing leads to healthier, more productive garlic plants.

    General Rule: Plant Garlic in Fall, About 4–6 Weeks Before the Ground Freezes

    Garlic needs a cold period (vernalization) to form large, healthy bulbs. Planting in fall allows the cloves to establish roots before winter, then rest through the cold months, and resume growth in early spring.

    • Northern U.S. (zones 3–5) – Late September through mid-October works best.
    • Mid-Atlantic & Midwest (zones 5–7) – Aim for October to early November.
    • Southern U.S. (zones 7–9) – You can plant a bit later, from November through December, since winters are milder.
    • Warm coastal or southernmost regions (zones 9–10) – If winters don’t get cold enough, refrigerate your seed garlic for 6–8 weeks before planting to mimic natural chilling.

    Why Fall Is Better Than Spring

    Technically, you can plant garlic in early spring, but the bulbs usually turn out smaller. Fall planting gives the cloves a head start to:

    • Develop strong root systems before the soil freezes
    • Form large bulbs after being exposed to winter’s chill
    • Mature earlier, usually by June or July

    Expert Tip from the Field

    In my own test gardens (zones 6a and 7b), I’ve found the second week of October to be the sweet spot. The soil is still warm enough for rooting, and the cloves don’t sprout too early. I always mulch heavily with shredded leaves or straw this keeps soil temperatures consistent through the winter and prevents heaving during freeze-thaw cycles.

     Quick Reference Table

    RegionBest Month to Plant GarlicNotes
    Northern states (MN, WI, ME, VT)Late Sept – Mid OctMulch thickly for winter protection
    Midwest / Mid-Atlantic (IL, PA, OH, MD)Oct – Early NovIdeal time for strong bulb formation
    Southern states (TX, GA, FL)Nov – DecUse pre-chilled cloves if winters are mild
    Pacific Northwest (OR, WA)OctWell-drained soil prevents rot
    Southwest (AZ, NM, CA)NovShade lightly in early growth stages

    Final Thought

    If you carefully remember just one thing:

    Plant garlic in fall ideally October about a month before the ground freezes.

    That timing gives you the healthiest, fullest bulbs by mid-summer harvest.

  • What Is the Luckiest Indoor Plant |  Top Plants That Bring Good Luck and Positive Energy

    What Is the Luckiest Indoor Plant | Top Plants That Bring Good Luck and Positive Energy

    Every product is independently reviewed and selected by our editors. If you buy something through our links, we may earn an affiliate commission at no extra cost to you.

    Many people believe plants do more than beautify a space they can also influence luck, energy, and well-being. If you’re wondering what is the luckiest indoor plant, you’re not alone. Across cultures, certain houseplants are thought to attract prosperity, happiness, and positive vibes. From Feng Shui traditions to modern home décor trends, lucky indoor plants have become a popular choice for homes and offices alike. But which plant truly stands out as the luckiest? In this guide, we’ll explore the meaning behind lucky plants and how choosing the right one can enhance both your space and your state of mind.

    Why the Jade Plant Is Considered the Luckiest Indoor Plant

    1. Symbolism of Prosperity and Growth For centuries, the jade plant has been known as the “money tree” or “friendship tree.” In many world cultures, especially in feng shui practice, its thick, round leaves symbolize good fortune, wealth, and renewal. I’ve often seen homeowners place jade plants near entryways or in home offices to invite positive energy and abundance.

    2. Exceptionally Easy to Care For From a sustainability perspective, jade plants are ideal for American homes and apartments because they’re:

    • Low-water succulents – They thrive on neglect, using stored water in their fleshy leaves.
    • Long-lived – With occasional pruning and yearly repotting, a jade plant can live for decades.
    • Adaptable – They tolerate bright indirect light, making them perfect for bright kitchens, living rooms, or sunny windowsills.

    3. Air-Purifying & Non-Toxic Benefits While jade plants aren’t the strongest air cleaners compared to species like snake plants or peace lilies, they still contribute to improved indoor air quality through photosynthesis and humidity regulation. For homes focusing on non-toxic living, jade plants are a good fit just keep them out of reach of pets, since they can cause mild stomach upset if eaten.

    4. Sustainable Choice Because jade plants grow slowly and propagate easily from cuttings, they’re one of the most environmentally responsible indoor plants to share and regrow. A single healthy mother plant can provide dozens of new ones over time no need for mass-produced nursery stock wrapped in plastic.

    Other “Lucky” Indoor Plants Worth Considering

    If you want to personalize your space or mix symbolism with environmental mindfulness, here are a few other plants homeowners often ask me about:

    PlantSymbolic MeaningCare LevelSustainability Notes
    Pachira aquatica (Money Tree)Wealth, positive energyMedium care, prefers bright indirect lightOften overwatered—use sustainable peat-free soil
    Lucky Bamboo (Dracaena sanderiana)Harmony, resilienceEasy, tolerates low lightAvoid plastic containers—use glass or ceramic
    Peace Lily (Spathiphyllum)Purity, peaceEasy, tolerates shadeExcellent air purifier but mildly toxic to pets
    Snake Plant (Sansevieria trifasciata)Protection, enduranceOne of the toughest plantsGreat for low-light apartments
    Pilea peperomioides (Chinese Money Plant)Friendship, prosperityLow maintenancePropagates readily—eco-friendly and giftable

    Real-World Placement Advice

    In my experience working with U.S. homeowners:

    • Jade plants thrive best on a bright east- or south-facing windowsill, away from cold drafts.
    • For apartments with limited light, snake plants or peace lilies are more forgiving.
    • In humid climates, choose terra-cotta pots for better soil breathing.
    • In dry climates, a small pebble water tray nearby can help maintain gentle humidity.

    Conclusion

    If you’re looking for the luckiest indoor plant that also aligns with organic, sustainable home design principles, the jade plant offers the best balance of symbolism, durability, and ecological integrity. It’s not only a “good luck charm” but a genuine living companion that teaches patience, respect for natural growth patterns, and mindful stewardship.

  • Which vegetables can be grown indoors

    Which vegetables can be grown indoors

    Every product is independently reviewed and selected by our editors. If you buy something through our links, we may earn an affiliate commission at no extra cost to you.

    Choosing the right clove is the first step toward a successful garlic harvest. When fall planting season arrives, not all garlic varieties perform the same, and selecting the best garlic for fall planting can make a noticeable difference in bulb size, flavor, and winter survival. Climate, soil conditions, and growing time all influence which garlic thrives in colder months. From hardy types that tolerate frost to flavorful options prized by home gardeners, understanding your choices helps set the stage for strong root development and a rewarding harvest in the months ahead.

    Leafy Greens (Easiest to Start With)

    These thrive in lower light and cooler indoor temperatures perfect for windowsills or under LED grow lights.

    • Lettuce (especially loose-leaf types like ‘Black-Seeded Simpson’ or ‘Buttercrunch’)
      • Light: 10–12 hours of bright light daily.
      • Harvest: Begin cutting outer leaves after 4–5 weeks.
    • Spinach – Compact and fast-growing; prefers cooler rooms (60–65°F).
    • Kale (dwarf or baby kale types) – Slow but steady growth under strong light.
    • Arugula – Thrives in containers; ready to harvest in under a month.

    Pro Tip: Use wide, shallow containers with at least 4–6 inches of soil and keep the surface consistently moist, not soggy.

    Root Vegetables (Compact Varieties Only)

    Root crops can be grown indoors if you choose short types that mature quickly.

    • Radishes – The easiest indoor root crop; grow well in 6-inch-deep pots.
    • Baby Carrots – Choose “Thumbelina” or “Parisian” types; need 8 inches of soil depth.
    • Green onions (scallions) – Perfect for windowsills; regrow from grocery-store roots or plant sets.

    In my experience: Root crops need uniform moisture and loose, fluffy soil. I often blend organic potting mix with fine compost and a bit of perlite for airiness.

    Herbs (Technically Not Vegetables, but Essential Companions)

    Most indoor vegetable growers incorporate herbs because they help create a healthy microclimate and are incredibly rewarding.

    • Basil – Needs strong light (south-facing window or LED grow light).
    • Parsley & Cilantro – Grow well in cooler rooms.
    • Chives – Perennial, easy to regrow after cutting.

    Try a mixed herb planter near your kitchen window—it thrives with regular harvesting.

    Fruiting Vegetables (Advanced but Possible Indoors)

    These need intense light (grow lights are usually essential) and consistent warmth.

    • Cherry Tomatoes – Choose compact varieties like ‘Tiny Tim’ or ‘Micro Tom’.
    • Peppers – Smaller sweet or hot peppers can grow indoors if kept warm (70–80°F).
    • Bush Beans – Fast and productive but require plenty of space and bright light.

    Tip from real homes: Tomatoes and peppers often thrive near bright patio doors or under full-spectrum LED grow panels. A small oscillating fan nearby mimics wind and helps pollination.

    Essential Setup for Indoor Vegetable Gardening

    Tool / MaterialWhy It’s NeededOrganic BenefitSustainability Consideration
    Organic potting mixProvides balanced nutrition and good drainageAvoids chemical fertilizers and soil-borne diseasesCompost or reuse after sterilizing between crops
    Containers with drainagePrevents root rotClay or recycled plastic pots breathe betterChoose durable, reusable containers
    LED grow lightsEnsures consistent light in winter or shady roomsEnergy-efficient and full-spectrumLong lifespan, low energy use
    Compost or organic fertilizerMaintains nutrient levelsSupports soil microbesLook for OMRI-certified options
    Humidity tray or pebble trayHelps maintain moisture near plantsReduces transplant shockRefillable, low-waste option

     Light and Temperature Tips

    • Windows: South-facing is best in northern states; east or west-facing in the South.
    • Grow Lights: Use a timer for 12–14 hours daily; keep lights 6–12 inches above plants.
    • Temperature: Most veggies thrive around 65–75°F with moderate humidity. Avoid drafty windows in winter.

    Realistic Indoor Growing Examples

    • Small Urban Apartment: A two-tier shelf under LED lights can yield a steady supply of lettuce, herbs, and radishes.
    • Suburban Kitchen Window: Basil, parsley, and green onions thrive with morning sun and weekly compost tea feeding.
    • Basement or Garage Setup: With proper grow lights and airflow, you can grow salad greens year-round even in snowy climates like Minnesota.

    Common Mistakes must be Avoid

    • Using garden soil indoors – It compacts easily and harbors pests.
    • Overwatering – Roots suffocate quickly in enclosed containers.
    • Ignoring light needs – Weak light = spindly, flavorless greens.
    • Neglecting airflow – Leads to mildew or fungus gnats.

    Sustainability & Health Benefits

    Growing vegetables indoors reduces food miles and packaging waste while improving indoor air quality. Living greenery also supports mental well-being, something I’ve seen time after time when clients convert part of their kitchen or office into a mini edible garden.

    Stick to non-toxic, organic potting materials and wash hands after handling soil to keep your indoor environment healthy for pets and kids.

    Final Takeaway

    If you’re new to indoor gardening, start with leafy greens and herbs. Once you’ve mastered light, watering, and airflow, experiment with compact tomatoes, peppers, or carrots. Every small indoor harvest is a step toward a more mindful, sustainable home environment.Would you like me to create a seasonal indoor planting calendar (by U.S. region and light level)? That’s something many of my clients find useful to plan year-round harvests indoors.

  • What is the best garlic for fall planting

    What is the best garlic for fall planting

    Every product is independently reviewed and selected by our editors. If you buy something through our links, we may earn an affiliate commission at no extra cost to you.

    Planting garlic in the fall is one of the most rewarding decisions a home gardener can make. Tuck cloves into the soil before winter, and by early summer, you’ll harvest large, aromatic bulbs that far outperform most store-bought garlic. But success starts with one critical decision: choosing the best garlic for fall planting.

    Not all garlic varieties behave the same way. Climate, soil, and even your storage goals determine which type will thrive. Choose wrong, and you’ll get small bulbs or weak growth. Choose right, and you’ll harvest plump, flavorful heads that store for months.

    This guide breaks down exactly which garlic types perform best in fall plantings, why they work, and how to grow them successfully.

    Introduction

    Many gardeners struggle with garlic because they treat it like a spring crop. Garlic is not a spring crop. It needs winter chilling (vernalization) to form proper bulbs.

    If you’ve planted garlic before and ended up with single clove “rounds” or undersized heads, the issue likely wasn’t your soil it was variety selection or planting timing.

    In this guide, you’ll learn:

    • The difference between hardneck and softneck garlic
    • Which varieties perform best in cold vs mild climates
    • How soil composition and drainage affect bulb size
    • Container depth requirements for small-space gardeners
    • Common mistakes that reduce yields
    • Budget vs premium planting setups

    By the end, you’ll know exactly which garlic to plant this fall and how to grow it properly.

    Quick Summary: Best Garlic for Fall Planting

    • Cold climates (USDA Zones 3–6): Hardneck varieties (e.g., Music, German Extra Hardy, Chesnok Red)
    • Mild winters (Zones 7–9): Softneck varieties (e.g., California Early, Inchelium Red)
    • Long storage needs: Softneck garlic
    • Maximum flavor and large cloves: Hardneck garlic
    • Container growing: Compact hardneck varieties or softneck types with 10–12 inch soil depth
    • Planting time: 4–6 weeks before ground freeze

    Understanding Garlic Types: Hardneck vs Softneck

    Before choosing the best garlic for fall planting, you need to understand the two primary types.

    Hardneck Garlic (Allium sativum var. ophioscorodon)

    Why It Works for Fall Planting

    Hardneck garlic requires cold winter temperatures (below 40°F) to properly divide into cloves. This makes it ideal for traditional fall planting in colder regions.

    Winter exposure triggers bulb formation. Without sufficient cold, you’ll get underdeveloped bulbs.

    Best For:

    • USDA Zones 3–6
    • Gardeners wanting bold flavor
    • Larger clove size
    • Cold winter climates

    Pros:

    • Superior flavor complexity
    • Larger individual cloves
    • Produces edible garlic scapes
    • Better cold tolerance

    Cons:

    • Shorter storage life (3–5 months)
    • Slightly lower yields per square foot

    Top Hardneck Varieties for Fall Planting

    • Music Garlic
      • Large bulbs, easy to peel
      • Excellent cold tolerance
      • Reliable in Zones 3–5
    • German Extra Hardy
      • Performs well in harsh winters
      • Strong, spicy flavor
      • Good resistance to winter rot
    • Chesnok Red
      • Exceptional roasted flavor
      • Attractive purple-striped bulbs
      • Slightly better storage than other hardnecks

    Softneck Garlic (Allium sativum var. sativum)

    Why It Works in Mild Climates

    Softneck garlic requires less winter chilling. In mild-winter areas (Zones 7–9), it often outperforms hardneck varieties.

    Best For:

    • Warmer regions
    • Long-term storage
    • Braiding garlic tops
    • Higher yields per bed

    Pros:

    • Stores 6–9 months
    • Higher yield per square foot
    • Adaptable to various soils

    Cons:

    • Smaller cloves
    • Less complex flavor
    • No scapes

    Top Softneck Varieties for Fall Planting

    • California Early
      • Reliable in Zones 7–9
      • High yields
      • Good for beginners
    • Inchelium Red
      • Mild but rich flavor
      • Excellent storage life
      • Performs well in varied climates

    How Climate Determines the Best Garlic for Fall Planting

    Garlic performance is tightly connected to USDA hardiness zones.

    Cold Climates (Zones 3–6)

    Choose hardneck garlic.

    WHY: Hardneck varieties require vernalization to divide into cloves. Cold winters naturally provide this.

    HOW:

    • Plant 4–6 weeks before ground freeze
    • Mulch heavily (2–4 inches straw)
    • Ensure soil drains well to prevent rot

    Maintenance impact: Low once mulched.

    Cost: Minimal straw mulch is inexpensive.

    Mild Climates (Zones 7–9)

    Choose softneck garlic.

    WHY: Winters may not provide enough chill hours for hardneck varieties.

    HOW:

    • Plant in late fall or early winter
    • Skip heavy mulching unless frost is expected
    • Ensure soil does not stay waterlogged

    Common mistake: Overwatering in winter.

    Soil Requirements for Maximum Bulb Size

    Garlic is highly sensitive to soil conditions.

    Ideal Soil Composition

    • 40% loamy garden soil
    • 30% finished compost
    • 20% coarse sand or perlite
    • 10% aged manure or worm castings

    WHY: Garlic requires loose, well-draining soil to allow bulb expansion. Compacted soil produces misshapen or small bulbs.

    Soil pH

    • Ideal range: 6.0–7.0

    Below 6.0 can restrict nutrient uptake.

    Testing kits are inexpensive and worthwhile.

    Drainage Is Non-Negotiable

    Garlic rots easily in soggy soil.

    HOW to ensure proper drainage:

    • Use raised beds (10–12 inches deep minimum)
    • Avoid clay-heavy soil without amendments
    • Incorporate coarse compost

    Raised beds are a worthwhile investment if your native soil drains poorly.

    Budget option: Amend soil heavily. Premium option: Cedar raised beds with drip irrigation.

    Maintenance impact: Better drainage reduces disease issues long term.

    Container Garlic: Yes, It Works

    For balcony and small-space gardeners, garlic grows well in containers.

    Container Requirements

    • Minimum depth: 10–12 inches
    • Width: 12+ inches
    • Drainage holes required

    WHY depth matters: Garlic roots extend 6–8 inches, and bulbs expand below that.

    Shallow pots produce small bulbs.

    Best Container Types

    • Fabric grow bags (excellent drainage)
    • Deep resin planters
    • Wooden planters with drainage holes

    Avoid decorative pots without drainage.

    Watering frequency: Every 7–10 days in fall, more frequently in spring.

    Planting Technique for Large Bulbs

    Even the best garlic for fall planting will fail with poor technique.

    Step-by-Step

    • Separate cloves (keep skins intact)
    • Plant pointed side up
    • Depth: 2 inches below soil surface
    • Spacing: 4–6 inches apart
    • Rows: 8–12 inches apart

    WHY spacing matters: Overcrowding reduces bulb size due to competition.

    Common beginner mistake: Planting grocery store garlic. It’s often treated to prevent sprouting.

    Watering and Fertilization Strategy

    Watering

    • Fall: Light watering after planting
    • Winter: Minimal unless drought
    • Spring: 1 inch per week
    • Stop watering 2–3 weeks before harvest

    Overwatering reduces storage life.

    Fertilization

    • At planting: Compost-rich soil
    • Early spring: Nitrogen boost (fish emulsion or blood meal)
    • Stop feeding once bulbs form

    Maintenance impact: Moderate in spring.

    Pest and Disease Prevention

    Garlic is relatively pest-resistant but not immune.

    Common Issues

    • Onion maggots
    • Thrips
    • Fungal rot

    Prevention:

    • Rotate crops (3-year rotation)
    • Avoid planting after onions
    • Ensure airflow

    Cost impact: Minimal if prevention is practiced early.

    Budget vs Premium Garlic Setup

    Budget Setup

    • Amend native soil
    • Use straw mulch
    • Manual watering
    • Compost-based fertility

    Estimated cost: Low

    Premium Setup

    • Raised cedar beds
    • Drip irrigation kit
    • High-quality seed garlic
    • Soil test kit

    Estimated cost: Moderate to high

    Premium setups reduce labor and increase consistency.

    FAQ

    What is the absolute best garlic for fall planting?

    For cold climates, Music hardneck garlic is widely considered the most reliable. For mild climates, Inchelium Red softneck performs best.

    Can I plant grocery store garlic in the fall?

    It’s not recommended. Store garlic may be treated to prevent sprouting and may not be adapted to your climate.

    When should I plant garlic in the fall?

    Plant 4–6 weeks before the ground freezes. Typically October in most regions.

    How deep should garlic be planted?

    Plant cloves 2 inches deep and mulch with 2–4 inches in cold climates.

    How long does fall-planted garlic take to grow?

    Garlic planted in fall is harvested in late spring to early summer (8–9 months total).

    Why are my garlic bulbs small?

    Common causes:

    • Poor soil fertility
    • Overcrowding
    • Inadequate winter chilling
    • Too much nitrogen late in season

    Conclusion

    The best garlic for fall planting depends entirely on your climate and growing conditions.

    If you live in a cold-winter region, hardneck varieties like Music or German Extra Hardy will reward you with bold flavor and large cloves. In warmer zones, softneck types like Inchelium Red offer reliability and long storage.

    Success comes down to three factors:

    • Choosing climate-appropriate varieties
    • Ensuring loose, well-draining soil
    • Planting at the correct time with proper spacing

    Garlic is one of the highest-return crops you can grow in a small space. A single bulb planted in fall can produce 8–12 cloves for next year’s harvest.

    Choose the right variety this fall, prepare your soil properly, and you’ll harvest larger, healthier bulbs for years to come.

  • What’s the Best Time to Plant Garlic in the Fall  |  A Simple Timing Guide for Bigger Bulbs

    What’s the Best Time to Plant Garlic in the Fall | A Simple Timing Guide for Bigger Bulbs

    Every product is independently reviewed and selected by our editors. If you buy something through our links, we may earn an affiliate commission at no extra cost to you.

    If you’ve ever harvested tiny garlic bulbs with barely separated cloves, chances are the planting time was off. Garlic isn’t difficult to grow, but it is extremely sensitive to seasonal timing. Plant too early and it wastes energy on top growth before winter. Plant too late and roots don’t establish properly.

    In this guide, you’ll learn exactly when to plant garlic in the fall based on your USDA zone, soil temperature, and local frost dates plus how to prepare the soil, choose the right variety, and avoid the most common beginner mistakes. Done correctly, fall planting sets you up for larger bulbs, better flavor, and fewer pest issues next summer.

    Quick Summary: Best Time to Plant Garlic in Fall

    • Ideal planting window: 4–6 weeks before your ground freezes
    • Soil temperature target: 50–60°F (10–16°C)
    • USDA Zones 3–5: Late September to mid-October
    • Zones 6–7: Mid-October to early November
    • Zones 8–9: Late October to December
    • Planting depth: 2–3 inches deep (4 inches in cold zones)
    • Spacing: 6 inches between cloves, 10–12 inches between rows
    • Mulch thickness: 3–4 inches of straw in cold climates

    Why Fall Is the Best Time to Plant Garlic

    Garlic requires a period of cold exposure (vernalization) to properly divide into multiple cloves.

    Why Cold Matters

    When garlic experiences 6–10 weeks of temperatures below 40°F, it triggers bulb formation. Without sufficient cold, plants may produce:

    • Single “round” bulbs instead of multiple cloves
    • Smaller heads
    • Reduced storage life

    Spring planting rarely produces bulbs as large as fall planting because it shortens root establishment time before heat stress begins.

    How Fall Planting Improves Yield

    Planting in fall allows garlic to:

    • Develop strong roots before winter dormancy.
    • Resume growth quickly in early spring.
    • Focus energy on bulb expansion as days lengthen.

    The result: larger, more uniform bulbs.

    The Best Time to Plant Garlic in the Fall (By USDA Zone)

    Garlic timing depends more on soil temperature than calendar date. Always check your first hard frost date and count backward 4–6 weeks.

    USDA Zones 3–5 (Cold Northern Climates)

    Best planting window: Late September to mid-October

    • Ground freezes early.
    • Plant when soil cools to about 55°F.
    • Mulch heavily (4 inches straw or shredded leaves).

    Maintenance Impact

    In these zones, insulation is critical. Without mulch, freeze-thaw cycles can heave cloves out of soil.

    Cost Consideration

    Straw mulch is inexpensive and dramatically improves overwinter survival. Skip decorative mulches they don’t insulate well.

    USDA Zones 6–7 (Moderate Winters)

    Best planting window: Mid-October to early November

    • Soil stays workable longer.
    • Use 2–3 inches mulch.
    • Monitor for early sprouting (normal and harmless).

    Common Mistake

    Planting too early in warm autumn weather. Excess top growth before winter can lead to winter damage.

    USDA Zones 8–9 (Mild Winters)

    Best planting window: Late October through December

    In warmer climates:

    • Choose softneck varieties.
    • Refrigerate seed garlic for 4–8 weeks before planting if winters are mild.
    • Plant when soil drops below 60°F.

    Why Pre-Chilling Works

    Artificial cold exposure mimics natural winter, encouraging proper bulb division.

    Choosing the Right Garlic Variety for Fall Planting

    Hardneck Garlic (Best for Cold Climates)

    • Thrives in Zones 3–6
    • Produces garlic scapes
    • Larger cloves
    • Shorter storage life (4–6 months)

    Why Choose Hardneck?

    Better cold tolerance and stronger flavor.

    Softneck Garlic (Best for Mild Winters)

    • Ideal for Zones 7–9
    • Longer storage (8–12 months)
    • Smaller but more numerous cloves

    Cost Impact

    Softneck varieties often store longer, reducing grocery purchases through winter.

    Soil Preparation: The Foundation of Big Garlic Bulbs

    Garlic is shallow-rooted but nutrient-demanding.

    Ideal Soil Composition

    • Loose, well-draining loam
    • Rich in organic matter
    • pH between 6.0–7.0

    How to Prepare Soil

    • Loosen soil 8–12 inches deep.
    • Mix in 2–3 inches compost.
    • Avoid fresh manure (causes rot).

    Why Drainage Is Critical

    Garlic rots in waterlogged soil. Raised beds are ideal if you have clay soil.

    Container Growing?

    Use containers at least:

    • 10–12 inches deep
    • With large drainage holes
    • Filled with high-quality potting mix + compost

    Budget tip: Avoid garden soil in containers it compacts and suffocates roots.

    Step-by-Step: How to Plant Garlic in the Fall

    • Separate cloves (do not peel).
    • Plant pointed side up.
    • Depth: 2–3 inches (4 inches in cold zones).
    • Space 6 inches apart.
    • Water thoroughly after planting.
    • Apply mulch after first frost.

    Why Proper Spacing Matters

    Overcrowding leads to smaller bulbs due to root competition.

    Watering Schedule Through Fall and Winter

    • Water immediately after planting.
    • Keep soil slightly moist until ground freezes.
    • Stop watering during winter dormancy.
    • Resume watering in early spring.

    Overwatering in fall is a common beginner mistake. Garlic needs moisture not saturation.

    Light Requirements for Strong Spring Growth

    Garlic requires:

    • 6–8 hours of full sun
    • South-facing or west-facing exposure ideal

    Shade reduces bulb size because photosynthesis drives bulb expansion.

    If growing on a balcony, ensure unobstructed sun during spring months when bulbs swell.

    Mulching: The Secret Weapon for Fall Garlic

    Mulch regulates:

    • Soil temperature
    • Moisture retention
    • Weed suppression

    Best mulch options:

    • Straw (seed-free)
    • Shredded leaves

    Avoid wood chips directly over cloves they compact and trap moisture.

    Pest and Disease Prevention Basics

    Garlic is relatively pest-resistant, but watch for:

    • Onion maggots
    • Thrips
    • Fungal rot in poorly drained soil

    Prevention Tips

    • Rotate crops (3-year rotation minimum).
    • Avoid planting after onions or leeks.
    • Ensure excellent drainage.
    • Use clean seed garlic from reputable suppliers.

    Cheap grocery-store garlic often carries disease and may be treated to prevent sprouting.

    Budget vs Premium Setup

    Budget Setup

    • In-ground planting
    • Homemade compost
    • Straw mulch
    • Standard watering

    Low upfront cost. More weeding required.

    Premium Setup

    • Raised garden beds (10–12 inches deep minimum)
    • High-quality organic soil blend
    • Drip irrigation kit
    • Soil thermometer

    Higher initial investment, but:

    • Better drainage
    • Larger bulbs
    • Reduced disease
    • Easier maintenance

    For small-space gardeners, raised beds often produce 20–30% larger bulbs due to improved soil control.

    Common Beginner Mistakes (And How to Avoid Them)

    • Planting too early.
    • Using small cloves (plant largest for biggest bulbs).
    • Skipping mulch in cold climates.
    • Poor drainage.
    • Overfertilizing with nitrogen in fall.

    Fall is for root growth not leafy growth.

    Frequently Asked Questions

    When is it too late to plant garlic in fall?

    If the ground is frozen solid, it’s too late. In mild zones, planting can extend into December as long as soil is workable.

    Can I plant garlic after the first frost?

    Yes. Light frost is fine. Just ensure soil isn’t frozen and you still have 4 weeks before hard freeze.

    Should garlic sprout before winter?

    A few inches of green growth is normal. It will die back and regrow in spring.

    What happens if I plant garlic too early?

    Excessive top growth can suffer winter damage and reduce bulb size.

    How deep should I plant garlic in raised beds?

    2–3 inches deep, or 4 inches in very cold climates. Raised beds warm faster in spring, which promotes early growth.

    Can I grow garlic in containers on a balcony?

    Yes. Use a container 10–12 inches deep, full sun exposure, and well-draining potting mix. Ensure winter protection in cold zones.

    Final Thoughts

    The best time to plant garlic in the fall isn’t a fixed date it’s a temperature window. Aim for 4–6 weeks before the ground freezes, when soil temperatures drop to 50–60°F. That timing allows roots to establish without triggering excessive top growth.

    Get the timing right, prepare loose well-draining soil, mulch properly, and choose the correct variety for your USDA zone. These small decisions determine whether you harvest undersized bulbs or full, flavorful garlic heads that store for months.

    Planting garlic in fall is one of the highest-return crops in a home garden. It requires minimal space, low maintenance, and delivers long-term kitchen value. Start this fall, and next summer’s harvest will reflect the care you put in now.

  • What is the best house plant for a hot sunny room

    What is the best house plant for a hot sunny room

    Every product is independently reviewed and selected by our editors. If you buy something through our links, we may earn an affiliate commission at no extra cost to you.

    While intense light and warmth can stress many plants, others flourish in these conditions. Choosing sun-loving, heat-tolerant houseplants ensures healthy growth without constant worry. With the right selection, even the brightest, warmest rooms can become vibrant, green indoor retreats.

    Top Plants for Hot, Sunny Indoor Rooms (Tested and Proven)

    1. Aloe Vera

    • Why it thrives: A true desert succulent, Aloe loves full sun and dry conditions.
    • Care tip: Place near a south- or west-facing window; water only when the top 2 inches of soil are completely dry.
    • Bonus: The gel inside its leaves is useful for soothing skin or minor burns.

    2. Jade Plant (Crassula ovata)

    • Why it thrives: Another succulent that loves direct sunlight. It stores water in thick leaves, tolerating both heat and neglect.
    • Design note: Works beautifully in minimalist or natural modern interiors the glossy green leaves complement wood and stone textures.
    • Caution: Needs a sturdy pot; top-heavy plants can tip over in narrow containers.

    3. Snake Plant (Sansevieria trifasciata / Dracaena trifasciata)

    • Why it thrives: Nearly indestructible, tolerates both low and high light, but really shines in warm, bright conditions.
    • Health bonus: Helps filter indoor air pollutants and releases small amounts of oxygen at night.
    • Care tip: Avoid overwatering  once every 2–3 weeks in bright light is usually enough.

    4. Cactus Varieties (Echinocactus, Mammillaria, etc.)

    • Why they thrive: Naturally adapted to extreme sun and dryness.
    • Real-world tip: If you live in a region with intense afternoon sun (Arizona, Texas, Southern California), give cactus filtered light through a sheer curtain to prevent glass magnifying heat.
    • Arrangement idea: Group three or five small cacti in terracotta pots for a sculptural, desert-inspired display.

    5. Bougainvillea (for very bright sunrooms or enclosed patios)

    • Why it thrives: Loves heat, sun, and dry air. Though technically not a small houseplant, it can be trained in containers indoors if placed in a very bright spot.
    • Care tip: Needs major light think sunroom or large south window. Let soil dry out between waterings.

    6. Zebra Haworthia (Haworthiopsis fasciata)

    • Why it thrives: Compact, sculptural succulent tolerant of high light and warmth, perfect for windowsills.
    • Bonus: Low water needs and stays small ideal for renters or small apartments.

    Expert Tips for Hot, Sunny Rooms

    • Use terracotta pots. They allow soil to breathe and prevent root rot, which can occur in ceramic or plastic pots under high heat.
    • Choose a gritty soil mix. Standard potting soil holds too much moisture for plants in hot, bright rooms. Mix equal parts potting soil, coarse sand, and perlite for succulents.
    • Add a light-filtering sheer curtain. Direct midday sun through glass can scorch even sun-loving leaves. A thin curtain softens the light while keeping brightness.
    • Hydrate smartly, not frequently. In my clients’ homes, I’ve found that most plant losses in sunny rooms come from overwatering, not dryness. Always check soil moisture before watering.
    • Rotate plants monthly. Strong sunlight hits one side more consistently, so rotating keeps growth even and prevents leaning or pale undersides.

    My Go-To Combination for a Hot, Bright U.S. Living Room

    In a typical bright southern or western exposure say, a living room with large windows in places like Phoenix or Austin I often design with:

    • 1 large Snake Plant in a ceramic floor pot near the window
    • 2–3 Aloe Vera or Zebra Haworthia on the sill
    • A Jade Plant as a centerpiece on a side table

    This combination creates a sculptural, natural look while tolerating heat and sun with almost no maintenance.

  • Which plant gives 24 hours of oxygen

    Which plant gives 24 hours of oxygen

    Every product is independently reviewed and selected by our editors. If you buy something through our links, we may earn an affiliate commission at no extra cost to you.

    No plant produces oxygen 24 hours a day. All green plants follow a natural rhythm called photosynthesis during daylight and respiration at night. During the day, in the presence of light, plants take in carbon dioxide and release oxygen. At night, when photosynthesis stops, most plants slightly reverse the process they take in oxygen and release a small amount of carbon dioxide.

    A few types of plants do continue to release oxygen at night, thanks to a special metabolic adaptation called Crassulacean Acid Metabolism (CAM). These plants keep their stomata (leaf pores) closed during the day to conserve water, and open them at night to take in CO₂ which means they can still release some oxygen when most other plants don’t.

    BubbleBlooms Sansevieria

    CAM Plants That Release Oxygen at Night

    From my professional experience setting up indoor gardens in U.S. homes and apartments, these are some of the best-known examples:

    PlantWhy It’s HelpfulIdeal Placement
    Snake Plant (Sansevieria trifasciata)Extremely hardy, tolerates low light, releases oxygen at nightBedroom or low-light living area
    Areca Palm (Dypsis lutescens)Good for humidifying dry indoor air, mild nighttime oxygen releaseBright rooms with indirect light
    Aloe VeraCAM plant, mild oxygen output at night, also useful for skin careSunny bathroom or kitchen window
    Peace Lily (Spathiphyllum)Filters VOCs like benzene and formaldehyde; minimal but steady oxygen exchangeShaded corner or office
    Orchid (especially Phalaenopsis)CAM-type metabolism; elegant and air-improvingBedroom or bright but indirect light area

    What This Means in Real Homes

    While no plant provides “24-hour oxygen” in a literal sense, placing a few of these CAM plants in bedrooms or home offices can help moderate indoor air composition overnight, especially in well-ventilated spaces.

    In my experience testing indoor plant setups, the biggest air-quality benefits come not from oxygen output but from:

    • Filtering airborne toxins (VOCs) from furniture and paint
    • Regulating humidity naturally
    • Creating a calmer, healthier environment that supports relaxation and sleep

    So, rather than searching for a mythical “24-hour oxygen plant,” focus on a thoughtful mix of hardy, air-purifying species and good airflow in your home.

  • What is the best flowering plant to grow indoors

    What is the best flowering plant to grow indoors

    Every product is independently reviewed and selected by our editors. If you buy something through our links, we may earn an affiliate commission at no extra cost to you.

    Choosing the right one can turn your home into a space filled with color and life. Some plants adapt beautifully to indoor conditions, blooming reliably with minimal care. Understanding light, space, and maintenance needs helps you select an indoor flowering plant that truly thrives.

    1. Peace Lily (Spathiphyllum wallisii) Best All‑Around Choice

    Why it’s great:

    • Tolerates lower light than most bloomers.
    • Evergreen foliage + graceful white flowers several times a year.
    • Excellent natural air purifier. Light: Medium indirect; thrives 3–6 ft from a window. Water: Keep soil slightly moist, never soggy. Bloom tip: Feed monthly with diluted organic fertilizer and maintain humidity around 50%.

    Ideal for: Apartments, offices, shaded living rooms.

    2. African Violet (Saintpaulia ionantha) Best for Consistent Indoor Blooms

    Why it’s great:

    • Compact, long‑blooming, and available in many colors.
    • Blooms year‑round with steady light and moderate humidity. Light: Bright, indirect (east or north window) or LED grow light. Water: Bottom‑water with room‑temperature water; avoid splashing leaves. Bloom tip: Use African violet soil mix (light and airy) and gentle, balanced feed every 2–3 weeks.

    Ideal for: Bright kitchen windowsills or sunrooms.

    3. Orchid (Phalaenopsis or Moth Orchid) Best for Elegance and Longevity

    Why it’s great:

    • Exotic, long‑lasting flowers (up to 3 months).
    • Low daily maintenance once you learn its rhythm. Light: Bright, filtered (no direct mid‑day sun). Water: Every 7–10 days; let roots dry slightly between. Bloom tip: After flowering, trim stem above a node; new spikes often emerge.

    Ideal for: Bright bathrooms or east‑facing windows.

    4. Anthurium (Anthurium andraeanum) Best for Bold Color Year‑Round

    Why it’s great:

    • Glossy leaves and long‑lasting red, pink, or white blooms.
    • Flowers (technically spathes) can last 2–3 months indoors. Light: Bright indirect. Water: Weekly, keeping soil lightly moist. Bloom tip: Warmth (above 65 °F) and consistent feeding every month sustain continuous color.

    Ideal for: Warm, bright living rooms or entryways.

    5. Kalanchoe (Kalanchoe blossfeldiana) Best Low‑Water Bloomer

    Why it’s great:

    • Succulent leaves + clusters of colorful flowers.
    • Needs very little water; thrives on bright windowsills. Light: Full sun (south or west window). Water: Every 10–14 days; avoid soggy soil. Bloom tip: After flowers fade, pinch spent blooms and give 6 weeks of shorter days (~10 h light, 14 h dark) to trigger reblooming.

    Ideal for: Busy households or bright, dry rooms.

    6. Begonia (Rex or Tuberous Hybrids) Best for Color and Texture

    Why it’s great:

    • Incredible range of leaf patterns and flowers.
    • Compact enough for shelves and tabletops. Light: Bright, indirect. Water: Keep evenly moist but not wet. Bloom tip: Maintain humidity around 50% and feed lightly every 2 weeks in spring/summer.

    Ideal for: Indoor accent tables or well‑lit bathrooms.

    7. Hibiscus  Best Tropical Showstopper (with Grow Light)

    Why it’s great:

    • Large, vivid blooms that brighten any space.
    • Rewarding if you have strong light or supplemental LED. Light: 6+ hours of direct or grow‑light exposure. Water: Thoroughly when top inch of soil dries. Bloom tip: Keep warm (70–80 °F) and feed every 2 weeks with organic bloom fertilizer.

    Ideal for: Sunrooms or bright rooms with grow lights.

    Quick Comparison

    PlantLightWaterBloom FrequencyMaintenance
    Peace LilyLow–mediumModerateEvery few monthsVery easy
    African VioletBright indirectModerateYear‑roundModerate
    Phalaenopsis OrchidBright, filteredLow–moderate1–2× per year, long-lastingLow
    AnthuriumBright indirectModerateContinuousEasy
    KalanchoeBright/directLowSeasonalVery easy
    BegoniaBright indirectModerateSpring–summerModerate
    HibiscusBright/direct or LEDModerateContinuous in summerHigher care

    My Professional Recommendation

    If you want a reliable, low‑stress starter, go with a peace lily or African violet. If you’re comfortable providing bright light and regular feeding, Anthurium gives the best long‑term payoff tropical color, minimal mess, and easy reblooming.

    For naturally lit homes or those with grow lights, hibiscus or orchids will reward your extra effort with dramatic, long‑lasting flowers.

    Pro Tips for Any Indoor Bloomer

    • Light = blooms. If flowers never appear, increase brightness before changing fertilizer.
    • Trim faded blooms to encourage new buds.
    • Feed lightly and regularly rather than rarely with heavy doses.
    • Maintain humidity between 45–60%; dry air is the enemy of buds.
    • Repot every 1–2 years in fresh, well‑draining organic mix.