Every product is independently reviewed and selected by our editors. If you buy something through our links, we may earn an affiliate commission at no extra cost to you.
If you’ve got a pothos, monstera, philodendron, or any climbing aroid that keeps flopping sideways, a moss stick is one of the simplest upgrades you can make. In real balcony and indoor pot setups, I’ve found it does two things that a plain stake doesn’t: it supports the vine and creates a humid surface roots can grab, which usually leads to bigger leaves, sturdier stems, and tidier growth as long as you install and maintain it correctly.
Below is a practical, step-by-step guide you can apply immediately.
Why a Moss Stick Works (Simple Plant Logic)
Many popular houseplants are climbers by nature. In the wild, they grow up trees. Along the stem they produce aerial roots little nubs that want to cling to something slightly damp and textured.
A moss stick helps because it:
- Mimics a tree trunk (vertical support = upright growth)
- Gives aerial roots something grippy
- Holds some moisture, encouraging the plant to “lock on”
- Keeps the plant’s weight supported so stems don’t crease or snap
What beginners often miss: a moss stick isn’t magic if it stays bone-dry all the time. For plants that truly size up (monstera, mature philodendrons), the pole’s moisture + texture is part of the benefit.
What You’ll Need
- Moss stick / moss pole
- Options: coco coir pole, sphagnum moss pole, DIY mesh + moss pole
- Soft plant ties
- Best: Velcro plant tape, soft twine, fabric strips
- Avoid: thin wire directly on stems (it cuts in)
- A sturdy pot with drainage
- Fresh potting mix (if repotting)
- Aroids do well in a chunkier mix: potting soil + orchid bark + perlite
- Scissors/pruners (clean)
Eco note: Coco coir poles are often more sustainable and lower-maintenance than pure sphagnum poles. Sphagnum works great, but it’s worth sourcing responsibly because it can be harvested from sensitive ecosystems.
Step-by-Step: How to Use a Moss Stick Properly
1) Choose the Right Pole Height
- Pick a pole that’s at least as tall as your plant now.
- Ideally, choose one that gives 30–60 cm (1–2 ft) extra growth room.
Practical tip: Too-short poles lead to constant “upgrading,” which usually means disturbing roots repeatedly.
2) Decide: Install Without Repotting vs. While Repotting
Best time: when you’re repotting anyway (spring/summer growth season).
- If repotting: easiest and most stable.
- If not repotting: you can still add a pole, but you must place it carefully to avoid spearing major roots.
Timing: do this in the morning or early day so the plant has time to recover with good light.
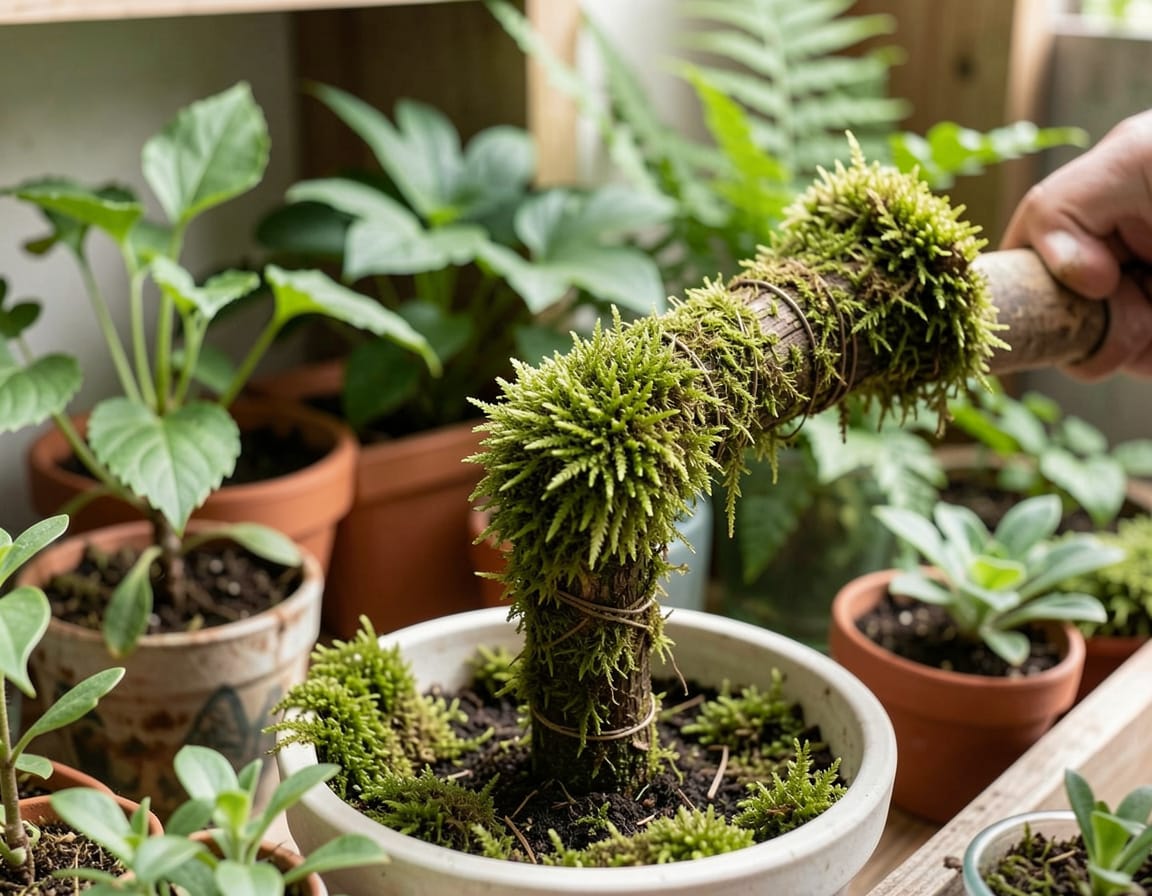
3) Position the Moss Stick Correctly (This Matters)
Place the pole close to the main stem base, usually 1–3 cm away, on the side where the plant naturally leans or where aerial roots face.
- Push the pole down until it hits the bottom of the pot (or as deep as possible).
- Aim for stability: wobble is your enemy.
Hands-on warning: if the pole is only buried a little, the first time you water or the plant gets top-heavy, the whole thing tilts stressing roots and snapping stems.
4) Secure the Pole So It Doesn’t Move
If the plant is tall or the pole is heavy:
- Use a heavier pot (terracotta helps)
- Add a support stake beside the pole if needed
- Some poles have a base spike; still, check wobble
Balcony/gusty window tip: wind will rock tall poles. If your plant sits outdoors, stabilize the pot (corner placement) or use a heavier container.
5) Tie the Plant to the Moss Stick (Gently)
- Start at the lowest part of the vine.
- Use soft ties in a loose “figure 8”:
- one loop around the pole
- one loop around the stem
- Tie at intervals of 10–15 cm (4–6 in).
Where to tie: support the stem between nodes, not directly on a node or aerial root nub.
Beginner mistake: tying too tight. Stems thicken and the tie can girdle (strangle) them. Check ties monthly.
6) Train New Growth Upward
As new leaves emerge:
- Keep guiding the vine upward.
- Attach new sections every few weeks.
Visual cue you’re doing it right: aerial roots begin pressing into the pole and the plant looks “stacked” rather than sprawling.
7) Keep the Pole Slightly Moist (Only If Your Plant Benefits)
This depends on the pole type and your plant.
- Sphagnum moss pole: mist or water it 2–4 times a week (more in dry indoor air).
- Coco coir pole: usually doesn’t hold much moisture; it’s mostly a climbing texture. You can still mist occasionally, but don’t obsess.
Simple method that works: when you water the pot, pour a small amount down the top of the moss pole so moisture moves downward.
Humidity caution: constantly soaking the pole in a low-airflow room can encourage fungus gnats or stem rot. Moist is good; soggy is not.
Pro Tips & Best Practices (From Real Use)
Match the Pole to the Plant
- Monstera deliciosa: benefits from a sturdy pole; aerial roots will anchor well.
- Pothos (Epipremnum): climbs easily; coco poles work fine.
- Philodendron hederaceum / micans: climbs well, appreciates some moisture.
- Self-heading philos (Birkin, Rojo Congo): don’t need a moss pole; a stake is enough.
Don’t Force the Stem
If a vine has hardened in a sideways shape, don’t bend it sharply upright it can crease.
- Instead, tie it gradually over 2–3 weeks, adjusting tension slowly.
Upgrade Before It’s a Jungle
Once the plant is huge and tangled, installing a pole becomes stressful.
- Add a pole when the plant is still manageable.
Consider Pruning + Propagating
If your plant is leggy:
- Cut back and root cuttings.
- Replant cuttings around the pole for a fuller “column” look.
FAQ
1) Why isn’t my plant attaching to the moss stick?
Common causes:
- Pole is too dry and smooth (especially coir poles)
- Not enough contact between nodes/aerial roots and the pole
- Plant is getting low light, so it’s not growing actively Try tying nodes closer to the pole and lightly moistening a sphagnum pole.
2) How often should I water or mist a moss pole?
- Sphagnum pole: usually 2–4 times a week, depending on heat and humidity.
- Coir pole: mist occasionally; focus more on plant care than pole moisture.
3) Can I use a moss stick for pothos?
Yes. Pothos climbs very well. With a pole and brighter light, leaves often get noticeably larger.
4) Will a moss stick cause pests like fungus gnats?
It can if the pole stays wet constantly, especially indoors with low airflow. Keep it damp, not dripping, and let the top layer dry slightly between wettings.
5) Do I need to repot when adding a moss stick?
Not always. Repotting is ideal for stability, but you can add one to an existing pot if you insert carefully and stabilize it well.
When NOT to Use a Moss Stick (And Better Options)
A moss stick isn’t necessary if:
- Your plant is naturally bushy/self-supporting (many upright philodendrons, rubber plant, jade)
- You prefer trailing growth (pothos cascading from a shelf)
- Your space is very low light (the plant may stretch even on a pole)
Alternatives:
- Trellis (great for hoya, jasmine indoors, some vines)
- Simple bamboo stake (for light support)
- Wall clips (for training vines along a wall watch for paint damage)
Conclusion
To use a moss stick for plants successfully: install it deep and stable, place it close to the stem, tie vines gently at intervals, and keep the pole appropriately moist (especially sphagnum). The payoff when conditions are right is a climbing plant that grows upright, stronger, and often with larger leaves, instead of sprawling and snapping under its own weight.
If you tell me what plant you have (pothos/monstera/philo?), whether it’s indoors or balcony, and your light (hours of sun or window direction), I can recommend the best pole type and a simple maintenance routine.