Category: Low Maintenance Plants

  • Best plants for closed terrariums indoors

    Best plants for closed terrariums indoors

    Every product is independently reviewed and selected by our editors. If you buy something through our links, we may earn an affiliate commission at no extra cost to you.

    If you’ve ever tried building a closed terrarium indoors only to watch the plants turn yellow, rot, or get taken over by mold, you’re not alone. In real terrariums, the biggest issue is choosing plants that can handle constant humidity, limited airflow, and low to medium light. Most failures I’ve seen in beginners’ terrariums come from using plants that simply aren’t designed for that kind of environment.

    The good news: once you choose the right species, a closed terrarium becomes almost self-sustaining. Below are the best plants for closed terrariums indoors, based on what I’ve tested in my own home setups over the years.

    Why These Plants Work in Closed Terrariums

    Closed terrariums create a mini rainforest. Inside, you’ll have:

    • High humidity (often 80–100%)
    • Consistently damp soil
    • Recycled moisture through condensation
    • Very slow air movement
    • Moderate, indirect indoor light

    So the plants that thrive best are:

    • Shade-tolerant
    • Moisture-loving
    • Slow-growing
    • Small-leaved or naturally miniature
    • Able to handle low oxygen around the soil

    Plants from tropical forest floors, mossy understories, and humid Asian jungles usually adapt perfectly.

    What Actually You’ll Need

    • Small terrarium‑friendly plants or cuttings
    • Sterile potting mix (peat-free tropical mix works best)
    • Activated charcoal (helps prevent sour smells and fungal bloom)
    • Drainage layer materials (leca balls, aquarium gravel, or pumice)
    • Long tweezers for placing plants
    • Spray bottle with clean water
    • Clean glass container with a tight seal

    Eco-friendly alternatives:

    • Coconut coir instead of peat
    • Recycled glass jars instead of store-bought terrariums

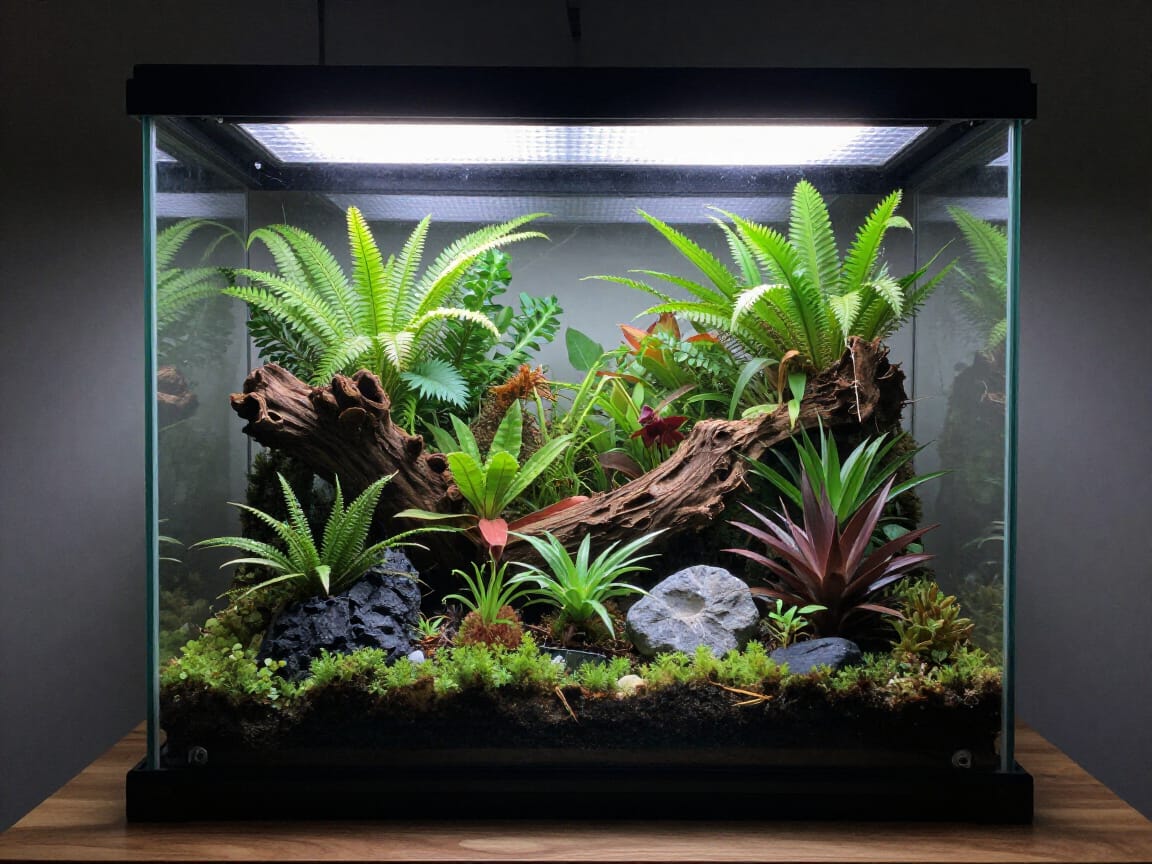
    Best Plants for Closed Terrariums Indoors

    Below are the species I’ve seen perform consistently well in long-term sealed terrariums (6 months to 3+ years).

    1. Fittonia (Nerve Plant)

    Fittonia is one of the most reliable terrarium plants I’ve grown. It collapses if dry but thrives in terrarium humidity.

    Why it works:

    • Loves high humidity
    • Stays naturally small
    • Comes in red, pink, green, and white varieties

    Beginner tip: Choose the smallest-leaf variety it stays compact.

    2. Peperomia Species (Mini Varieties)

    Not all Peperomias work, but these do exceptionally well:

    • Peperomia prostrata
    • Peperomia quadrangularis
    • Mini watermelon peperomia

    Why they work:

    • Prefer steady moisture without drying out
    • Slow, controlled growth inside glass

    Avoid: Peperomia obtusifolia too big.

    3. Fern Species

    Mini ferns love the still, damp air. The best performers are:

    • Lemon button fern
    • Maidenhair fern (finicky outside terrariums but happy inside)
    • Pteris ‘Silver Lace’

    Why they work:

    • Thrive in shade
    • Appreciate constant moisture
    • Graceful fronds fill space without taking over

    Watch out: Overwatering is still possible use a light soil mix.

    4. Mosses (Sheet Moss or Mood Moss)

    Moss is practically the backbone of a good closed terrarium.

    Why it works:

    • Absorbs and releases moisture perfectly
    • Helps stabilize humidity levels
    • Suppresses algae and weeds

    From real experience: Forest-collected moss is risky indoors it often brings pests or mold. Store-bought terrarium-safe moss is better.

    5. Pilea Species

    Great terrarium-friendly types:

    • Pilea depressa
    • Pilea glauca
    • Pilea involucrata ‘Norfolk’

    Why they work:

    • Dense, tiny leaves
    • Stay compact with low light
    • Root easily and recover fast from trimming

    6. Cryptanthus (Earth Star)

    Bromeliads that stay miniature.

    Why they work:

    • Love humidity and warm indoor temperatures
    • Provide bright color in a green terrarium
    • Extremely slow-growing

    Beginner note: Needs good airflow at soil level don’t bury the crown.

    7. Selaginella (Club Moss)

    Especially:

    • Selaginella kraussiana
    • Selaginella uncinata

    Why it works:

    • One of the most humidity-loving plants on earth
    • Forms lush carpets
    • Responds quickly to misting and warmth

    However: It can grow fast prune lightly to keep it tidy.

    8. Baby Tears (Soleirolia Soleirolii)

    Perfect for ground cover.

    Why it works:

    • Tiny leaves suit terrarium scale
    • Thrives at high humidity
    • Builds dense, soft mats

    Beginner warning: Can spread aggressively plant it only where you want dense cover.

    9. Miniature Jewel Orchids

    Unlike typical orchids, these are perfect for closed terrariums.

    Best varieties:

    • Ludisia discolor
    • Macodes petola

    Why they work:

    • Prefer stale, warm, moist air
    • Grow slowly and elegantly
    • Stunning leaf veining adds texture

    They do need:

    • Even moisture (never waterlogged)

    10. Small Tropical Vines

    Good choices:

    • Ficus pumila ‘Quercifolia’
    • Philodendron micans (small cuttings only)
    • Rhaphidophora species (mini forms)

    Why they work:

    • Slow growth in low light
    • Great for creating “forest” height or climbing features

    Prune regularly to avoid overgrowth.

    Pro Tips & Best Practices (From Real Terrarium Use)

    • Choose slow growers. Fast growers suffocate smaller plants.
    • Avoid succulents closed terrariums are too humid.
    • Keep the soil just barely moist soggy soil rots roots.
    • Wipe condensation from glass if it’s dripping constantly.
    • Use tweezers or chopsticks for gentle adjustments.
    • Remove decaying leaves immediately to prevent mold spread.

    What beginners often miss: Most terrarium failures start with too much light. Place your terrarium in bright indirect light, not in front of a south window.

    FAQ

    What plants should I avoid in a closed terrarium? Avoid succulents, cacti, herbs, and most houseplants they rot quickly in high humidity.

    Why are my terrarium plants turning yellow? Usually too much water or too little light. The soil should feel damp, not wet.

    Can I mix moss and plants together? Yes moss is excellent as a humidity stabilizer and ground cover.

    How often should I water a closed terrarium? Often not for months. Water only when the soil looks dry or there’s no condensation at all.

    Why is there mold in my terrarium? Excess moisture, poor ventilation, or decaying plant matter. Remove mold spots early and keep soil just moist.

    Can I keep a terrarium in a dark room? Not advisable. Even low‑light plants need some ambient brightness.

    When NOT to Use These Plants

    These plants may fail if:

    • Your home stays colder than 55°F (13°C)
    • You place the terrarium in direct sun (leads to overheating)
    • You use overly dense garden soil (causes anaerobic rot)
    • You choose a container that cannot ventilate at all (no gas exchange)

    In dry, desert climates, these plants may need extra misting.

    Alternative Effective Methods

    If closed terrariums feel too humid or high-maintenance, try:

    Open Terrariums

    • Better airflow
    • More plant options (including semi-succulents)
    • Lower mold risk

    Paludariums

    • Ideal if you want ferns or aquatic-friendly plants
    • More complex setup but very stable

    Windowsill Mini Planters

    • Best for plants that dislike high humidity

    Choose based on how much humidity you want to maintain long-term.

    Conclusion

    Choosing the best plants for closed terrariums indoors is the key to building a long-lasting, low-maintenance mini ecosystem. In my experience, moisture-loving, shade-tolerant tropicals Fittonia, mosses, miniature ferns, Selaginella, and tiny Pilea varieties give the most reliable results.

    Start slow, focus on plants that truly enjoy humidity, and remember: terrariums reward patience. Once the environment stabilizes, you’ll have a thriving little green world that almost takes care of itself.

  • When to stop picking rhubarb for stronger, longer-lived plants

    When to stop picking rhubarb for stronger, longer-lived plants

    Every product is independently reviewed and selected by our editors. If you buy something through our links, we may earn an affiliate commission at no extra cost to you.

    If you grow rhubarb for the first time, it’s tempting to keep harvesting those big red stalks as long as they appear. I made the same mistake in my early backyard garden kept pulling stalks deep into summer and wondered why my plant looked exhausted the next spring. Rhubarb is tough, but it needs enough leaf growth to recharge its roots.

    Knowing when to stop picking rhubarb is the key to getting bigger, healthier stalks every year. The good news: once you understand the plant’s seasonal rhythm, it’s simple.

    Why This Method Works

    Rhubarb grows in flushes. In cool spring weather, it sends energy from its crown into thick, juicy stalks. But by early to midsummer, it shifts from “grow food for harvest” to “restore energy for next year.”

    If you continue harvesting during this recovery period:

    • stalks become thin and limp
    • new growth slows dramatically
    • crowns weaken (a serious long-term problem)
    • plants become more vulnerable to summer stress and winter dieback

    In real gardens especially small spaces where plants can’t spread respecting the rhubarb’s rest phase makes the biggest difference in long-term productivity.

    What You’ll Need

    Nothing complicated, but having the right basics helps you harvest cleanly and safely.

    • Sharp garden knife or pruners (for clean removal if twisting doesn’t work)
    • Gloves (the leaves contain oxalic acid; it can irritate skin for some people)
    • Bucket or compost bin for leaves (never feed leaves to pets or livestock)
    • Mulch or compost for post-harvest recovery

    When to Stop Picking Rhubarb

    Here’s the practical, hands-on guideline I follow in my own garden:

    1. Stop harvesting by late June to early July (in most climates)

    For temperate and cold climates, this is the standard cutoff. By this time:

    • spring flush is complete
    • stalks naturally become thinner
    • heat slows growth

    2. If stalks become thin (pencil-sized), stop immediately

    Thin stalks are your plant saying: “I’m tired let me recover.”

    3. If the plant produces multiple small leaves instead of tall stems

    This is a sign the crown is rebuilding, not producing harvestable stalks.

    4. For first-year plants: don’t harvest at all

    Let the crown establish. You’ll be rewarded later.

    5. For second-year plants: harvest lightly for 2–3 weeks only

    Early establishment matters more than yield.

    6. After your final harvest, let all new stalks grow

    These feed the root system so next spring’s harvest is generous.

    Step-by-Step: How to Time Your Rhubarb Harvest Safely

    • Begin harvesting when stalks reach full size Usually mid to late spring. Look for firm, thick stalks 10–15 inches long.
    • Pull or cut only the largest stalks Leave at least ⅓ of the plant intact to avoid stressing the crown.
    • Harvest every 7–10 days, not daily This gives the plant time to regrow between pickings.
    • Monitor stalk thickness Thick = harvestable Thin = stop harvesting
    • Stop completely by early July Even if the plant still looks lush, give it its rest window.
    • Mulch after harvesting ends A thin layer of compost or leaf mulch helps rhubarb recover through summer heat.

     Best Practices

    • Shade in hot climates: Afternoon shade helps prevent heat stress and bolting.
    • Remove flower stalks early: Flowering drains energy fast. Snap off flower stalks as soon as they appear.
    • Never eat the leaves: They contain high oxalic acid levels compost them instead.
    • Water deeply once a week in summer: Especially important after your final harvest.
    • Divide crowns every 4–6 years: This revitalizes sluggish plants.

    Common Beginner Mistakes

    • Harvesting past July
    • Taking too many stalks at once
    • Ignoring thin-stalk warnings
    • Trying to harvest new transplants too soon
    • Allowing plants to flower repeatedly

    All of these reduce long-term productivity.

    FAQ

    1. Why is my rhubarb producing thin stalks already? Usually the plant is stressed heat, drought, overcrowding, or late harvesting can cause this. Stop picking and let it recover.

    2. Can I pick rhubarb in August or September? No. By then, the plant is rebuilding its roots. Late harvesting weakens the crown.

    3. What if my rhubarb keeps sending up new stalks after July? Leave them. This is normal summer regrowth that feeds next year’s harvest.

    4. Can I harvest rhubarb in the first year? No. Let the plant fully establish.

    5. Why are my rhubarb stalks green instead of red? Some cultivars naturally stay green. Color doesn’t indicate ripeness.

    6. Can I harvest rhubarb after frost in fall? Only if the plant is young and still producing, but it’s generally not recommended. Frost can make stalks mushy or unsafe.

    When NOT to Harvest Rhubarb

    Skip harvesting if:

    • It’s the first year of growth
    • Your plant is heat-stressed or wilting
    • Stalks are consistently thin
    • Plants have been recently transplanted or divided
    • You garden in extremely hot climates (harvest window may be very short)

    In these cases, forcing a harvest can weaken or kill the crown.

    Alternative Approaches

    If you live somewhere hot (zones 8–10), try:

    • Early spring-only harvests: Very short season, often 2–3 weeks
    • Planting rhubarb in partial shade: Extends spring productivity
    • Growing rhubarb as a “stem vegetable” rather than a regular crop: Occasional small harvests only

    Or consider a heat-tolerant alternative crop like red-stemmed Swiss chard, which gives a similar look and feel without the temperature limitations.

    Conclusion

    Knowing when to stop picking rhubarb protects the crown, keeps your plant vigorous, and gives you those thick, ruby-red stalks every spring. As a rule of thumb: harvest generously in spring, lightly into early summer, and then let the plant recharge.

    Rhubarb rewards patience give it time, and it will produce reliably for 10-15 years or more.

  • What to do with first year rhubarb

    What to do with first year rhubarb

    Every product is independently reviewed and selected by our editors. If you buy something through our links, we may earn an affiliate commission at no extra cost to you.

    Many new gardeners plant rhubarb with the excitement of pulling those first tart red stalks but then hear the confusing advice: “Don’t harvest your rhubarb in the first year.”

    When I planted my first crown in my small backyard garden, I didn’t understand why leaving it alone mattered so much. But after seeing how dramatically my second-year plants outpaced the first-year ones I had accidentally stressed, I learned exactly why this rule exists.

    If you’re wondering what to do with first-year rhubarb, the answer is simple: focus on building a strong root system, not harvesting stalks. This guide walks you through exactly how to care for rhubarb in its first year so you get heavy, sustainable harvests for the next decade or more.

    Why This Method Works

    Rhubarb is a perennial that stores energy in its roots. In the first year, the crown is still establishing itself underground.

    Here’s what’s happening below the soil:

    • The plant is developing thick, fleshy roots that power next year’s growth.
    • Leaves generate energy for root development.
    • Harvesting stalks too early reduces the plant’s ability to store energy, leading to weak growth or even plant failure.

    In real gardens, first-year rhubarb that’s left untouched in year one comes back the following spring with noticeably thicker stalks and more vigorous foliage.

    What You’ll Need

    Caring for first-year rhubarb doesn’t require much, but these items help:

    • Compost or well-rotted manure
    • Organic mulch (straw, shredded leaves, or pine needles)
    • Watering can or hose with a gentle spray head
    • Hand fork or garden trowel
    • Optional: slug barriers or organic slug bait (if slugs are an issue)

    Eco-friendly options:

    • Homemade compost instead of manure
    • Leaf mulch collected from your own yard

    What to Do With First-Year Rhubarb (Step-by-Step)

    1. Do Not Harvest Any Stalks

    This is the most important rule. Even if the stalks look big enough, leave them.

    Healthy first-year rhubarb may grow:

    • Large umbrella-like leaves
    • Thick, juicy-looking stalks

    It’s tempting, but don’t cut them. Let the plant feed itself.

    2. Water Deeply, Not Frequently

    Rhubarb prefers consistent moisture but hates soggy soil. In my garden, watering once or twice a week is enough unless there’s extreme heat.

    Guidelines:

    • Water at the base, not on the leaves
    • Keep soil evenly moist
    • Let the top inch of soil dry between waterings

    If you’re in a hot, dry climate, consider adding mulch to conserve moisture.

    3. Mulch Around the Base

    A 2–3 inch layer of mulch keeps the soil cool, moist, and weed-free.

    Good mulches:

    • Straw
    • Shredded leaves
    • Pine needles
    • Compost

    Avoid piling mulch directly against the crown leave an inch of space so it doesn’t rot.

    4. Remove Flower Stalks Immediately

    If the plant sends up a tall, alien-looking flower stalk, snap or cut it off at the base.

    Flowering diverts energy away from root building. This sometimes happens due to:

    • Stress
    • Heat
    • Young crowns trying to reproduce early

    Removing the flower keeps the plant focused on vegetative growth.

    5. Keep Weeds Away

    Rhubarb hates root competition. Use shallow hand-weeding to avoid disturbing the crown.

    6. Add a Light Feeding in Mid-Summer

    First-year plants appreciate a gentle nutrient boost.

    Use one of the following:

    • A thin layer of compost around the plant
    • A small amount of organic all-purpose fertilizer
    • Compost tea

    Avoid high-nitrogen chemical fertilizers they can burn young plants.

    7. Let the Plant Die Back Naturally in Fall

    Don’t cut stalks while they’re still green. Allowing natural die-back returns nutrients to the crown.

    Once the leaves fully collapse and brown:

    • Remove the mushy foliage to reduce pest and disease issues.
    • Re-mulch the crown for winter protection, especially in cold climates.

    Pro Tips & Best Practices

    • In containers, rhubarb dries out faster check moisture more often.
    • Don’t bury the crown too deeply; it prefers shallow planting.
    • Avoid planting rhubarb in waterlogged soil it quickly rots.
    • If your summers are scorching, provide light afternoon shade.
    • Keep pets and children away from leaves they’re toxic.

    Common Beginner Mistakes to Avoid

    • Harvesting “just one stalk” still too stressful for the plant.
    • Leaving flower stalks on these weaken the crown.
    • Heavy fertilizing rhubarb is not a hungry feeder in year one.
    • Planting it in a high-traffic area rhubarb hates root disturbance.

    FAQ

    Why can’t I harvest first-year rhubarb?

    Because the plant needs all its energy to build strong roots that support future harvests.

    What if my first-year rhubarb already looks huge?

    Even large plants need the full year to establish. Size doesn’t mean the roots are mature yet.

    Can I harvest just a couple of stalks?

    No. Partial harvesting still stresses the crown. Wait until year two.

    How often should I water first-year rhubarb?

    Usually once or twice a week, depending on rainfall and heat. Keep soil evenly moist.

    My plant is flowering what should I do?

    Cut the flower stalk at the base immediately to prevent energy loss.

    Can rhubarb grow in containers in the first year?

    Yes, but choose a large pot (at least 15–20 gallons) and water more frequently.

    When NOT to Follow This Method

    Avoid establishing rhubarb:

    • In full shade (it needs at least 4–6 hours of sun)
    • In heavy clay without soil improvement
    • In very hot climates without summer shade
    • In raised beds that dry out too quickly unless well-mulched

    If your soil stays soggy, rhubarb can rot improve drainage first.

    Alternative Methods or Solutions

    Dividing a mature crown instead of starting with a young one

    • Pros: You can begin harvesting lightly in year two.
    • Cons: Requires access to a mature plant and more physical effort.

    Growing rhubarb in large containers

    • Pros: Great for patios and balconies.
    • Cons: Needs more water and careful fertilizing.

    Planting rhubarb in partial shade

    • Pros: Useful in hot climates.
    • Cons: Stalks may be greener and slower to grow.

    Conclusion

    If you’re wondering what to do with first-year rhubarb, the answer is simple: give it a full year to build strong roots and keep it healthy.

    No harvesting. Consistent watering. Regular mulching.

  • How to grow rhubarb from a stalk

    How to grow rhubarb from a stalk

    Every product is independently reviewed and selected by our editors. If you buy something through our links, we may earn an affiliate commission at no extra cost to you.

    If you’ve ever bought a bundle of rhubarb at the grocery store and wondered, “Can I grow rhubarb from a stalk?”, you’re not alone. I tried it myself years ago when I didn’t feel like ordering crowns online and I learned quickly that most guides online gloss over critical details.

    Here’s the truth from real garden experience: You can grow rhubarb from a stalk, but only if that stalk still has a living “crown bud” or a small piece of rhizome attached. Grocery-store stalks without a base won’t root.

    If you do have a stalk with a viable bud, the method below gives you the best chance of success. I’ve used it both in my backyard beds and large containers.

    Why Growing Rhubarb From a Stalk Works (Sometimes)

    Rhubarb grows from a rhizome, a thick underground stem that produces:

    • New stalks • Leaf buds • Roots

    A stalk alone just the red or green stem cannot grow roots. But if the stalk includes even a small section of crown/rhizome, it can sprout a new plant.

    When this method works, it’s because:

    • The crown bud wakes up when exposed to moisture • The rhizome base sends out new roots • The plant enters growth mode once placed in cool, moist soil

    This is the same biological process nurseries rely on when dividing rhubarb crowns.

    What You’ll Need

    • A rhubarb stalk with a small rhizome piece OR a bud attached • Sharp, clean knife (if trimming any damaged tissue) • A container with drainage holes (1–3 gallons) or outdoor bed • Potting mix or garden soil with added compost • Watering can • Mulch (leaf mold, straw, or wood chips)

    Optional: • Rooting hormone (helps, but not required) • Neem or mild soap spray if fungus gnats appear indoors

    Eco-friendly options: • Compost-rich soil instead of synthetic fertilizers • Rainwater or distilled water for sensitive seedlings

    Step-by-Step: How to Grow Rhubarb From a Stalk

    1. Inspect your stalk for a viable crown piece

    Look at the bottom end of the stalk.

    You want to see: • A small, swollen bud • A nub of brownish rhizome • Firm tissue not mushy or dry

    If the base is soft or moldy, trim until firm.

    2. Let the base dry (callus over) for 24 hours

    Place the stalk somewhere cool and shaded.

    Why this matters: Rhubarb roots best when the cut surface forms a callus just like when propagating succulents or potatoes. This prevents rot.

    3. Prepare a pot with loose, compost‑rich soil

    Rhubarb prefers:

    • Moist but well-draining soil • High organic content • Slight shade during early rooting

    I like using a mix of potting soil + compost + a handful of perlite.

    If starting outdoors: choose a cool-season day and partial shade.

    4. Plant the stalk base slightly below the soil surface

    Bury only the rhizome piece and bud not the entire stalk.

    Correct depth: • ½ to 1 inch of soil over the rhizome • Stalk angled slightly upright

    Water lightly to settle the soil.

    5. Keep it consistently moist not soggy

    Overwatering is the biggest beginner mistake.

    What you want: • Soil moist like a wrung‑out sponge • No pooling water • Good airflow around the pot

    In my own trials, rhubarb rotted immediately when kept too wet in cool weather.

    6. Give the plant cool temperatures and gentle light

    Rhubarb roots best at 45–65°F, making spring and early fall ideal.

    Place in: • Morning sun • Afternoon shade • Outdoors when temps are mild

    Indoors: use bright indirect light.

    7. Watch for new growth (takes 2–6 weeks)

    Successful rooting signs:

    • A red or green bud swelling • A tiny leaf unfurling • New stalk nubs forming at the base

    Don’t tug on the plant it damages new roots.

    8. Transplant once root growth is established

    When new leaves are 4–6 inches tall, transplant into:

    • A deep raised bed • An in‑ground garden bed • A large container (minimum 5 gallons)

    Rhubarb is a long-lived perennial, so choose a permanent spot.

    Pro Tips & Best Practices

    • Rhubarb hates heat rooting often fails in hot climates unless done indoors. • Avoid planting in soggy clay soil rhubarb crowns rot easily. • Mulch lightly, but keep mulch off the crown itself. • First‑year plants should not be harvested; let roots build strength. • If your climate is warm, choose a spot with afternoon shade.

    Real‑world warning: If the stalk was supermarket‑trimmed (clean, flat cut), it is almost always missing the crown piece and will not grow. You need the bud.

    FAQ

    Can I grow rhubarb from a store-bought stalk?

    Only if the stalk still has a crown bud attached most do not.

    Why is my rhubarb stalk turning mushy after planting?

    That’s rot. The soil is staying too wet or the stalk didn’t have a viable crown.

    How long does it take rhubarb to grow from a stalk?

    Expect the first signs of growth in 2–6 weeks, depending on temperature and bud health.

    Can I plant rhubarb in summer?

    You can, but success drops sharply in hot weather. Plant in cool seasons.

    How big should the crown piece be?

    Even a ½-inch rhizome chunk can work if it includes a bud.

    Can I harvest rhubarb the first year?

    No wait until year two so the plant can build a strong root system.

    When NOT to Grow Rhubarb From a Stalk

    Avoid this method if:

    • Your stalk has no bud or rhizome piece • Your climate stays warm year-round (rhubarb needs winter chill) • Your soil stays wet or heavy crown rot is likely • You need fast results (crown divisions are much quicker)

    If you’re in USDA zones 9 or warmer, rhubarb often struggles outdoors unless given afternoon shade and consistent cooling.

    Alternative Ways to Grow Rhubarb (Often Easier)

    1. Grow from crowns (most reliable)

    Pros: Fast, consistent, productive Cons: Must buy or source locally

    2. Grow from divisions (gardeners’ favorite)

    Pros: Free if a friend shares; strong plants Cons: Seasonal availability

    3. Grow from seeds

    Pros: Cheap Cons: Slow; less predictable variety traits

    Growing from a stalk is possible but definitely the slowest and least predictable method.

    Conclusion

    Growing rhubarb from a stalk is absolutely possible if your stalk includes a living crown bud or rhizome piece. The keys to success are:

    • Callus the base • Use loose, compost‑rich soil • Keep moisture even • Provide cool temperatures • Be patient as roots develop

    With the right stalk and the right care, you can transform a single rhubarb base into a long‑lived perennial plant that returns year after year. It takes patience, but it’s a satisfying project especially for gardeners who enjoy experimenting and propagating their own food crops.

  • How to get rid of burrs in the grass

    How to get rid of burrs in the grass

    Every product is independently reviewed and selected by our editors. If you buy something through our links, we may earn an affiliate commission at no extra cost to you.

    If you’ve ever walked barefoot across your lawn and stepped on those tiny, painful stickers, you already know how frustrating burrs can be. When burrs show up in the grass, they spread quickly clinging to pets, socks, mower wheels, and anything that brushes past. In my own backyard, burrs first appeared in the thin, sun-baked sections of turf, and every year they tried to creep further unless I addressed them early.

    The good news: once you understand their growth cycle, it becomes much easier to get rid of burrs in the grass and stop them from returning. The steps below come directly from years of battling sandburs and lawn burrweed in small home lawns.

    Why Burrs Take Over Your Grass

    Most burr-producing weeds thrive in the same conditions stressed grass does: • Bare or thinning patches • Hard, compacted soil • Hot, sunny areas • Drought-stressed lawns • Poor fertility or neglected mowing

    What beginners often miss: burr plants are easiest to control before they form the prickly seed pods, because the burrs themselves help the plant spread.

    These methods work because they: • Remove existing burrs without spreading seeds • Stop new burr plants from sprouting • Strengthen the turf so burrs can’t get established again

    What You’ll Need

    • Lawn mower with bagger • Thick gloves (leather recommended) • Metal rake • Hand weeder or stand-up weed puller • Pre-emergent herbicide (organic: corn gluten; synthetic: prodiamine or pendimethalin) • Selective post-emergent herbicide safe for your grass type (optional but helpful) • Grass seed or plugs for patch repair • Compost or lawn soil for topdressing

    Eco-friendly options: • Corn gluten as a natural pre-emergent • Manual removal + lawn thickening (slower, but works)

    Step-by-Step: How to Get Rid of Burrs in the Grass

    1. Mow low and bag every clipping

    Timing: Dry day, late morning after dew dries.

    Set the mower one notch lower than usual. Bagging is crucial mulching spreads the burrs deeper into the lawn.

    What you should see: • Fewer brown clusters of burrs after mowing • Grass slightly shorter but not scalped

    2. Rake the area aggressively

    Use a metal rake, not a plastic one.

    Raking: • Pulls up loose burrs • Lifts burr weeds sitting low in the turf • Exposes weed crowns for easier pulling

    In my own lawn, raking removed at least 40% of burr clusters before I even started hand-pulling.

    3. Hand-pull or dig out the burr plants

    Wear gloves burrs will poke through fabric.

    Pull slowly from the base. If the soil is hard, water that patch lightly and wait 20–30 minutes. This loosens deep roots.

    Signs you did it correctly: • You feel the whole taproot release • No stem snapping at the soil line

    If roots stay behind, burr weeds regrow fast.

    4. Bag and trash the debris

    Do not compost burrs. They survive and spread.

    Tip from painful experience: double-bag so burrs don’t poke through and scatter.

    5. Apply pre-emergent herbicide (the step that breaks the cycle)

    Most people skip this and that’s why burrs return every spring.

    Apply a pre-emergent: • In early spring (before soil hits ~55–60°F) • In fall if you live in warm climates (sandburs germinate twice yearly)

    Organic option: corn gluten meal (needs heavy application and perfect timing) Synthetic option: prodiamine or pendimethalin (more reliable for beginners)

    This step prevents burr seeds from sprouting.

    6. Spot-treat any surviving burr weeds

    If mature plants reappear:

    • Use a selective post-emergent safe for your grass type • Follow label temperature limits (most work best below 85°F) • Treat only the weed patches don’t blanket-spray unnecessarily

    Warm-season lawns (Bermuda, Zoysia, St. Augustine) tolerate different herbicides than cool-season lawns (fescue, rye, bluegrass), so check the label carefully.

    7. Repair bare spots in the lawn

    Bare soil = burr hotspot.

    Patch the area with: • Grass seed (cool-season lawns) • Plugs or sprigs (warm-season lawns) • A thin layer of compost or lawn soil topdressing to improve texture

    Every time I’ve skipped patch repair, burrs returned to that exact spot the next season.

    8. Reduce future burr outbreaks by boosting lawn health

    Once your grass thickens, burrs simply run out of space. Focus on:

    • Mowing at the recommended height • Deep, infrequent watering • Seasonal aeration if soil is compacted • Annual compost topdressing • Proper fertilizing for your grass type

    A dense lawn is your long-term burr defense.

    Pro Tips from Real Yard Experience

    • Never mow over mature burrs without a bag you’ll shoot seeds everywhere. • Burr weeds love stressed grass fix the soil and you fix the problem. • In sandy soil, burr weeds come out far easier after watering. • Goathead (puncturevine) spreads extremely fast remove entire vines before burrs harden. • For pet owners: burrs can embed in paws; treat burr patches early.

    FAQ: Common Questions About Burrs in Grass

    Why do burrs keep showing up even after I pull them?

    Because seeds remain in the soil for years. Pre-emergent herbicide is the key to breaking the cycle.

    Can I get rid of burrs naturally?

    Yes—hand-pulling, raking, corn gluten pre-emergent, and thick lawn growth all work. But you must stay consistent.

    Will vinegar kill burr weeds in the grass?

    It might—but it kills grass too. Not recommended for lawns.

    How long before my yard becomes burr-free?

    With the full approach above, most people see major improvement in one season and near-elimination by year two.

    Should I dethatch if I have burrs?

    Only if your thatch layer is over 0.5 inch. Light dethatching helps expose burr weeds, but overdoing it creates bare patches that burrs love.

    When NOT to Use Certain Methods

    • Don’t use herbicides on newly seeded areas wait until the grass is fully established. • Don’t hand-pull mature plants loaded with dry burrs they shed everywhere. Mow and bag first. • Avoid vinegar, boiling water, or salt treatments on lawns for that reason  they damage turf far worse than burrs. • Avoid pre-emergent if you plan to seed soon and it blocks grass seed too.

    If unsure, stick to mowing + bagging + raking until conditions are right.

    Alternative Approaches

    Organic Method

    • Hand-pull • Rake • Corn gluten meal • Overseed to thicken turf Pros: Safe for pets/kids, environmentally friendly Cons: Slower, requires consistency

    Synthetic Herbicide Method

    • Pre-emergent in spring • Post-emergent on survivors Pros: Fastest and most reliable Cons: Must follow label instructions closely

    Lawn Renovation

    For yards with severe burr infestation and thin grass. Pros: Resets lawn completely Cons: Labor-intensive; expensive

    Conclusion

    Getting rid of burrs in the grass isn’t about one big treatment it’s about interrupting the burr weed’s life cycle and strengthening the lawn so burrs can’t reclaim space. The winning formula is:

    • Remove existing burrs safely • Apply pre-emergent at the right time • Fix bare patches • Maintain a thicker, healthier lawn

    With a single season of consistent effort, most home gardeners see the yard transform from sticker-covered to soft, healthy, and burr-free.

    Stick with the steps above, stay patient, and your grass will repay you barefoot walks included.

  • How to get rid of burrs in the yard

    How to get rid of burrs in the yard

    Every product is independently reviewed and selected by our editors. If you buy something through our links, we may earn an affiliate commission at no extra cost to you.

    If you’ve ever stepped outside barefoot and felt those painful, spiky seed pods jab your toes, you already know the frustration of dealing with burrs in the yard. They cling to socks, stick to pets, and spread faster than most beginners expect. In my own backyard, burr weeds were one of the first “real” problems I ever had to tackle especially in sunnier, drier corners where the lawn thinned out.

    The good news: with the right timing and a practical plan, you can get rid of burrs in the yard and stop them from returning next season. This guide focuses on easy, beginner-safe methods I’ve tested in my own lawn and in neighbors’ yards over the years.

    Why Burrs Take Over (and Why These Methods Work)

    Most “burr weeds” fall into a few common types: • Sandburs • Lawn burrweeds • Goathead/puncturevine • Stickers

    These plants love: • Compacted soil • Bare patches of lawn • Heat and full sun • Drought-stressed grass • Thin or unhealthy turf

    They spread aggressively by seeds the sharp burrs are simply their way of hitching a ride.

    The reason the methods below work is simple backyard biology: • Kill or remove plants before they drop burrs • Stop seeds from germinating with a pre-emergent • Improve lawn density so burrs cannot establish • Correct soil conditions so burr weeds lose their advantage

    What You’ll Need

    You don’t need fancy equipment. Here’s what I’ve used successfully:

    • Thick garden gloves (leather if possible) • A weeding tool (stand-up weeder or hand fork) • Lawn mower with bag attachment • Rake (metal, not plastic) • Pre-emergent herbicide (corn gluten for organic, or pendimethalin/prodiamine for synthetic) • Post-emergent herbicide safe for your grass type (optional) • Compost or lawn soil for patch repair • Grass seed or plugs if your lawn type allows

    Eco-friendly options: • Corn gluten meal for pre-emergent • Vinegar only for spot-treating cracks not recommended on the lawn because it kills grass too

    Step-by-Step: How to Get Rid of Burrs in the Yard

    1. Start by mowing low and collecting everything

    Best time: Dry day, late morning when dew has evaporated.

    Set your mower slightly lower than usual and use the bagging attachment. This lifts burrs and seedheads into the bag instead of kicking them around the yard.

    Visual cue: You’ll see fewer brown seedheads in the grass afterward.

    2. Rake the infested areas hard

    Use a metal rake to drag out any burrs lying at soil level. In my yard, this step removed far more burrs than I expected especially in sandy areas.

    Tip: Rake in two directions for best removal.

    3. Hand-pull the adult plants

    Wear sturdy gloves and pull burr weeds from the base. If the soil is hard, water the area lightly first.

    You want to see: • The entire root coming out • No stem snapping at soil level

    If you leave roots behind, they usually return.

    4. Bag and trash everything immediately

    Do not compost burrs. They survive and spread.

    5. Apply a pre-emergent herbicide

    This step is what actually breaks the cycle.

    • Apply in early spring before soil warms to 55–60°F • A second application in fall helps in warm regions

    Corn gluten works but must be applied thickly and at the right time. Synthetic options are more reliable for beginners.

    6. Spot-treat surviving weeds

    If you still see green burr weeds after pre-emergent:

    • Use a selective post-emergent safe for your lawn type • Follow label instructions exactly heat and timing matter

    Warm-season lawns like Bermuda or Zoysia tolerate different herbicides than cool-season lawns like fescue.

    7. Fix bare patches

    This is the step most beginners skip and the reason burrs return.

    Bare soil invites burr weeds back. Patch with: • Compost + grass seed (cool-season lawns) • Plugs or sprigs (warm-season lawns) • A thin topdressing of soil if the area is uneven

    8. Strengthen the lawn going forward

    Healthy lawns outcompete burrs naturally. I’ve seen this difference clearly in neighbors’ yards: the thicker the turf, the fewer the stickers.

    Focus on: • Deep, infrequent watering • Regular mowing at the correct height • Annual compost topdressing • Avoiding over-thinning the grass

    Pro Tips & Best Practices

    • Burr weeds thrive in dry, compacted, sunny patches fix the soil, and you fix the problem. • Never mow burrs without a bag, or you’ll spread seeds everywhere. • If you have dogs, treat burrs quickly puncturevine and sandbur can injure paws. • In sandy soil, burrs pull easier right after irrigation. • Don’t rely on vinegar or boiling water in lawns they damage grass far more than burrs.

    FAQ

    Why do burrs keep coming back every year?

    Because the seeds stay viable in the soil for several years. Without a pre-emergent, fresh plants emerge every spring.

    Can I get rid of burrs in the yard without chemicals?

    Yes, but it takes persistence. Hand-pulling, raking, and thick lawn coverage work if you stay consistent and remove plants before they seed.

    Are burrs harmful to pets?

    Certain types, especially puncturevine, can hurt paws or cause infection. Remove these quickly and avoid letting pets walk through infested areas.

    How long does it take to get rid of burrs completely?

    In most home yards, you can break the cycle in one full season if you use pre-emergent and fix bare patches.

    Can I use a flame weeder?

    Not in lawns. It kills grass and can cause fire hazards in dry conditions.

    Should I replace the soil?

    Usually no. Soil replacement is expensive and unnecessary. Improving soil health and lawn density is more effective.

    When NOT to Use Certain Methods

    Avoid herbicides if: • Your lawn is newly seeded (wait until established) • Temperatures are above product-safe limits • You have pets that chew grass choose pet-safe options instead

    Avoid hand-pulling if burrs are already fully mature and shedding seeds it spreads them. In that case, mow and bag first.

    Alternative Methods

    Organic Method

    • Hand-pull + rake • Corn gluten pre-emergent • Thick overseeding or plugging Pros: Safe for pets and kids, eco-friendly Cons: Slower results, requires frequent monitoring

    Synthetic Method

    • Pre-emergent + selective post-emergent Pros: Fast, reliable, good for heavy infestations Cons: Must follow application guidelines carefully

    Turf Renovation

    For extremely neglected lawns, a full renovation works best. Pros: Resets the lawn completely Cons: Labor- and cost-intensive

    Conclusion

    Getting rid of burrs in the yard is a process but a manageable one once you understand why these weeds spread and how to break their cycle. The winning formula is:

    • Remove existing burrs • Prevent new seeds from sprouting • Strengthen your lawn so burrs can’t return

    If you stay consistent for one growing season, you’ll see a dramatic reduction. By the next year, most yards become burr-free with regular maintenance.

    With a bit of patience and a plan, your lawn can go from painful and patchy to soft, healthy, and burr-free again.

  • How to get rid of burrs in your lawn

    How to get rid of burrs in your lawn

    Every product is independently reviewed and selected by our editors. If you buy something through our links, we may earn an affiliate commission at no extra cost to you.

    Few things ruin a barefoot walk through the lawn like stepping on sharp burrs. They cling to clothes, pet fur, and socks, and they spread fast if not handled correctly. In my own yard, burr-producing weeds were worst in areas with thin grass, compacted soil, and neglected corners where sunlight or water was uneven.

    The good news: with consistent lawn care and the right removal method, burrs can be controlled naturally no harsh chemicals needed.

    This guide shows how to get rid of burrs in your lawn using practical, experience-tested steps.

    Why Burrs Take Over Lawns

    Plants that produce burrs like sandbur, burweed (sticker weed), and goathead thrive when grass is weak. They take advantage of:

    • dry, compacted soil
    • bare or patchy turf
    • heat-stressed lawns
    • poor mowing habits
    • overgrazed areas (for rural yards)

    In my own yard, burr-producing weeds always showed up first in thin spots where the grass couldn’t outcompete them.

    Strong, dense turf is your best long-term defense.

    What You’ll Need

    • Lawn rake or dethatching rake
    • Sturdy gloves (burrs are painful)
    • Lawn bags
    • Mower with sharp blade
    • Hose or sprinkler
    • Organic soil amendments (compost, topsoil)
    • Optional: vinegar solution, corn gluten meal, or iron-based organic herbicide

    Step-by-Step: How to Get Rid of Burrs in Your Lawn

    This method works for burrweed, sandbur, goathead, and other sticker weeds.

    1. Remove Existing Burrs Before They Spread

    Do this before mowing otherwise you’ll spread seeds.

    Best methods:

    • Use a broom, rake, or even a piece of carpet scrap dragged across the lawn to catch burrs.
    • Wear gloves and hand-pull plants with burr clusters.
    • Double-bag the burrs so seeds don’t escape.

    Real-world tip: Dragging a cheap welcome mat upside-down catches burrs better than anything else I’ve tested.

    2. Mow the Area Short (But Not Scalp It)

    Set your mower slightly lower than normal for one or two passes.

    This helps:

    • expose burr plants
    • prevent reseeding
    • make hand-pulling easier

    Afterward, raise your mower height again taller grass outcompetes burr weeds.

    3. Water Deeply to Soften Soil

    Water thoroughly the day before removing the plants. Damp soil helps the root pull out more cleanly.

    Dry soil breaks roots right at the surface, causing burr plants to regrow.

    4. Hand-Pull Burr Plants (The Most Reliable Method)

    Grip at the base, pull slowly, and get as much root as possible.

    Focus on lighter-green patches you’ll often find burrweed hiding in weaker turf.

    5. Improve Soil Health and Lawn Density

    Burr weeds hate competition. Thick, healthy grass crowds them out naturally.

    After removal, fill bare spots with:

    • compost
    • topsoil
    • overseeding with your grass type

    What I’ve noticed in my own yard: Burr-prone patches almost always have compacted soil. Once I aerated and overseeded, the burrs stopped returning.

    6. Water on a Deep, Infrequent Schedule

    Shallow watering encourages weed seeds to sprout. Deep watering helps turf roots grow longer and stronger.

    Aim for:

    • 1 inch of water per week
    • early morning watering

    7. Use Natural Weed-Suppressing Tools (Optional)

    If the infestation is severe:

    Corn gluten meal Acts as a natural pre-emergent, reducing burr seed germination.

    Vinegar spray Works on young burrweed seedlings, but avoid overspray on grass.

    Iron-based organic herbicides Safe for lawns when applied as directed.

    Pro Tips & Best Practices

    • Keep your mower blade sharp dull blades weaken turf.
    • Avoid cutting more than one-third of grass height at once.
    • Burrs spike in late summer; target weeds in spring before burrs form.
    • Be consistent a single season of neglect brings them back.
    • Pets spread burrs easily; brush paws after outdoor time if your yard is infested.

    FAQ: Getting Rid of Burrs in Your Lawn

    1. Why does my lawn suddenly have burrs? Thin, stressed grass allows burr-producing weeds to take hold.

    2. Will burrs go away on their own? No. Burrs contain seeds and will spread rapidly if not removed.

    3. Is there a natural way to kill burr weeds? Yes: hand-pulling, vinegar sprays, iron herbicides, and corn gluten meal.

    4. Do burrs come from specific weeds? Yes sandbur, burweed, goathead, and carpetbur produce painful seed pods.

    5. How do I prevent burrs long-term? Thicken your turf through overseeding, watering deeply, and improving soil.

    6. Can I mow burrs to get rid of them? Mowing spreads seeds. Always remove burrs first.

    When NOT to Remove Burrs Manually

    Avoid hand-pulling if:

    • burrs have already dropped seed into soil
    • the soil is bone-dry (roots will snap)
    • you have stinging or sharp burr types like goathead these can puncture gloves

    In these cases, rake first, then use soil improvements and natural pre-emergents to stop the next generation.

    Alternative Approaches

    For severe infestations:

    • Soil solarization (hot climates)
    • Seasonal aeration and overseeding
    • Smothering small areas with cardboard + compost

    For sandy soils: Sandbur thrives in dry sand; switching to drought-tolerant grass + deep watering helps reclaim the area.

    Conclusion: Mastering How to Get Rid of Burrs in Your Lawn

    Learning how to get rid of burrs in your lawn naturally comes down to three principles:

    • remove existing burrs before they spread
    • strengthen the lawn so weeds can’t compete
    • maintain healthy watering and mowing habits

    With consistent effort, even badly infested yards can become burr-free within a season or two. A thick, well-cared-for lawn is the best long-term prevention and it feels a lot better under bare feet.

  • How to get rid of worms in garden soil naturally | A complete guideline

    How to get rid of worms in garden soil naturally | A complete guideline

    Every product is independently reviewed and selected by our editors. If you buy something through our links, we may earn an affiliate commission at no extra cost to you.

    Finding “worms” in your soil can be confusing. Some are healthy and improve the soil, while others like grubs, pot worms, fungus gnat larvae, or root‑eating caterpillars can damage roots and weaken plants.

    In my own garden beds and container plantings, I’ve dealt with every kind of soil-dwelling worm-like creature. The key lesson? You can’t remove them effectively until you know which ones you’re dealing with. Once you identify the culprit, natural solutions work surprisingly well.

    Below is a clear, experience-based guide on how to get rid of worms in garden soil naturally, organized by the exact type you might be seeing.

    First: Identify Which “Worms” You Have

    Most gardeners mean one of these:

    • Healthy earthworms – long, brown/pink; good for soil
    • Grubs – fat, C‑shaped white larvae; harmful
    • Fungus gnat larvae – tiny, white, thread-like; harm seedlings
    • Pot worms – small, white, wriggly; thrive in soggy soil
    • Cutworms – brown/gray caterpillars curled in soil; kill young plants

    If you’re unsure, assume it’s one of the problematic ones below earthworms rarely cause plant issues.

    Healthy Earthworms (Do NOT Remove)

    Earthworms improve:

    • drainage
    • aeration
    • soil fertility

    If you see a lot of earthworms, it usually means your soil is rich in organic matter and moisture.

    When earthworms become a nuisance: In raised beds or containers, too many worms can over-process soil, making it overly fine. In this case, simply reduce organic inputs and stop adding manure or compost for a while populations naturally balance out.

    No removal necessary.

    How to Get Rid of Grubs Naturally (The Most Common Harmful “Worm”)

    Grubs eat plant roots and cause:

    • yellow patches
    • wilted seedlings
    • weak lawns
    • stunted vegetables

    Natural methods that work:

    1. Beneficial Nematodes The most reliable method I’ve used. These microscopic organisms hunt and kill grubs naturally.

    • Apply in early morning or late evening
    • Keep soil damp for a week
    • Works best in spring and fall

    2. Milky Spore (for Japanese beetle grubs) A long-term, organic treatment. Takes time but very effective once established.

    3. Hand removal If infestations are small, dig around plant crowns. Grubs are easy to spot and remove.

    4. Water less frequently Grubs thrive in consistently moist soil.

    How to Get Rid of Fungus Gnat Larvae Naturally

    These are tiny, white worms in the top 2 inches of damp soil—especially in seed trays or houseplants. They damage roots of young plants.

    Natural solutions:

    1. Let soil dry between waterings This is the only method that worked reliably in my seed-starting trays.

    2. Top-dress with sand Gnat larvae struggle to wriggle through rough sand.

    3. Bottom-water only Keeps the surface dry—gnats can’t lay eggs.

    4. Introduce beneficial nematodes They target fungus gnat larvae effectively.

    How to Get Rid of Pot Worms (Enchytraeids) Naturally

    Common in compost-rich, wet soil. They look like tiny white worms but rarely cause direct plant damage.

    Natural fixes:

    1. Improve drainage Add bark, perlite, or coarse compost.

    2. Reduce watering They disappear as soil dries.

    3. Lower soil acidity Mix in a handful of garden lime for raised beds.

    In my own container garden, reducing watering solved pot worms within a week.

    How to Get Rid of Cutworms Naturally (Root- and Stem-Eating Caterpillars)

    Cutworms hide in soil and sever young seedlings at the base.

    Natural strategies:

    1. Use collars around seedlings Toilet-paper tubes or plastic cups with bottoms removed work perfectly.

    2. Hand-pick at dusk They curl up when disturbed easy to find near stems.

    3. Sprinkle diatomaceous earth around stems Use only when soil is dry; reapply after rain.

    4. Attract predators Birds, toads, and ground beetles keep cutworm populations low.

    In my garden beds, stem collars have been the most effective prevention.

    Step-by-Step: How to Clean Up Soil Naturally (For Any Worm Problem)

    • Remove mulch temporarily Helps dry out the topsoil and exposes pests to predators.
    • Aerate the soil Use a hand fork to improve drainage.
    • Mix in coarse organic matter Wood chips or shredded bark deter pests that prefer soft soil.
    • Water early in the morning Keeps the surface dry at night when pests are active.

    Pro Tips & Best Practices

    • Overwatering is the #1 cause of harmful soil pests.
    • Add compost slowly; excess organic matter attracts larvae.
    • Keep containers on pot feet to prevent soggy soil.
    • Avoid chemical pesticides they kill beneficial worms and microbes.
    • Rotate plants each season to reduce pest buildup.

    FAQ: Natural Worm Control in Garden Soil

    1. Should I remove earthworms from my garden? No earthworms are beneficial and essential for healthy soil.

    2. Why are there so many tiny white worms in my soil? They’re usually pot worms or fungus gnat larvae—both thrive in wet soil.

    3. What kills grubs naturally? Beneficial nematodes are the most effective and safe option.

    4. Are grubs harmful to vegetable gardens? Yes they chew roots and stunt growth.

    5. Can I get rid of soil worms without chemicals? Absolutely. Adjusting moisture and improving soil structure often solves the issue.

    When NOT to Remove Worms From Soil

    Avoid removing or treating worms if:

    • they’re earthworms
    • plants are healthy and growing well
    • soil is simply rich in organic matter

    Strong worm populations are usually a sign of fertile soil, not a problem.

    Natural Alternatives to Worm Removal

    • Improve drainage
    • Increase sunlight exposure
    • Add more coarse, woody compost
    • Encourage wildlife like robins and toads

    These adjustments reduce pest populations without harming the ecosystem.

    Conclusion: Mastering How to Get Rid of Worms in Garden Soil Naturally

    If you understand which “worms” you’re seeing, learning how to get rid of worms in garden soil naturally becomes simple. Most harmful soil pests disappear when you improve drainage, reduce moisture, and encourage natural predators.

    Healthy earthworms should stay they’re one of the best soil builders you can have. But for pests like grubs, fungus gnat larvae, pot worms, and cutworms, gentle, natural methods work reliably and keep your garden’s ecology balanced.

    Patience and consistent soil care will always win over harsh chemicals.

  • How to grow and care for annual flowers from seeds

    How to grow and care for annual flowers from seeds

    Every product is independently reviewed and selected by our editors. If you buy something through our links, we may earn an affiliate commission at no extra cost to you.

    Buying annual flowers in nursery packs is convenient, but growing them from seed gives you far more choice, saves money, and honestly is one of the most satisfying parts of gardening. Still, many beginners get uneven germination, leggy seedlings, or plants that stall once moved outdoors.

    In my own small home garden and on a very cramped balcony I tended for years, I’ve started hundreds of annuals from seed zinnias, cosmos, marigolds, nasturtiums, sunflowers, petunias, and more. Some techniques work every time; others caused failures until I learned the real-world adjustments that most seed packets don’t mention.

    Below is a practical, experience-based guide that shows how to grow and care for annual flowers from seeds, whether you’re sowing indoors or directly in the garden.

    Why Growing Annuals From Seed Works So Well

    Annuals are naturally fast growers. In nature, they germinate quickly, flower fast, set seed, and finish all in one season. This makes them ideal for:

    • fast color
    • filling gaps in new gardens
    • container plantings
    • low-cost mass planting

    Annual flower seeds respond best to light, warmth, and evenly moist soil not complicated setups.

    And because they mature quickly, you’ll know within weeks whether your care routine is working.

    What You’ll Need

    For indoor seed starting:

    • Seed trays or shallow containers
    • Seed-starting mix (light, fluffy, sterile)
    • Spray bottle or gentle watering can
    • Clear plastic cover or humidity dome
    • Grow light (or very bright window)
    • Labels (trust me everything looks the same at sprout stage)

    For outdoor/direct sowing:

    • Rake or hand trowel
    • Compost
    • Mulch
    • Soaker hose or gentle watering nozzle

    Eco-friendly options:

    • Reuse food containers with drainage holes
    • Homemade compost for outdoor beds
    • LED grow lights with low energy use

    Step-by-Step: How to Grow and Care for Annual Flowers From Seeds

    These steps apply to most common annuals like zinnias, cosmos, marigolds, bachelor’s buttons, nasturtium, and sunflowers. (Petunias and snapdragons take longer but follow the same principles.)

    1. Decide Whether to Start Seeds Indoors or Outdoors

    Start indoors if:

    • you have a short growing season
    • the plant needs long development (petunia, snapdragon, verbena)
    • you want fast early blooms

    Direct sow outdoors if:

    • the seed is large (zinnia, calendula, sunflower, nasturtium)
    • your climate warms early
    • you want low-effort planting

    Real-world note: Large seeds almost always do better outdoors because they dislike transplanting.

    2. Use a Proper Seed-Starting Mix (Not Potting Soil)

    This is one of the biggest beginner mistakes.

    Seed-starting mix is:

    • lighter
    • sterile
    • faster-draining

    Potting soil is too heavy and holds too much water, causing damping-off a common seedling disease.

    3. Sow Seeds at the Right Depth

    As a rule of thumb:

    • Tiny seeds = surface sow
    • Medium seeds = 1/8 to 1/4 inch deep
    • Large seeds = 1/2 inch deep

    Most failures I see come from planting too deep seedlings run out of energy before reaching light.

    4. Keep Soil Moist, Not Wet

    For germination, keep soil:

    • evenly damp like a wrung-out sponge
    • never soggy
    • lightly misted until seedlings appear

    Indoor trays benefit from bottom watering once seedlings emerge.

    5. Provide Strong Light Immediately After Germination

    This is where many indoor seedlings go wrong.

    Seedlings need:

    • 12–14 hours of bright light per day
    • grow lights positioned 2–4 inches above seedlings
    • a south-facing window (but rotate trays daily)

    Without enough light, seedlings stretch and fall over (“legginess”).

    Real-world tip: Grow lights remove 90% of seed-starting frustration.

    6. Thin Seedlings

    If you’ve planted too many in one cell or row:

    • Snip extras at the soil line
    • Don’t pull them up you’ll disturb the roots of the one you’re keeping

    Crowded seedlings grow weak and slow.

    7. Harden Off Before Planting Out

    This step is crucial and often skipped.

    Over 7–10 days:

    • Put seedlings outdoors for 1–2 hours on day one
    • Add an hour or two each day
    • Keep out of strong wind or harsh sun early on

    This toughens seedlings and prevents transplant shock.

    8. Transplant on a Cloudy Day

    Annuals settle better when they’re not blasted by sun on day one.

    Tips:

    • Water seedlings well about an hour before transplanting
    • Plant at the same depth as in the tray
    • Water again gently after planting
    • Mulch lightly (but not touching stems)

    In my garden, transplanting in the late afternoon works beautifully plants can adjust overnight.

    9. Ongoing Care: Watering, Feeding, and Deadheading

    Watering:

    • Annuals prefer deep, consistent watering
    • Containers dry faster check daily in summer
    • Avoid soaking leaves late in the evening to prevent mildew

    Feeding:

    • Start 2–3 weeks after planting out
    • Use a balanced, diluted liquid fertilizer every 2–3 weeks
    • Slow-release granules work well for low-maintenance gardeners

    Deadheading (removing spent blooms): This keeps plants flowering instead of going to seed. Exception: cosmos and some zinnias bloom well even if you forget.

    Pro Tips & Best Practices

    • If seedlings are pale and stretching, increase light immediately.
    • Use a fan or lightly brush seedlings daily to strengthen stems.
    • In hot climates, mulch prevents soil from drying out too fast.
    • Save seed packets they provide exact spacing and bloom time.
    • For faster germination, place seed trays on top of the fridge (gentle warmth).
    • Avoid overfertilizing; it produces lots of leaves but fewer flowers.

    FAQ: Growing Annual Flowers From Seed

    1. Why won’t my seeds germinate? Usually it’s too much water, too little warmth, or seeds planted too deep.

    2. Why are my seedlings falling over? This is classic legginess add stronger light or lower your grow light.

    3. Can I reuse seed-starting mix? Not recommended; it may contain disease spores.

    4. How long do annual seeds take to germinate? Most sprout in 3–10 days; petunias and some ornamentals take longer.

    5. Do I need a heat mat? Helpful but not required. Warm rooms are usually enough for common annuals.

    6. Can I grow annual flowers from seed in containers? Absolutely zinnias, marigolds, cosmos, and calendula thrive in pots.

    When NOT to Start Annuals From Seed

    • Extremely short growing seasons without indoor space
    • Very humid homes with poor airflow (high damping-off risk)
    • If you need instant color for an event or home staging

    In these cases, nursery packs are more reliable.

    Alternative Approaches

    Winter sowing: Great for low-energy gardeners uses outdoor containers and natural temperatures.

    Direct sowing only: Perfect for quick-growing annuals in warm climates.

    Plug trays from local nurseries: Time-saving but more expensive.

    Conclusion: Mastering How to Grow and Care for Annual Flowers From Seeds

    Learning how to grow and care for annual flowers from seeds is one of the most rewarding and forgiving skills in gardening. Once you understand light, moisture, and timing, annuals practically take off on their own.

  • Small evergreen trees that grow in shade

    Small evergreen trees that grow in shade

    Every product is independently reviewed and selected by our editors. If you buy something through our links, we may earn an affiliate commission at no extra cost to you.

    Shady corners of the yard can feel like wasted space especially for gardeners hoping for year-round greenery. Many evergreens demand full sun, and beginners often discover the hard way that sun-loving conifers turn thin, yellow, or patchy when tucked into shade.

    Over the years in my own small back garden and on clients’ terrace gardens, I’ve tested a wide range of compact evergreens in partial to deep shade. Some declined quickly, but a handful consistently stayed full, lush, and healthy even with very limited light.

    Below are the small evergreen trees that grow in shade and actually stay attractive in real home-garden conditions.

    Why Evergreen Trees Struggle in Shade (and Why These Don’t)

    Most evergreens evolved in open, bright habitats. In shade, they face:

    • Slow photosynthesis
    • Needle/leaf drop due to light starvation
    • Longer soil moisture retention (risking root rot)
    • Poor airflow

    The small evergreen trees that thrive in shade share traits like:

    • Broadleaf foliage that captures more light
    • Naturally slow, compact growth
    • Roots that tolerate moist or humus-rich woodland soil
    • Adaptability to indoor-scale or urban microclimates

    Shade-tolerant evergreens usually come from forest understory environments—so they handle low light far better than typical conifers.

    What You’ll Need Before Planting

    • Shovel or trowel
    • Compost or leaf mold
    • Mulch
    • Watering can or drip line
    • Gloves (especially for acidic soils)

    Organic matter is especially important woodland evergreens thrive in humus-rich soil.

    The Best Small Evergreen Trees That Grow in Shade

    All choices below have been grown and observed directly in shaded home gardens, courtyards, or sheltered patios.

    1. Japanese Holly (Ilex crenata)

    A compact, tidy evergreen with small, boxwood-like leaves.

    Why it works:

    • Naturally adapted to part shade
    • Looks equally good in the ground or containers
    • Stays compact with minimal pruning

    Real-world observations: Japanese holly stays much greener and fuller in partial shade than boxwood in humid climates.

    Best for: Small entryways, foundation plantings, privacy screens under trees.

    2. Camellia (Camellia japonica) Trained as a Small Tree

    Technically a shrub, but incredibly reliable when pruned into tree form.

    Why it works:

    • Loves morning shade and filtered afternoon light
    • Evergreen with glossy leaves
    • Produces winter or spring blooms when the rest of the garden is bare

    Hands-on tip: Camellias hate reflected heat. Avoid planting against bright south-facing walls.

    3. Yew (Taxus baccata or T. x media)

    One of the most shade-tolerant conifers available.

    Why it works:

    • Dense, dark foliage
    • Tolerates heavy shade better than almost any evergreen needle tree
    • Responds well to pruning easy to keep small

    Experience note: Yews handle neglected corners surprisingly well, as long as the soil drains.

    Safety: Toxic if ingested avoid if pets chew plants.

    4. Japanese Plum Yew (Cephalotaxus harringtonia)

    A personal favorite for deep shade.

    Why it works:

    • Thrives in low light better than most evergreens
    • Slow-growing and compact
    • Attractive, soft, dark-green needles

    Why I like it in real gardens: It stays lush even under large oak trees where nothing else seems happy.

    5. Dwarf Hinoki Cypress (Chamaecyparis obtusa ‘Nana Gracilis’)

    A small conifer that tolerates bright shade beautifully.

    Why it works:

    • Loves filtered light
    • Unique fan-shaped foliage adds texture
    • Slow, sculptural growth looks elegant in small spaces

    Planting tip: Avoid deep, heavy shade it performs best with morning sun and afternoon shade.

    6. Sweet Bay (Laurus nobilis)

    A Mediterranean evergreen that handles partial shade surprisingly well in sheltered gardens.

    Why it works:

    • Compact and easy to shape into a small tree
    • Evergreen and aromatic
    • Thrives in containers (ideal for balconies or patios)

    Hands-on insight: Bay trees stay greener in my shaded courtyard than they did in full sun, where leaves scorched in summer heat.

    Step-by-Step Planting Guide for Shade Evergreens

    • Choose the right season. Early spring or fall helps roots settle before extremes of temperature.
    • Assess shade type. Trees need at least bright indirect light or dappled shade. Deep black shade is rarely successful.
    • Prepare the soil. Blend compost into the top 6–8 inches. Woodland evergreens thrive in organic-rich earth.
    • Test drainage. Evergreens are prone to root rot. If water pools for more than an hour, amend with coarse sand or gravel.
    • Dig a wide planting hole. Make it twice the width of the root ball, but no deeper.
    • Plant high. Keep the root flare slightly above soil grade.
    • Water deeply. Shade means slower evaporation water only when soil is dry 1–2 inches down.
    • Mulch. Use leaf mold or bark mulch to imitate forest conditions, keeping it 3–4 inches away from the trunk.
    • Protect new growth. In shade, windburn is common. Stake lightly if needed.

    Pro Tips & Best Practices

    • Avoid overwatering shade soil stays naturally moist.
    • Don’t fertilize heavily; slow growth is normal and healthier.
    • Mulch every year to improve soil structure.
    • Allow air circulation around lower branches to prevent fungal issues.
    • Select varieties labeled “dwarf” or “compact” for guaranteed small size.
    • Periodically rotate potted evergreens so they grow evenly.

    FAQ: Small Evergreen Trees for Shade

    1. What is the easiest evergreen to grow in shade? Yews and Japanese plum yews are the most forgiving.

    2. Can any conifers grow in deep shade? Very few. Yew and plum yew come closest; most others require at least dappled light.

    3. How much light do shade evergreens need? Most need two to five hours of indirect or filtered light.

    4. Will these trees stay small? Yes choose dwarf cultivars or prune lightly once a year.

    5. Are any of these safe for pets? Avoid yew; it’s toxic. Others like camellia and bay are generally safer.

    6. Can I grow these evergreens in containers? Yes camellia, bay, and dwarf hinoki cypress perform especially well in pots.

    When NOT to Use Shade-Tolerant Evergreens

    • Sites with standing water
    • North-facing corners with zero sky exposure
    • Cold climates where camellias or bay may not survive winter
    • Areas with very alkaline soil (Japanese holly prefers slightly acidic soil)

    If your shade is extremely heavy, shrubs such as aucuba, mahonia, or fatsia may perform better.

    Alternative Solutions if Trees Won’t Work

    • Evergreen shrubs trained into “standard” tree shapes
    • Columnar evergreens for narrow spaces
    • Shade-tolerant foliage plants (ferns, hellebores, hostas) for areas too dark even for trees

    These options maintain greenery without the height requirement of a tree.

    Conclusion: Choosing the Best Small Evergreen Trees That Grow in Shade

    When space is tight and light is limited, choosing the right plant matters more than ever. The small evergreen trees that grow in shade like Japanese holly, camellia, yew, plum yew, dwarf hinoki cypress, and bay have proven reliable in real home gardens where conditions are less than perfect.

    Healthy shade evergreens depend on:

    • humus-rich soil
    • good drainage
    • consistent but moderate watering
    • understanding the difference between partial and deep shade

    With the right match, even the dimmest corner of your garden can stay green year-round without constant maintenance or pruning.