Author: Adams Charles
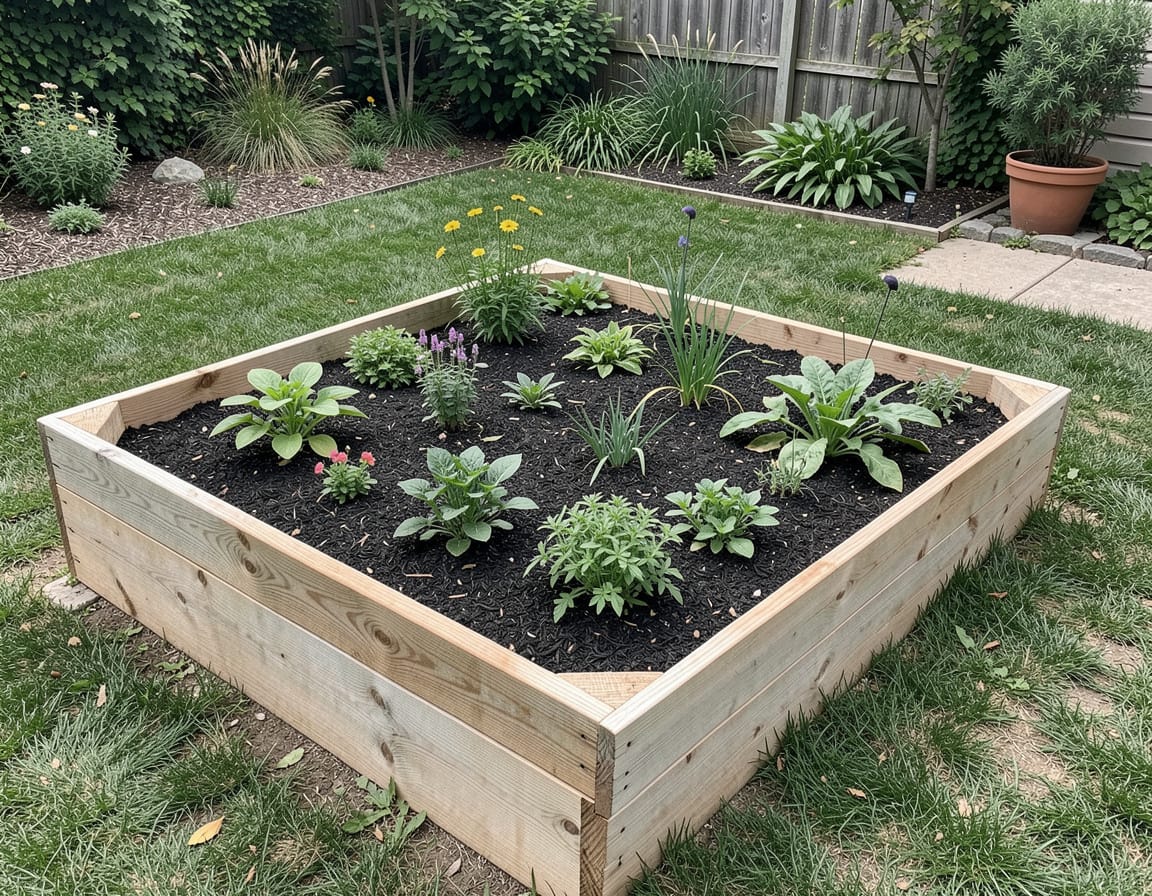
  • Plant that looks like elephant ear but smaller

    Every product is independently reviewed and selected by our editors. If you buy something through our links, we may earn an affiliate commission at no extra cost to you.

    If you’ve ever tried growing caladiums in containers, you already know their colorful, heart‑shaped leaves can brighten even the shadiest corner of a home garden. But many beginners struggle with the next step: What to plant with caladiums in pots so the whole container looks balanced, healthy, and long‑lasting?

    In my own balcony and backyard containers, I’ve tested dozens of pairings. Some plants wilt from too much shade, some fight for root space, and others simply don’t match caladiums’ need for steady moisture. But a handful of plants consistently perform beautifully with them.

    This guide breaks down the most dependable, real‑world combinations simple enough for beginners, but professional‑looking enough for any garden.

    Why Certain Plants Grow Better With Caladiums

    Caladiums are shade‑loving tropical foliage plants that thrive in:

    • Warm temperatures • High humidity • Fertile, well‑draining soil • Consistently moist conditions • Bright shade or filtered light

    Because of this, the best companions are plants that:

    • Prefer the same partial‑shade environment • Handle regular watering • Don’t compete heavily for root space • Offer contrasting shapes or colors

    When you choose plants with matching needs, the container stays healthier with less work no scorched leaves, no constant drooping, no mismatched watering needs.

    What Actually You’ll Need

    • Caladium tubers or potted plants • Large pot (at least 12–14 inches wide) • Rich potting mix with compost • Slow‑release fertilizer • Shade‑tolerant companion plants (list below) • Mulch (optional but helps with moisture)

    Eco‑friendly options: • Homemade compost • Coconut husk mulch • Organic slow‑release fertilizers

    Best Plants to Grow With Caladiums in Pots

    1. Begonias

    One of my most reliable combinations.

    • Thrive in partial shade • Love moisture but not soggy soil • Continuous blooms add contrast • Compact growth fills space under caladium leaves

    2. Impatiens

    Perfect for beginners.

    • Bright pops of color • Handle shade extremely well • Stay low and don’t smother caladium foliage

    3. Coleus

    Great foliage‑on‑foliage pairing.

    • Huge variety of colors • Matches caladiums’ moisture needs • Works in shade or indirect light

    Pro tip: Choose compact or trailing coleus for mixed containers.

    4. Ferns

    Soft texture balances caladiums’ bold leaves.

    • Love the same humidity • Stay lush in shaded patios • Perfect for layered foliage arrangements

    5. Sweet Potato Vine (Ipomoea batatas)

    One of my favorites for edge‑of‑pot drama.

    • Trails gracefully down the container • Handles shade surprisingly well • Comes in chartreuse, purple, and variegated types

    6. Torenia (Wishbone Flower)

    Ideal if you want blooms without sun stress.

    • Shade‑loving annual • Continuous flowers across summer • Attracts pollinators in low‑light gardens

    7. Heuchera (Coral Bells)

    An excellent match for caladium color palettes.

    • Handles shade • Beautiful contrasting foliage • Works well in larger containers

    8. Browallia

    My go‑to for blue flowers in shade.

    • Compact and neat • Handles moisture • Looks especially good with red or pink caladium varieties

    Step‑by‑Step: How to Assemble a Caladium Companion Pot

    1. Choose the Container

    Use a pot at least 12–14 inches wide. For multiple companions, 16–18 inches is better.

    2. Fill With Rich, Moisture‑Retaining Soil

    Mix:

    • 60% potting mix • 30% compost • 10% coco peat or leaf mold

    This keeps the soil airy but moisture‑steady.

    3. Plant the Caladiums First

    • Position caladiums toward the center or slightly back of the pot. • Tubers should be planted 2 inches deep, bumps facing up. • If using live plants, transplant gently their roots are sensitive.

    4. Add Companion Plants

    Use this simple formula:

    • Thriller (height) – Caladiums • Filler (medium plants) – Begonias, impatiens, coleus • Spiller (trailing plants) – Sweet potato vine, trailing coleus

    5. Water Thoroughly

    Caladiums droop if even slightly under‑watered.

    6. Place in Bright Shade

    Direct sun for long periods burns their leaves, especially thin‑leaf varieties.

    Pro Tips & Best Practices

    • Water early in the morning helps prevent fungal issues. • Don’t pack too many plants caladium roots need room to expand. • Keep pots away from strong wind  leaves tear easily. • Use mulch to maintain moisture in hot climates. • Rotate pots every 1–2 weeks to ensure even growth. • In very hot summers, increase watering frequency.

    Common beginner mistake: Pairing caladiums with sun‑loving plants like petunias or marigolds they will scorch or stunt.

    Frequently Asked Questions

    What plants go best with caladiums in shade?

    Begonias, impatiens, coleus, ferns, heuchera, and torenia are the best shade companions.

    Can caladiums be planted with petunias?

    No. Petunias need full sun, while caladiums need shade. They are a poor match.

    Do caladiums do well in mixed containers?

    Yes they are ideal centerpieces for shade‑loving container combinations.

    How many plants should I pair with caladiums in a pot?

    In a 14‑inch pot, use: • 1 caladium • 2–3 fillers • 1 trailing plant

    Do caladiums grow well with ferns?

    Yes. Both love humidity, shade, and consistent moisture.

    Are caladiums safe around pets?

    No. Most varieties are toxic if eaten. Keep containers out of reach.

    When NOT to Mix Plants With Caladiums

    Avoid companion planting if:

    • Your pot is very small (under 10 inches) • You’re growing caladiums in full sun varieties they may overpower shade companions • You cannot maintain consistent watering • You live in a very dry climate and don’t want daily watering

    Caladiums simply can’t tolerate drought‑tolerant partners.

    Alternatives to Companion Planting

    If you prefer a simpler look:

    Option 1: Caladiums Alone in a Pot

    • Bold and clean design • Very low maintenance

    Option 2: Mixed Foliage Pots

    Use: • Caladium • Coleus • Heuchera • Sweet potato vine

    Pretty foliage combos, no flowers needed.

    Option 3: Flower‑Heavy Shade Pots

    Use: • Caladium • Impatiens • Torenia • Begonias

    Ideal for bright, colorful patios.

    Conclusion

    The best plants to grow with caladiums in pots are other shade‑loving, moisture‑friendly plants such as begonias, impatiens, coleus, ferns, sweet potato vine, and heuchera. When you combine plants that share the same needs, your containers stay healthier, fuller, and more vibrant with minimal effort.

    With the right companions, caladium containers can stay spectacular from spring through early fall even in small balcony or patio spaces.

  • What to plant with caladiums in pots

    Every product is independently reviewed and selected by our editors. If you buy something through our links, we may earn an affiliate commission at no extra cost to you.

    If you’ve ever tried growing caladiums in containers, you already know their colorful, heart‑shaped leaves can brighten even the shadiest corner of a home garden. But many beginners struggle with the next step: What to plant with caladiums in pots so the whole container looks balanced, healthy, and long‑lasting?

    In my own balcony and backyard containers, I’ve tested dozens of pairings. Some plants wilt from too much shade, some fight for root space, and others simply don’t match caladiums’ need for steady moisture. But a handful of plants consistently perform beautifully with them.

    This guide breaks down the most dependable, real‑world combinations simple enough for beginners, but professional‑looking enough for any garden.

    Why Certain Plants Grow Better With Caladiums

    Caladiums are shade‑loving tropical foliage plants that thrive in:

    • Warm temperatures • High humidity • Fertile, well‑draining soil • Consistently moist conditions • Bright shade or filtered light

    Because of this, the best companions are plants that:

    • Prefer the same partial‑shade environment • Handle regular watering • Don’t compete heavily for root space • Offer contrasting shapes or colors

    When you choose plants with matching needs, the container stays healthier with less work no scorched leaves, no constant drooping, no mismatched watering needs.

    What Materials Actually You’ll Need

    • Caladium tubers or potted plants • Large pot (at least 12–14 inches wide) • Rich potting mix with compost • Slow‑release fertilizer • Shade‑tolerant companion plants (list below) • Mulch (optional but helps with moisture)

    Eco‑friendly options: • Homemade compost • Coconut husk mulch • Organic slow‑release fertilizers

    Best Plants to Grow With Caladiums in Pots

    1. Begonias

    One of my most reliable combinations.

    • Thrive in partial shade • Love moisture but not soggy soil • Continuous blooms add contrast • Compact growth fills space under caladium leaves

    2. Impatiens

    Perfect for beginners.

    • Bright pops of color • Handle shade extremely well • Stay low and don’t smother caladium foliage

    3. Coleus

    Great foliage‑on‑foliage pairing.

    • Huge variety of colors • Matches caladiums’ moisture needs • Works in shade or indirect light

    Pro tip: Choose compact or trailing coleus for mixed containers.

    4. Ferns

    Soft texture balances caladiums’ bold leaves.

    • Love the same humidity • Stay lush in shaded patios • Perfect for layered foliage arrangements

    5. Sweet Potato Vine (Ipomoea batatas)

    One of my favorites for edge‑of‑pot drama.

    • Trails gracefully down the container • Handles shade surprisingly well • Comes in chartreuse, purple, and variegated types

    6. Torenia (Wishbone Flower)

    Ideal if you want blooms without sun stress.

    • Shade‑loving annual • Continuous flowers across summer • Attracts pollinators in low‑light gardens

    7. Heuchera (Coral Bells)

    An excellent match for caladium color palettes.

    • Handles shade • Beautiful contrasting foliage • Works well in larger containers

    8. Browallia

    My go‑to for blue flowers in shade.

    • Compact and neat • Handles moisture • Looks especially good with red or pink caladium varieties

    Step‑by‑Step: How to Assemble a Caladium Companion Pot

    1. Choose the Container

    Use a pot at least 12–14 inches wide. For multiple companions, 16–18 inches is better.

    2. Fill With Rich, Moisture‑Retaining Soil

    Mix:

    • 60% potting mix • 30% compost • 10% coco peat or leaf mold

    This keeps the soil airy but moisture‑steady.

    3. Plant the Caladiums First

    • Position caladiums toward the center or slightly back of the pot. • Tubers should be planted 2 inches deep, bumps facing up. • If using live plants, transplant gently their roots are sensitive.

    4. Add Companion Plants

    Use this simple formula:

    • Thriller (height) – Caladiums • Filler (medium plants) – Begonias, impatiens, coleus • Spiller (trailing plants) – Sweet potato vine, trailing coleus

    5. Water Thoroughly

    Caladiums droop if even slightly under‑watered.

    6. Place in Bright Shade

    Direct sun for long periods burns their leaves, especially thin‑leaf varieties.

    Expert Tips & Best Practices

    • Water early in the morning helps prevent fungal issues. • Don’t pack too many plants caladium roots need room to expand. • Keep pots away from strong wind leaves tear easily. • Use mulch to maintain moisture in hot climates. • Rotate pots every 1–2 weeks to ensure even growth. • In very hot summers, increase watering frequency.

    Common beginner mistake: Pairing caladiums with sun‑loving plants like petunias or marigolds they will scorch or stunt.

    Frequently Asked Questions

    What plants go best with caladiums in shade?

    Begonias, impatiens, coleus, ferns, heuchera, and torenia are the best shade companions.

    Can caladiums be planted with petunias?

    No. Petunias need full sun, while caladiums need shade. They are a poor match.

    Do caladiums do well in mixed containers?

    Yes they are ideal centerpieces for shade‑loving container combinations.

    How many plants should I pair with caladiums in a pot?

    In a 14‑inch pot, use: • 1 caladium • 2–3 fillers • 1 trailing plant

    Do caladiums grow well with ferns?

    Yes. Both love humidity, shade, and consistent moisture.

    Are caladiums safe around pets?

    No. Most varieties are toxic if eaten. Keep containers out of reach.

    When NOT to Mix Plants With Caladiums

    Avoid companion planting if:

    • Your pot is very small (under 10 inches) • You’re growing caladiums in full sun varieties they may overpower shade companions • You cannot maintain consistent watering • You live in a very dry climate and don’t want daily watering

    Caladiums simply can’t tolerate drought‑tolerant partners.

    Alternatives to Companion Planting

    If you prefer a simpler look:

    Option 1: Caladiums Alone in a Pot

    • Bold and clean design • Very low maintenance

    Option 2: Mixed Foliage Pots

    Use: • Caladium • Coleus • Heuchera • Sweet potato vine

    Pretty foliage combos, no flowers needed.

    Option 3: Flower‑Heavy Shade Pots

    Use: • Caladium • Impatiens • Torenia • Begonias

    Ideal for bright, colorful patios.

    Conclusion

    The best plants to grow with caladiums in pots are other shade‑loving, moisture‑friendly plants such as begonias, impatiens, coleus, ferns, sweet potato vine, and heuchera. When you combine plants that share the same needs, your containers stay healthier, fuller, and more vibrant with minimal effort

    With the right companions, caladium containers can stay spectacular from spring through early fall  even in small balcony or patio spaces.

  • What type of plant is elephant ear in grow a garden

    Every product is independently reviewed and selected by our editors. If you buy something through our links, we may earn an affiliate commission at no extra cost to you.

    If you’ve ever spotted those huge, bold, heart‑shaped leaves in someone’s yard and wondered “What type of plant is elephant ear in a grow‑a‑garden setup?” you’re not alone. Elephant ears are one of the most common “statement plants” new gardeners fall in love with, but many aren’t sure what they actually are, how they grow, or how to care for them.

    In my own small backyard and terrace garden, elephant ears have been some of the most rewarding foliage plants I’ve grown as long as they get the moisture and warmth they crave. When they’re unhappy, they droop, yellow, or simply refuse to grow, which frustrates beginners quickly.

    This guide breaks everything down in simple, practical terms so you can grow them confidently, even in small home gardens.

    Why Elephant Ears Are Considered Tropical Foliage Plants

    Elephant ear plants belong to a group of tropical, tuber‑grown ornamental plants. In gardens, they are primarily grown for their dramatic leaves, not flowers.

    Most garden varieties fall into three main genera:

    • Colocasia – classic elephant ears with large, downward‑facing leaves • Alocasia – more upright, arrow‑shaped leaves • Xanthosoma – lighter green, vigorous growers in warm climates

    In everyday gardening terms, elephant ears are:

    • Tropical ornamental plants • Moisture‑loving foliage plants • Perennial in warm climates • Tender annuals in cold climates (unless tubers are dug up and stored)

    Their biology explains why they love heat, humidity, and consistently moist soil the same environment tropical forest floors provide.

    Why This Method Works for Growing Elephant Ears

    Elephant ears thrive when we treat them like the tropical understory plants they are:

    • Their tubers store energy and send up fast-growth leaves when soil warms. • Large leaf surfaces transpire quickly, so they need steady moisture. • They photosynthesize aggressively, which means they need rich, fertile soil. • Their roots spread widely, so they prefer roomy planting spaces or big containers.

    Once I started watering more deeply and enriching the soil with compost, the difference was dramatic larger leaves, stronger stems, and fewer yellowing issues.

    What Actually You’ll Need

    • Elephant ear tubers or young plants • Well‑draining but moisture‑retentive soil (compost + garden loam) • Large pot (at least 16–20 inches wide) if growing in containers • Fertilizer (slow‑release organic or balanced liquid feed) • Mulch (coconut husk, straw, or bark) • Gloves (sap may irritate skin for some people)

    Budget‑friendly options: • Reuse old large buckets with drainage holes • Make homemade compost instead of buying soil enrichers

    How to Grow Elephant Ear in a Home Garden (Step-by-Step)

    1. Choose the Right Spot

    • Morning sun and afternoon shade are ideal. • Full shade is tolerated but gives smaller leaves. • Full sun works only with extra watering.

    Visual cue: Leaves should look glossy and upright floppy leaves usually mean too much sun or wind.

    2. Prepare the Soil

    Elephant ears hate dry, sandy soil. Mix:

    • 50% garden soil • 30% compost • 20% coco peat or leaf mold

    This mimics the moisture-rich tropical soil they prefer.

    3. Plant the Tuber (or Transplant a Seedling)

    • Plant tubers 2–4 inches deep, with the bumpy side facing up. • Space plants 2–4 feet apart outdoors. • For containers, choose the largest pot you can manage the bigger the root space, the bigger the leaves.

    4. Water Deeply and Consistently

    Elephant ears perform best when soil is consistently moist but not waterlogged.

    Beginner tip: If the top 1 inch of soil dries out, it’s time to water.

    5. Feed Regularly

    These are heavy feeders. Apply fertilizer every:

    • 2 weeks for liquid feed • 6–8 weeks for slow‑release pellets

    Signs of underfeeding: pale leaves and slow growth.

    6. Mulch the Soil

    Mulch helps retain moisture and prevents soil from drying out.

    7. Monitor Humidity and Temperature

    • Best growth: 70–90°F (21–32°C) • Slow growth below 60°F (15°C)

    If you’re in a cold climate, treat them as annuals or dig up the tubers before frost.

    Professional Tips & Best Practices

    • Water early in the morning evening watering can encourage fungal issues. • Keep them away from strong winds; large leaves tear easily. • Don’t let pots dry out container-grown elephant ears dry faster. • Add compost mid-season for extra leaf size. • If leaves yellow from the base upward, check moisture and nutrients first. • Place trays under pots to increase humidity in balcony gardens.

    Frequently Asked Questions

    What type of plant is elephant ear in grow‑a‑garden setups?

    It is a tropical, moisture-loving ornamental foliage plant grown from a tuber.

    Why are my elephant ear leaves turning yellow?

    Most common reasons: underwatering, low nutrients, cold temperatures, or poor soil drainage.

    Can I grow elephant ears in pots?

    Yes , they thrive in large containers with rich, moist soil and partial sun.

    How often should I water elephant ears?

    Water whenever the top inch of soil begins to dry. In summer heat, often every 1–2 days for containers.

    Can elephant ears grow indoors?

    They can, but need bright indirect light and high humidity. Indoor leaves stay smaller.

    Are elephant ears safe around pets?

    Some varieties are toxic if ingested. Keep them out of reach of pets and children.

    When NOT to Grow Elephant Ears

    Avoid planting elephant ears if:

    • Your garden stays below 50°F (10°C) for long periods • Your soil is very sandy and dries quickly • You cannot water frequently • Your space gets strong wind exposure • You want a drought-tolerant garden (elephant ears are the opposite)

    Alternatives Worth Considering

    • Canna lilies: Tropical look but more sun and drought tolerant • Hostas: Shade lovers with big leaves, easier in cool climates • Taro (edible colocasia varieties): Similar appearance, edible in some types

    Elephant ears = boldest foliage Hostas = easiest care Canna = sun‑loving tropical option

    Conclusion

    Elephant ears are tropical, tuber-grown ornamental foliage plants that thrive in warm, moist, nutrient-rich garden environments. Once you understand their need for heat, humidity, and steady watering, they become incredibly rewarding and dramatic centerpieces for home, balcony, terrace, or backyard gardens.

    Grow them with patience, feed them well, and they’ll transform even the smallest garden corner into something lush and tropical.

    If you’d like, I can also create a shorter version, a care cheat sheet, or a companion planting guide for elephant ears.

  • Flowers to plant with elephant ears

    Every product is independently reviewed and selected by our editors. If you buy something through our links, we may earn an affiliate commission at no extra cost to you.

    When I first started growing elephant ears in my backyard and balcony containers, I struggled to find flowers that could keep up with their needs. Most common annuals wilted in the shade of those massive leaves, and many sun‑loving blooms simply never opened. Over several seasons and a lot of trial and error I finally found flowers that genuinely thrive with elephant ears and make the planting look lush instead of lopsided.

    Elephant ears need:

    • Moist, rich soil
    • Warm, humid conditions
    • Partial shade to bright indirect light

    So the best flowers are those that enjoy the same environment and won’t fight for root space. Here are the flowers that consistently work in real home gardens plus the ones I avoid every time.

    Why Certain Flowers Work With Elephant Ears

    Elephant ears cast shade, hold lots of moisture around the soil, and grow big fast. Flowers planted with them need to be:

    • Shade tolerant
    • Moisture loving
    • Moderate growers (not root bullies or space hogs)
    • Comfortable with humidity

    In my garden beds and containers, the most successful combinations tend to include:

    • One tall centerpiece (elephant ears)
    • A ring of bushy, shade-friendly flowers
    • A few trailing bloomers for edges

    When you get the moisture and shade balance right, these flowers actually bloom better near elephant ears because of the protected microclimate.

    Best Flowers to Plant With Elephant Ears (Tested + Reliable)

    1. Impatiens (Standard or New Guinea)

    My most dependable choice.

    Why they work:

    • Bloom heavily in shade
    • Love consistent moisture
    • Fill gaps under the elephant ear canopy

    Great for: borders, container edges, shady beds.

    2. Begonias (Wax, Cane, or Tuberous)

    Begonias and elephant ears thrive in the same conditions.

    Why they work:

    • Handle partial shade beautifully
    • Don’t mind close spacing
    • Provide color for months

    Tip: Avoid placing them where afternoon sun can hit directly leaves will scorch.

    3. Torenia (Wishbone Flower)

    A fantastic, underused shade bloomer.

    Why it works:

    • Loves humidity
    • Flowers nonstop in dappled shade
    • Compact plants won’t compete with elephant ears

    Great for: ground-level planting and pot fillers.

    4. Caladiums (Technically foliage, but showy like flowers)

    Not flowers, but they give so much color that many gardeners treat them as bloom substitutes.

    Why they work:

    • Same soil and water needs
    • Bright leaf colors brighten shaded spots
    • Stay low, letting elephant ears stand tall

    5. Fuchsias

    Perfect if you want a slightly more dramatic, ornamental look.

    Why they work:

    • Thrive in cool shade
    • Provide elegant, delicate hanging blooms
    • Work well in mixed containers

    Note: Keep soil cool; mulch helps.

    6. Coleus (Not flowers, but essential for color contrast)

    Coleus adds color where shady flowering options are limited.

    Why it works:

    • Thrives under the shade canopy
    • Handles container crowding
    • Provides continuous season-long color

    7. Begonia boliviensis (Trailing Begonia)

    Ideal for containers.

    Why it works:

    • Trailing habit softens the edges
    • Loves moist, shady spots
    • Light, airy flowers contrast well with huge elephant ear leaves

    8. Astilbe

    A great choice for in-ground beds.

    Why it works:

    • Plume-like flowers brighten shade
    • Thrives in cool, moist soil
    • Works beautifully in woodland-style plantings

    Note: Needs reliably moist soil mulching is essential.

    9. Coleus Kong Series (Large-leaf coleus)

    Acts like a flowering plant because of dramatic leaf patterns.

    Why it works:

    • Loves humidity under elephant ear foliage
    • Great filler
    • Gorgeous color varieties

    Step-by-Step: How to Plant Flowers With Elephant Ears

    1. Prepare Moist, Nutrient-Rich Soil

    Mix together:

    • High-quality potting mix or garden soil
    • Compost
    • A bit of coconut coir or peat-free moisture retainers

    Soil should feel spongy and cool.

    2. Plant Elephant Ears First

    They set the structure, so give them proper spacing:

    • Colocasia: 3–5 feet spacing in beds
    • Alocasia: 2–3 feet
    • Containers: plant slightly off-center

    3. Add Flowering Companions Around the Base

    Place shade-loving, moisture-friendly flowers around the perimeter.

    Good layout:

    • Mid-height fillers: begonias, coleus
    • Low bloomers: impatiens, torenia
    • Trailers: begonia boliviensis

    4. Mulch Generously

    A 2–3 inch mulch layer:

    • Keeps roots cool
    • Prevents soil from drying
    • Supports flowers that like steady moisture

    5. Water Deeply and Regularly

    Elephant ears draw a lot of water flowers will suffer if the soil dries out.

    Watering tips:

    • Water early morning
    • Soil should feel moist but not waterlogged

    6. Fertilize Lightly

    Use a balanced, slow-release fertilizer. Too much nitrogen = floppy leaves and fewer blooms.

    Pro Tips & Best Practices

    • Group flowers with matching water needs don’t mix dry-loving plants.
    • Rotate containers monthly for even growth.
    • Use mulch in containers to prevent the soil from baking in summer.
    • Deadhead non-self-cleaning flowers to keep bloom production steady.
    • Provide afternoon shade for begonias they decline fast in hot western sun.

    Flowers to Avoid Planting With Elephant Ears

    These flowers will struggle or die under the moist, shaded conditions elephant ears create.

    Avoid:

    • Marigolds (need full sun)
    • Petunias (rot easily in shade + moisture)
    • Zinnias (powdery mildew magnet in shade)
    • Lavender, rosemary, and other dry-soil herbs
    • Geraniums (prefer dry, airy soil)
    • Sunpatiens in deep shade (need more light)

    If you’ve tried these before and they wilted or turned leggy, it wasn’t you the conditions were simply wrong.

    FAQ

    What flowers grow best with elephant ears?

    Impatiens, begonias, torenia, and caladiums are the most reliable flowering companions.

    Can I plant flowers in the same pot as elephant ears?

    Yes just choose shade-loving, moisture-loving flowers like impatiens, begonias, or trailing begonias.

    Do elephant ears create too much shade for flowers?

    Some flowers struggle, but shade bloomers actually perform better under the canopy because of the humidity.

    How far should I plant flowers from elephant ears?

    6–12 inches for bedding plants, 3–6 inches in containers.

    Why do flowers die next to my elephant ears?

    Usually because they’re sun-loving or dry-soil plants. Choose moisture-friendly, shade-tolerant varieties.

    Conclusion

    Choosing the right flowers to plant with elephant ears can give your garden or containers a vibrant, tropical look without constant babysitting. Stick to moisture-loving, shade-tolerant bloomers like impatiens, begonias, torenia, fuchsias, and color-rich coleus varieties. Avoid sun-demanding or dry-soil plants, which simply can’t handle the humid, shady microclimate elephant ears create.

    With the right pairings, your elephant ear plantings will feel lush, colorful, and intentionally designed for all season long. Happy gardening!

  • Elephant ear companion plants to grow and what to avoid

    Every product is independently reviewed and selected by our editors. If you buy something through our links, we may earn an affiliate commission at no extra cost to you.

    If you’ve ever grown elephant ears in a home garden whether tucked into a shady corner or as a bold statement in a container you’ve probably noticed how differently they behave depending on what grows around them. I learned this the hard way in my own humid backyard: one planting bed exploded into lush, jungle‑like growth, while another stayed sad, stunted, and constantly thirsty. The only difference was the companion plants.

    Choosing the right elephant ear companion plants helps you:

    • Keep soil evenly moist
    • Reduce pest pressure
    • Shade the soil to prevent heat stress
    • Create a fuller, more balanced tropical look

    Planting the wrong companions does the opposite stealing nutrients, drying the soil, or competing for root space.

    This guide is based on real-world planting tests in small backyards, balcony containers, and mixed beds, so you can confidently pair your elephant ears with plants that genuinely help them thrive.

    Why Certain Companion Plants Work

    Elephant ears (Colocasia, Alocasia, and Xanthosoma) thrive when their three key needs stay consistent:

    • Moist, rich, organically enhanced soil
    • Partial shade to bright indirect light
    • Warm, humid air with minimal wind stress

    Good companion plants support at least one of these needs without competing aggressively.

    In my experience:

    • Plants with similar water requirements help maintain soil moisture.
    • Plants with broad leaves help create humid microclimates elephant ears love.
    • Plants with upright or low-spreading habits fill empty space without bullying the elephant ears’ roots.

    What You’ll Actually Need

    • Healthy elephant ear plants (Colocasia or Alocasia)
    • Companion plants suited to your USDA zone and lighting
    • Compost or organic matter
    • Mulch (coconut husk chips, shredded bark, or composted leaves)
    • Watering can or drip hose
    • Containers with drainage (if gardening on balcony/terrace)

    Eco-friendly options:

    • Homemade compost
    • Leaf mold for moisture retention
    • Organic slow-release fertilizer

    Best Elephant Ear Companion Plants to Grow (With Real‑World Results)

    1. Hostas

    Hostas love the same conditions—shade, rich soil, frequent watering. Why they work:

    • They fill in the space under elephant ears.
    • Their broad leaves help trap humidity.
    • They have non-aggressive roots. Best for: Shaded garden beds and containers.

    2. Caladiums

    Caladiums create a layered tropical look without competing heavily. Why they work:

    • Nearly identical soil and water needs.
    • Bright leaf colors contrast beautifully with elephant ear foliage. Tip: Give caladiums slightly more filtered shade to prevent leaf scorch.

    3. Ferns (Boston, Lady, or Autumn Fern)

    Why they work:

    • Ferns thrive in the same moist, shady microclimate.
    • Their fine texture pairs well with elephant ears’ large leaves.
    • They help cool the soil during heat waves.

    4. Canna Lilies

    Great for gardeners wanting a taller, tropical look. Why they work:

    • Cannas enjoy moisture and heat just like elephant ears.
    • They don’t mind close planting. Note: Water consistently or cannas may stunt and fall behind.

    5. Coleus

    One of my favorite fillers in mixed beds. Why they work:

    • Provides bold color where elephant ears create shadow.
    • Non-invasive roots. Container gardeners: Pinch back regularly to avoid legginess in shade.

    6. Taro (Edible Colocasia esculenta)

    Works only if you want an intentional “tropical crop” aesthetic. Why they work:

    • Similar root and moisture preferences.
    • Creates a denser foliage display. Safety note: Leaves are not edible raw; handle rhizomes carefully.

    7. Impatiens (New Guinea or Standard)

    Why they work:

    • Reliable shade-loving bloomers
    • Thrive in moist soil Good for: Garden borders, container edges, filling bare soil.

    8. Hydrangeas

    Especially in shaded woodland-style gardens. Why they work:

    • Both enjoy cool, moist soil.
    • Hydrangeas create wind protection for tall elephant ear leaves.

    Step-by-Step: How to Plant Elephant Ears With Companions

    1. Choose a Moisture-Holding Bed

    • Look for spots with morning sun and afternoon shade.
    • Soil should feel spongy, not sandy.

    2. Amend the Soil

    Mix into the top 6–8 inches:

    • Compost
    • A handful of slow-release organic fertilizer
    • Leaf mold (optional, but helps in hot climates)

    3. Plant Elephant Ears First

    • Position them as the main focal point.
    • For Colocasia: 3–5 feet apart.
    • For Alocasia: 2–3 feet apart. You want space for air flow to avoid fungal issues.

    4. Add Companion Plants Based on Height Layers

    • Tall layer (Cannas, Hydrangeas): behind or flanking the elephant ears
    • Mid layer (Hostas, Ferns, Coleus): around the perimeter
    • Low layer (Impatiens, groundcovers): near the front to shade soil

    5. Mulch Generously

    I’ve tested several mulches coconut husk chips work best for moisture. Spread 2–3 inches around all plants.

    6. Water Deeply

    Elephant ears prefer deep watering over frequent shallow watering.

    • Water early morning.
    • Soil should stay consistently damp, never fully dry.

    7. Monitor for Overcrowding

    Check monthly:

    • If leaves overlap too tightly, thin or prune companions.
    • Good airflow prevents stem rot.

    Expert Tips & Best Practices

    • Group plants by watering needs. Dry-loving plants will always struggle next to elephant ears.
    • Don’t plant too close. Elephant ears have fleshy roots that need room to expand.
    • Use containers on balconies. Combine elephant ears with coleus and impatiens for a humidity-boosting trio.
    • Fertilize lightly. Overfeeding leads to floppy, oversized leaves that tear easily in wind.
    • Check for snails. Dense plantings attract them use crushed eggshell barriers or organic pellets.

    Elephant Ear Companion Plants to Avoid

    1. Succulents and Cacti

    Worst possible match. They dislike moisture, while elephant ears demand it.

    2. Lavender, Rosemary, and Mediterranean Herbs

    These herbs:

    • Thrive in dry, poor soil
    • Hate shade and humidity
    • Decline quickly in elephant ear environments

    3. Aggressive spreading plants

    Such as:

    • Mint
    • Creeping Jenny (in warm climates)
    • Ribbon grass

    They compete for nutrients and invade elephant ear roots.

    4. Heavy nitrogen feeders

    Corn, bananas (in small gardens), and certain ornamental grasses steal too many nutrients.

    5. Sun-demanding annuals

    Marigolds, petunias, zinnias they scorch in elephant ear shade and leave beds patchy.

    FAQ

    1. What grows best under elephant ears?

    Shade-loving plants like hostas, ferns, impatiens, and caladiums grow best because they like the same moisture and light levels.

    2. Can I plant elephant ears with bananas?

    Yes, but only in large garden beds. Both grow aggressively and need lots of space.

    3. Why do my companion plants keep wilting near elephant ears?

    Elephant ears draw a lot of water. Increase your watering depth or choose moisture-loving companions.

    4. Can I mix elephant ears with vegetables?

    Only moisture-loving vegetables like taro or water spinach. Other crops compete or dry out.

    5. Are elephant ears toxic to pets?

    Yes. All parts cause oral irritation. Avoid placing them where pets chew or dig.

    6. Can I grow companions in the same pot as elephant ears?

    Yes—coleus, impatiens, and dwarf caladiums work well in large containers.

    When NOT to Use Companion Planting With Elephant Ears

    Avoid tight companion planting if:

    • You live in very dry or windy climates (plants may compete for limited moisture).
    • The soil is poorly drained (crowding increases rot risk).
    • You are growing Alocasia indoors they prefer airflow and minimal crowding in pots.

    If drainage is poor, raise the bed or grow elephant ears in containers.

    Alternative Approaches

    Mulching Instead of Companion Planting

    Great for minimalist gardens. Helps keep moisture but won’t add color or humidity.

    Spacing Elephant Ears Alone for a Statement Look

    Good for modern designs. Drawback: soil dries faster without companions.

    Groundcover-Only Planting

    Plant low growers like creeping thyme (in partial shade) or sweet woodruff. Not ideal in deep shade or high moisture beds.

    Conclusion

    Choosing the right elephant ear companion plants not only creates a fuller, more tropical landscape but also supports healthier, faster-growing foliage. In my own garden, the difference between a thriving elephant ear and a struggling one often came down to planting partners that shared its love for moisture, shade, and warmth.

    Stick to moisture-loving, shade-tolerant companions like hostas, ferns, caladiums, cannas, coleus, and impatiens and avoid dry-soil herbs, succulents, and aggressive spreaders. With the right pairings, you’ll create a balanced, low-stress environment your elephant ears will reward with spectacular leaves all season long.

    Happy planting and may your garden feel a little more like a tropical hideaway this year.

  • What to plant with elephant ears in pots

    Every product is independently reviewed and selected by our editors. If you buy something through our links, we may earn an affiliate commission at no extra cost to you.

    If you’ve ever grown elephant ears in containers on a balcony, terrace, or small backyard you know they can look either stunningly tropical or oddly empty and unbalanced. I’ve had pots where the elephant ears shot up beautifully while the underplanting wilted, dried out, or simply disappeared under the shade. The biggest issue? Choosing the wrong plant partners.

    In containers, elephant ears need companions that can handle:

    • Constant moisture
    • Partial shade
    • Humid microclimates
    • Tight root spaces

    Through trial and error across several seasons, I’ve found a handful of plants that consistently thrive alongside elephant ears in pots and a few that absolutely do not.

    This guide breaks down what actually works in real gardens and containers, with clear planting combinations you can copy today.

    Why Certain Plants Thrive With Elephant Ears in Containers

    Elephant ears grown in pots behave differently than in the ground. Their root systems fill containers fast, they dry out more quickly, and they rely heavily on consistency.

    Good container companions must be able to:

    • Tolerate constant moisture
    • Grow well in filtered light or partial shade
    • Handle root competition
    • Create humidity instead of drying the pot

    Container combinations that work well in my own garden tend to include:

    • One tall centerpiece (elephant ears)
    • One medium-height filler
    • One or two trailing plants to soften the pot edges

    This structure mimics professional container design but tailored to elephant ears’ needs.

    What You’ll Need

    • Elephant ear plant (Colocasia or Alocasia)
    • Large pot with drainage (minimum 18–24 inches wide)
    • Rich potting mix with added compost
    • Slow-release fertilizer (organic recommended)
    • Mulch (optional but highly helpful for moisture retention)
    • Suitable companion plants (list below)

    Budget or eco-friendly options:

    • Homemade compost
    • Coconut coir for moisture retention
    • Leaf mold as a pot-top mulch

    Best Plants to Grow With Elephant Ears in Pots

    1. Coleus (Top Choice for Color + Shade Tolerance)

    Coleus is the most reliable companion I’ve grown in containers with elephant ears.

    Why it works:

    • Loves moisture and partial shade
    • Can handle the humid, sheltered environment under large leaves
    • Provides bright color where elephant ears provide structure

    Tip: Pinch back regularly to keep it compact.

    2. Impatiens or New Guinea Impatiens

    These are perfect for filling the lower level of the pot.

    Why they work:

    • Thrive in moist soil
    • Flower reliably in shade
    • Spread gently without overtaking roots

    Best for: small to medium containers.

    3. Caladiums

    If you want a full tropical container, caladiums pair beautifully.

    Why they work:

    • Same moisture and shade preferences
    • Stunning leaf contrast
    • Non‑aggressive roots

    Note: Don’t let caladium bulbs dry out it slows growth drastically.

    4. Ferns (Boston Fern, Maidenhair, or Autumn Fern)

    Ferns add softness and texture.

    Why they work:

    • Love steady moisture
    • Tolerate filtered light
    • Fill space without strangling the elephant ears

    Great for: big patio urns and large terracotta pots.

    5. Creeping Jenny (Lysimachia nummularia small trailing plant)

    One of the best trailing plants for elephant ear pots.

    Why it works:

    • Enjoys moist soil
    • Beautiful golden green color
    • Cascades over the pot edge

    Warning: In the ground it spreads aggressively, but in pots it’s well-behaved.

    6. Torenia (Wishbone Flower)

    Highly underrated companion for shady containers.

    Why it works:

    • Loves shade and humidity
    • Long blooming season
    • Compact and container-friendly

    Great for: brightening lower areas under elephant ear leaves.

    7. Begonias (Rex, Cane, or Wax Begonias)

    Begonias thrive in filtered light and offer long-lasting foliage or blooms.

    Why they work:

    • Don’t mind crowded planting
    • Do well in warm, humid containers
    • Pair beautifully with giant foliage

    Note: Avoid full sun most begonias will scorch next to elephant ears.

    Step‑by‑Step: How to Plant Elephant Ears With Companions in Containers

    1. Choose a Big Enough Pot

    Elephant ears need room. For healthy growth:

    • Use at least 18–24 inches wide
    • Ensure several drainage holes
    • Use a saucer only for catching overflow, not constant standing water

    2. Prepare a Moisture‑Rich Soil Mix

    Use:

    • 60% high-quality potting mix
    • 30% compost
    • 10% coconut coir or peat alternatives

    This retains moisture without becoming waterlogged.

    3. Plant the Elephant Ear First

    • Position it slightly off-center this gives space for companions.
    • Plant bulbs 4–6 inches deep or set the rootball level with soil.

    4. Place Mid-Height and Trailing Companions

    Around the edge of the pot:

    • Coleus for medium height
    • Impatiens or begonias as fillers
    • Creeping Jenny or torenia as trailers

    5. Water Thoroughly

    Elephant ears in pots need consistent moisture. After planting:

    • Saturate the container fully
    • Apply mulch to slow moisture loss

    6. Position the Pot Properly

    Best placement:

    • Morning sun + afternoon shade
    • Bright indirect light
    • Sheltered from strong wind (large leaves tear easily)

    7. Maintain Regular Watering

    Container elephant ears often need daily watering in summer. Check moisture by pressing into the soil:

    • Should feel consistently damp, not muddy.

    Pro Tips & Best Practices

    • Use self-watering containers on sunny balconies elephant ears love it.
    • Fertilize lightly every 4–6 weeks too much nitrogen makes weak, floppy leaves.
    • Rotate the pot monthly so growth stays balanced.
    • Don’t overcrowd two to three companion plants are usually enough.
    • Add a thin layer of mulch on top to reduce evaporation.
    • If leaves droop midday, it’s usually a watering issue, not heat stress.

    Plants to Avoid in Containers With Elephant Ears

    Avoid these because they fight the elephant ears for water or light.

    1. Succulents or Cacti

    They hate moisture and will rot quickly.

    2. Rosemary, Lavender, or Mediterranean Herbs

    Need dry soil and full sun exact opposite conditions.

    3. Thirsty, Fast-Spreading Grasses

    They steal too many nutrients in small containers.

    4. Sun-Loving Annuals (Petunias, Marigolds, Zinnias)

    They scorch in the shade created by elephant ear canopies.

    5. Anything with deep taproots

    Makes container maintenance difficult and stresses all plants.

    FAQ

    What grows best with elephant ears in pots?

    Coleus, impatiens, caladiums, ferns, begonias, and creeping Jenny are the most reliable choices.

    Can I plant flowers with elephant ears in containers?

    Yes shade flowers like impatiens, begonias, and torenia do especially well.

    Will elephant ears outgrow other plants in the pot?

    They can. Choose low-growing companions and avoid plants with large root systems.

    Do elephant ears need full sun in pots?

    No morning sun or bright indirect light is ideal. Full sun dries containers too quickly.

    Can I mix different types of elephant ears in one pot?

    Yes, if the pot is large enough (at least 24 inches). Avoid mixing aggressive Colocasia with slow-growing Alocasia varieties.

    When NOT to Plant Companions With Elephant Ears in Pots

    Avoid companion planting if:

    • The pot is under 16 inches wide
    • You’re growing Alocasia varieties that prefer airflow
    • You live in very dry, windy climates where moisture loss is high
    • The soil is prone to staying waterlogged (rot risk increases in crowded pots)

    In these cases, plant elephant ears alone and use mulch instead.

    Alternative Approaches

    Single-Plant Statement Pot

    Great for modern, minimalist spaces. Pro: Clean look Con: Soil dries faster; less visual interest

    Elephant Ear + Groundcover Only

    Use creeping Jenny or sweet potato vine as a simple trailing option. Pro: Very low maintenance Con: Less height contrast

    Jungle-Style Mixed Container

    Includes elephant ears + caladiums + coleus + ferns. Pro: Lush, dramatic display Con: Needs regular watering and pruning

    Conclusion

    Choosing the right plants for what to plant with elephant ears in pots can completely transform your container garden. Moisture-loving, shade-tolerant companions like coleus, impatiens, caladiums, ferns, begonias, and trailing plants such as creeping Jenny create a balanced, healthy, tropical display even in small spaces.

    Avoid dry-climate herbs, succulents, or sun-demanding annuals, and focus on combinations that support consistent moisture and soft shade. With just a few smart plant pairings, your elephant ear containers will look fuller, healthier, and far more dramatic all season long.

    Happy growing your patio or balcony is about to feel like a tiny tropical escape.

  • Can you plant swiss chard next to tomatoes | What Gardener’s Need to know

    Every product is independently reviewed and selected by our editors. If you buy something through our links, we may earn an affiliate commission at no extra cost to you.

    If you’re working with a small backyard, balcony planters, or a compact raised bed, you’ve probably wondered: “Can I plant Swiss chard next to tomatoes?” I’ve experimented with this pairing in multiple garden setups—small containers, 4×4 raised beds, and even a narrow in-ground row—and the short answer is: yes, they can grow well together, but only if you set them up correctly.

    Many gardeners run into problems without understanding why. They plant chard too close to dense tomato foliage, or they water both plants the same way, and the chard ends up pale, floppy, or sluggish. This guide explains how to make the pairing work, why it works biologically, and when it doesn’t work.

    Why Planting Swiss Chard Next to Tomatoes Can Work

    Swiss chard and tomatoes actually complement each other when grown under the right conditions.

    Here’s the plant biology behind it:

    • Different root zones: Tomatoes send roots deep; Swiss chard spreads shallow and wide. This reduces underground competition.
    • Compatible nutrient needs: Chard is a moderate feeder. Tomatoes are heavy feeders but draw nutrients from deeper soil layers.
    • Partial shade tolerance: Chard tolerates—and in hot climates sometimes appreciates—the afternoon shade tomatoes cast.
    • Moisture balance: Tomatoes prefer a deep watering rhythm, while chard wants consistent moisture near the surface. Mulch makes this compatible.

    In real gardens, what causes trouble isn’t compatibility—it’s poor spacing or excessive shade.

    What You’ll Need to Try This Combo Successfully

    • Tomato seedlings (determinant or indeterminate)
    • Swiss chard seedlings or seeds
    • Compost or compost-enriched potting mix
    • Mulch (straw, dry leaves, or wood chips)
    • Stakes, cages, or string trellis for tomato support
    • A watering can with a gentle rose or a hose with a soft setting

    Optional:

    • Pruning shears for managing tomato foliage
    • Liquid organic fertilizer (kelp, fish emulsion, or compost tea)

    How to Plant Swiss Chard Next to Tomatoes: Step-by-Step

    1. Choose the Right Spot

    Plant in full sun—6+ hours is ideal—but remember that the tomatoes will grow tall, so placing the chard on the east or southeast side ensures it gets morning sun before the tomato shade creeps in.

    2. Prep the Soil

    Both plants appreciate rich, well-draining soil. Mix in:

    • compost
    • aged manure (optional)
    • a little organic slow-release fertilizer

    Tomatoes will pull nutrients as they grow, so don’t skimp on soil quality.

    3. Plant Tomatoes First

    Set your tomato plants at least:

    • 24–30 inches apart for indeterminate varieties
    • 18–24 inches apart for determinate varieties

    Bury them deep so the stems can root well.

    4. Add Swiss Chard Around the Base (But Not Too Close)

    Plant chard 10–12 inches away from the tomato stem. This gives:

    • airflow
    • access to light
    • space for the tomato roots to expand downward

    If using seeds, plant them after the tomatoes are established.

    5. Mulch Generously

    Mulch is the “secret glue” that makes this pairing work.

    Benefits:

    • keeps moisture steady for chard
    • prevents soil splash on tomato leaves
    • cools the shallow soil where chard roots sit

    I use 2–3 inches of straw or shredded leaves.

    6. Water Smart

    This is where many beginners struggle.

    • Tomatoes: deep watering, less often
    • Chard: steady, even soil moisture

    The trick? Water deeply for tomatoes, then do a lighter surface soak around the chard.

    7. Prune Your Tomatoes

    To keep your chard from getting shaded out:

    • remove lower tomato leaves
    • prune suckers (optional but helpful)
    • support tomatoes so they grow upward, not outward

    I’ve found that even a simple string trellis makes the bed far brighter and roomier.

    Pro Tips & Best Practices

    • Avoid overcrowding. Tight spacing almost always leads to pale, floppy chard.
    • Fertilize lightly around the chard. Too much nitrogen makes tomatoes leafy instead of fruiting.
    • Watch for leaf miners. Tomatoes don’t attract them, but chard and nearby beets/spinach do.
    • Water in the morning. Reduces fungal issues, especially around tomato stems.
    • Harvest chard regularly. Removing big leaves helps maintain airflow under the tomatoes.

    Real-world note: In my hot summers, the chard grows far better next to tomatoes than in full, harsh sun. In spring and fall, I give it more light by pruning the tomatoes aggressively.

    Frequently Asked Questions

    Will tomatoes stunt Swiss chard if they grow too tall?

    Yes. If the tomato canopy gets too dense, chard will stretch, pale, and lose flavor. Regular pruning prevents this.

    Can I grow Swiss chard and tomatoes together in containers?

    Yes, but only in large containers (15–20 gallons minimum). Chard needs its own surface space.

    Does Swiss chard attract pests that harm tomatoes?

    Not typically. Leaf miners hit chard, but they don’t damage tomatoes.

    Should I fertilize both plants the same way?

    No. Tomatoes need heavier feeding; chard prefers mild, steady nutrition.

    How far apart should tomatoes and chard be?

    Keep them 10–12 inches apart for best airflow and growth.

    Can I plant chard under tomato cages?

    Yes—this is actually one of my favorite space-saving setups but prune lower foliage to give the chard morning light.

    When Not to Plant Swiss Chard Next to Tomatoes

    Avoid pairing them if:

    • you live in cool, cloudy climates with short summers
    • your garden gets less than 5 hours of sun
    • you’re growing very bushy, determinate tomatoes with minimal pruning
    • you’re using heavy clay soil with poor drainage
    • slugs are a big local issue (they love shady chard beds)

    In these cases, the tomatoes will overshadow the chard, and both will struggle.

    Alternatives If the Pairing Doesn’t Work in Your Space

    If the tomatoes grow too aggressively or you have limited sun:

    • Move chard to a sunnier edge of the bed.
    • Grow chard in containers near the tomato bed.
    • Switch to compact tomato varieties (Tiny Tim, Glacier, Patio).
    • Plant basil or marigolds near tomatoes instead and give chard its own row.

    Swiss chard is incredibly adaptable sometimes a few inches of distance is all it needs.

    Conclusion

    So, can you plant Swiss chard next to tomatoes? Yes—this pairing is one of the more reliable combinations for small gardens, as long as you manage light, spacing, and water correctly.

    Tomatoes grow tall and deep, while chard stays low and shallow. With good pruning and mulching, both plants produce abundantly without getting in each other’s way.

    If you’re gardening in containers, raised beds, or tight balcony spaces, this combo can help you maximize every inch. Just keep an eye on shading and airflow, and your Swiss chard will reward you with vibrant, flavorful leaves all season long.

    Happy gardening and enjoy discovering how well these two favorites can grow together.

  • What not to plant next to swiss chard | Beginner friendly guideline

    Every product is independently reviewed and selected by our editors. If you buy something through our links, we may earn an affiliate commission at no extra cost to you.

    Swiss chard is one of the most forgiving greens I grow in my small backyard garden heat-tolerant, cut-and-come-again, and surprisingly pest-resistant. But one frustration I learned early on is that chard sulks when the wrong neighbors crowd it, leading to smaller leaves, sluggish growth, or sudden pest flare-ups.

    If your chard has ever looked pale, stunted, or simply “not as lush as it should be,” there’s a good chance incompatible companion plants are part of the problem. Plants compete underground and above it root depth, moisture needs, shade cast, pests attracted so knowing what not to plant next to Swiss chard can save you a lot of disappointment.

    This guide distills what I’ve learned through real trial and-error, plus the horticultural reasoning behind those results.

    Why Certain Plants Don’t Belong Next to Swiss Chard

    Swiss chard is a heavy feeder with shallow yet wide-reaching roots. It’s also moisture-loving and sensitive to shading. Plants that cause problems usually:

    • Compete aggressively for nitrogen
    • Cast too much shade
    • Hog water or dry out the soil
    • Attract pests that move onto chard
    • Release root chemicals (allelopathy) that slow leafy growth

    Think of chard as a plant that likes good neighbors steady feeders, non-aggressive roots, and companions that don’t overwhelm its space.

    What You’ll Need (If You’re Rearranging Your Garden)

    • A spade or hori-hori knife
    • Compost or mature manure for re-amending disturbed soil
    • A watering can or hose with a gentle setting
    • Mulch (straw, leaves, or untreated wood chips)
    • Optional: garden markers to keep incompatible plants apart

    Plants You Should NOT Plant Next to Swiss Chard

    1. Potatoes

    Potatoes are one of the worst neighbors for Swiss chard. In my beds, whenever they’ve grown side by side, the chard always ends up stunted.

    Why they’re incompatible:

    • Potatoes are heavy feeders and aggressively steal nutrients.
    • They pull moisture from wide soil areas.
    • They attract flea beetles and leaf miners both of which can jump to chard.

    2. Corn

    Corn casts a tremendous amount of shade, even when planted a few feet away.

    Problems I’ve seen:

    • Chard becomes pale and floppy in low light.
    • Leaves stay small and take on a bitter flavor.
    • Soil dries out too quickly because corn drinks heavily.

    3. Melons (Cantaloupe, Watermelon)

    Melons sprawl fast and will choke out slower-growing greens.

    Issues:

    • Their vines climb over chard and block sunlight.
    • They demand heavy feeding and watering.
    • They attract squash bugs and cucumber beetles pests that also nibble chard.

    4. Cucumbers

    Similar to melons, but with slightly less aggressive sprawl.

    Problems:

    • Powdery mildew can transfer easily.
    • Cucumber beetles can move onto chard.
    • Competition for moisture is high.

    5. Broccoli & Cauliflower

    These brassicas are surprisingly poor partners for chard.

    Why:

    • Both are heavy feeders, depleting soil nutrients quickly.
    • They attract cabbage moths whose larvae will chew holes in chard too.
    • Their large leaves shade out tender greens.

    6. Other Heavy-Feeding Brassicas (Brussels sprouts, Cabbage, Kohlrabi)

    These plants crowd upward and downward, leaving little for chard.

    Issues:

    • Nitrogen competition
    • Shading from dense foliage
    • Shared pest pressure

    7. Fennel

    Fennel is generally a bad companion for most crops, and chard is no exception.

    Why:

    • Its root secretions can stunt leafy greens.
    • It attracts swallowtail caterpillars, which may also snack on chard.

    Better Alternatives: What to Plant Near Swiss Chard Instead

    If you need reliable neighbors, consider these garden-friendly choices:

    • Carrots (deep roots don’t compete)
    • Onions, garlic, leeks (repel pests, light feeders)
    • Radishes (mature quickly, don’t compete)
    • Herbs like dill or mint in containers (attract beneficial predators)
    • Bush beans (fix nitrogen and stay compact)

    These combinations consistently produce more vibrant, fuller chard in my garden beds.

    Step-by-Step: How to Rearrange a Bed with Bad Chard Companions

    • Start early morning or late afternoon. Plants handle disturbance better when temperatures are cooler.
    • Gently remove incompatible neighbors. Use a hori-hori knife to loosen roots. Avoid ripping aggressively chard roots spread widely but shallowly.
    • Top-dress the planting area with compost. After removing heavy feeders like potatoes or brassicas, the soil needs replenishing.
    • Replant compatible crops 10–12 inches away. Chard needs airflow to avoid leaf miners and fungal issues.
    • Water deeply but not aggressively. Let the soil settle and avoid blasting leaves.
    • Mulch to reduce stress. This helps maintain soil moisture while the bed stabilizes.

    Professional Tips & Best Practices

    • Chard grows best in full sun avoid planting bothersome shade-casters nearby.
    • Consistent moisture leads to sweeter leaves; incompatible neighbors usually dry the soil too fast.
    • If you’ve had leaf miner issues, avoid planting chard near any crop that attracts them (beets, spinach).
    • Rotate chard yearly to reduce pest buildup.

    What beginners often miss: even mild root competition can dramatically reduce chard’s productivity, especially in small garden beds.

    Frequently Asked Questions

    Why is my Swiss chard growing slowly even though I water it?

    Often it’s because of nutrient competition from nearby heavy feeders like potatoes, cabbages, or corn.

    Can I grow Swiss chard next to tomatoes?

    Yes, in moderation. Just keep the tomato plant pruned so it doesn’t shade the chard.

    Will Swiss chard grow poorly in partial shade?

    It will survive but not thrive. Neighboring plants that cast shade can stunt leaf size.

    Can I plant chard next to peppers?

    Yes peppers have deeper roots and don’t compete aggressively.

    Why do my chard leaves get holes?

    Leaf miners often come from nearby beets, spinach, or brassicas. Avoid clustering these together.

    Can I plant Swiss chard with squash?

    Not recommended squash crowds and shades chard.

    When NOT to Use Companion Planting for Chard

    Companion planting can fail if:

    • You have extremely limited space (less than 2–3 square feet per plant)
    • You’re growing in hot climates where shade might actually benefit chard
    • Your soil is depleted or compacted

    In those cases, prioritize soil health over plant combinations.

    Alternative Solutions if You Can’t Rearrange Plants

    • Use containers for incompatible plants like fennel or cucumbers.
    • Prune shading plants (corn, tomatoes) to allow more light.
    • Boost soil nutrients with compost tea or worm castings to reduce competition stress.

    These adjustments can keep everything growing reasonably well even if spacing is tight.

    Conclusion

    Knowing what not to plant next to Swiss chard can make a huge difference in how lush and productive your plants become. Avoid pairing chard with heavy feeders, shade producers, and pest-attracting crops like potatoes, corn, melons, brassicas, and fennel. Choose lighter feeders and root-friendly companions instead to keep your chard vigorous and flavorful.

    The more you observe your own garden sun patterns, soil moisture, plant behavior the easier these decisions become. Happy planting, and may your chard be as bright and sturdy as it deserves to be.

  • Are kale and swiss chard companion plants | Grow healthier greens together

    Every product is independently reviewed and selected by our editors. If you buy something through our links, we may earn an affiliate commission at no extra cost to you.

    If you’re planning a cool‑season garden or filling a raised bed with leafy greens, you may wonder: Are kale and Swiss chard companion plants? It’s a common question, especially for gardeners working with limited space on balconies, terraces, or small backyard beds.

    I’ve grown both crops side‑by‑side in several seasons, and the real-world answer is:

    Kale and Swiss chard are compatible, but they are not ideal companion plants.

    They won’t harm each other, but they also don’t provide the classic mutual benefits seen in strong companion pairs like basil and tomatoes or carrots and radishes. Instead, kale and Swiss chard tend to compete for nutrients, space, and light if planted too closely. This guide walks you through how to grow them successfully together and when it’s better to separate them.

    Why Kale and Swiss Chard Are Not Ideal Companion Plants

    From hands‑on experience in raised beds and container gardens, here’s why they aren’t perfect partners:

    • Both are large, long‑season leafy greens. As the season progresses, their leaves spread widely, competing for space and airflow.
    • They have similar nutrient demands. These two crops are heavy feeders. Without rich soil and regular composting, one will outgrow the other.
    • Pests often affect both. Aphids, flea beetles, and leaf miners can easily spread between closely planted leafy greens.
    • They enjoy the same sunlight pattern. Neither shades the other helpfully unlike pairings where one plant protects the other from heat.

    They don’t hurt each other chemically or biologically they simply want the same things.

    Why They Can Still Be Planted Together

    Even though they’re not classic companions, kale and Swiss chard can grow together successfully when managed properly:

    • Neither is aggressive or allelopathic (they don’t release compounds that inhibit growth).
    • Both thrive in cool weather, making them easy to plant at the same time.
    • Both appreciate consistent moisture and mulching.
    • Both benefit from regular harvesting, which helps keep spacing workable.

    In larger beds or well‑maintained soil, they can peacefully coexist.

    What Materials You’ll Need

    • Kale seedlings or seeds
    • Swiss chard seedlings or seeds
    • Compost or well‑rotted manure
    • Raised bed, garden plot, or large container (at least 12 inches deep)
    • Mulch (straw, shredded leaves, or compost)
    • Drip irrigation or a watering can
    • Optional: organic pest control tools (Neem, row covers)

    Eco tip: Leafy greens are easy to grow organically synthetic fertilizers often make them grow too fast and turn bitter.

    How to Plant Kale and Swiss Chard Together (Step-by-Step)

    1. Prepare Rich, Well-Draining Soil

    Both are heavy feeders, so soil quality matters.

    • Add 2–3 inches of compost to the top 6–8 inches.
    • Aim for a loose, crumbly texture avoid compact soil.

    2. Give Them Generous Spacing

    This is the most important step.

    • Space kale 12–18 inches apart.
    • Space Swiss chard 10–12 inches apart.
    • Keep at least 12 inches between kale and chard.

    In my raised beds, staggering them in a zig‑zag pattern prevents crowding better than planting them in rows.

    3. Plant in Cool Seasons

    Ideal times:

    • Early spring
    • Fall
    • Late winter in mild climates

    They will both tolerate light frost but suffer in heat.

    4. Water Deeply

    Both want consistent moisture not soggy soil.

    • Water 2–3 times per week in cool weather.
    • Water more often in dry, warm weather.
    • Mulch to keep the soil cool and moist.

    Swiss chard droops slightly before kale does, so it’s a useful indicator that watering is needed.

    5. Feed Regularly

    To prevent competition:

    • Add compost every 4–6 weeks.
    • Avoid high‑nitrogen synthetic fertilizers that cause floppy, weak growth.

    6. Harvest Smartly

    • Harvest outer kale leaves regularly to keep airflow open.
    • Pick Swiss chard stems when they reach full size; this keeps plants compact.

    Keeping both plants trimmed prevents overcrowding and disease spread.

    Pro Tips & Best Practices

    • Choose compact kale varieties (like dwarf curly kale) if space is tight.
    • Swiss chard handles partial shade better, so plant it on the shadier side of the bed.
    • Use row covers early if aphids or flea beetles are common.
    • Rotate greens each season to reduce soil-borne pests.
    • If chard starts to overshadow kale (common in hot climates), prune a few large leaves.

    FAQ

    Are kale and Swiss chard harmful to each other?

    No. They don’t chemically interfere, and neither is invasive.

    Will they crowd each other out?

    Yes if spacing is too tight. Give at least 12 inches between plants.

    Can I grow kale and Swiss chard together in containers?

    Yes, but use a large container (minimum 15–20 gallons) and avoid overcrowding.

    Do they attract the same pests?

    Often yes. Aphids, leaf miners, and flea beetles can affect both.

    Can kale and Swiss chard share nutrients?

    They compete heavily. Add compost often if growing them side‑by‑side.

    When NOT to Plant Kale and Swiss Chard Together

    Avoid pairing them when:

    • You’re gardening in a small container (they compete too strongly).
    • You have poor soil and can’t amend regularly.
    • You garden in hot climates Swiss chard outgrows kale in heat.
    • You deal with heavy pest pressure on leafy greens.

    Better Alternative Companions

    Best partners for kale:

    • Onions
    • Garlic
    • Dill
    • Sage
    • Beets
    • Celery

    Best partners for Swiss chard:

    • Lettuce
    • Spinach
    • Radishes
    • Carrots
    • Marigolds

    These combinations improve growth and reduce pests more effectively.

    Conclusion

    So, are kale and Swiss chard companion plants? Not really but they can grow well together if spaced generously and fed regularly. They share similar needs and won’t harm each other, but they do compete for light and nutrients, especially in small beds.

    With good soil, consistent watering, and smart harvesting, you can grow both successfully in the same garden. But if you have limited space or poor soil, choosing better companion pairings will give you stronger, healthier plants.

    If you’d like, I can also create a full companion planting chart for leafy greens or for your entire garden layout.

  • Can you plant swiss chard with zucchini | A practical Guideline

    Every product is independently reviewed and selected by our editors. If you buy something through our links, we may earn an affiliate commission at no extra cost to you.

    If you garden in a small backyard or a few raised beds, you’ve probably wondered that Can you plant Swiss chard with zucchini without the zucchini taking over? I’ve tested this pairing in both ground beds and 2×4 raised beds, and the short answer is:

    Yes, Swiss chard can be planted with zucchini but only with careful spacing, sunlight planning, and consistent moisture management.

    Zucchini grows aggressively and can shade out anything too close. Swiss chard, on the other hand, is sturdy but not competitive against a sprawling squash plant. When planted with the right layout, the two can actually complement each other. This guide shows exactly how to make the pairing work.

    Why Planting Swiss Chard With Zucchini Can Work

    From real garden experience, here’s the logic behind this combination:

    • Zucchini grows upward first, giving Swiss chard room early on. Chard gets established before the zucchini canopy expands.
    • Swiss chard tolerates partial shade, especially in summer. Light afternoon shade from zucchini can help prevent chard from wilting.
    • Root competition isn’t severe when spacing is correct. Zucchini sends deep, wide roots. Swiss chard roots stay moderately deep but more compact.
    • Moisture needs match well. Both thrive with consistent, even watering.

    The key is proper timing and planting layout not crowding them together.

    What Actually You’ll Need

    • Swiss chard seedlings or seeds
    • Zucchini seedlings (bush varieties are best for small gardens)
    • Compost or well-aged manure
    • Garden bed or pot at least 16–20 inches deep
    • Mulch (straw, shredded leaves, or wood chips)
    • A trellis or stake for zucchini (optional but helpful)
    • Watering can or drip line

    Eco tip: Mulch heavily around zucchini to reduce water needs and prevent soil splash, which reduces powdery mildew risk.

    How to Plant Swiss Chard With Zucchini: Step-by-Step

    1. Choose the Right Zucchini Type

    In tight spaces, bush zucchini (like ‘Black Beauty’ or ‘Bush Baby’) outperforms sprawling types. Sprawlers can overrun chard unless you prune aggressively.

    2. Prepare the Soil

    Both crops appreciate rich soil.

    • Add 2–3 inches of compost to the top 10–12 inches.
    • Soil should drain well zucchini hates soggy roots.
    • Lightly pre-water the bed so the soil is evenly moist.

    3. Plant Zucchini First (Very Important)

    Plant zucchini seedlings or seeds on the south or west side of your bed so they don’t shade chard too early.

    • Space zucchini 24–36 inches from anything else.
    • If using a container, use at least a 10–15 gallon pot.

    4. Plant Swiss Chard at a Safe Distance

    Plant Swiss chard 10–12 inches away from the zucchini plant, ideally:

    • Along the edges of the bed
    • In front of the zucchini if sun comes from behind
    • In a “ring” pattern around a large pot

    This keeps chard in bright light while giving zucchini room to expand.

    5. Mulch the Entire Area

    A light mulch layer helps:

    • Retain moisture
    • Prevent powdery mildew (less soil splash)
    • Keep chard cool in summer heat

    6. Water Deeply and Consistently

    Both plants need consistent moisture, especially zucchini.

    • Water deeply 2–3 times per week.
    • Avoid overhead watering on zucchini leaves to reduce mildew.
    • Chard will droop slightly before zucchini does use it as your moisture indicator.

    7. Harvest Regularly

    • Pick zucchini when they’re small (6–8 inches). This keeps the plant manageable.
    • Cut outer chard leaves often to improve airflow.

    This prevents overcrowding and reduces fungal issues.

    Pro Tips & Best Practices

    • Use a tomato cage or vertical stake to encourage zucchini upward rather than outward.
    • Choose rainbow chard it tolerates a little extra shade.
    • In very hot climates, zucchini’s shade actually improves chard flavor and texture.
    • Remove a few large zucchini leaves if they overshadow chard too heavily.
    • Add compost every 4–6 weeks zucchini is a heavy feeder.

    Common beginner mistake: Planting chard too close. Zucchini grows wider than you expect.

    FAQ

    Will zucchini choke out Swiss chard?

    Only if they are planted too close or zucchini is not pruned. Maintain 10–12 inches of clearance.

    Can I grow them together in containers?

    Yes, but use a large container (minimum 20 gallons) and plant chard around the edges.

    Does Swiss chard help zucchini grow?

    Indirectly. Chard acts as a “living mulch,” shading soil and helping retain moisture.

    Will Swiss chard tolerate the shade from zucchini leaves?

    Yes chard handles partial shade better than most greens.

    How often should I water when they’re planted together?

    Deep watering 2–3 times weekly in cool weather; more often in summer heat.

    When NOT to Plant Swiss Chard With Zucchini

    Avoid pairing them if:

    • You grow vining/sprawling zucchini varieties without pruning.
    • Your garden bed is under 2 feet wide (zucchini will dominate).
    • You live in a very cool climate where chard needs more sun than it gets.
    • You can’t water consistently zucchini suffers badly from stress.

    Alternative Planting Options

    If this pairing doesn’t suit your space, try:

    • Swiss chard + lettuce for cool-season success
    • Zucchini + nasturtiums to deter pests
    • Swiss chard + radishes for efficient spacing
    • Zucchini + beans (beans fix nitrogen, but give them plenty of space)

    These combinations work well in small gardens with varied climates.

    Conclusion

    So, can you plant Swiss chard with zucchini? Yes but  you have to keep in your mind that spacing, sunlight direction, and consistent moisture are the key to success. Plant zucchini first on the sunnier side, tuck Swiss chard around the edges, and harvest both crops often to keep growth controlled. This pairing works especially well in raised beds and larger containers where airflow is good.

    With thoughtful layout and regular tending, you can enjoy a productive mix of tender chard leaves and steady zucchini harvests throughout the growing season.

    If you want, I can also create a full companion planting chart for common summer vegetables.