Every product is independently reviewed and selected by our editors. If you buy something through our links, we may earn an affiliate commission at no extra cost to you.
Raised planter boxes are one of the most efficient ways to grow vegetables, herbs, and flowers in small yards, patios, balconies, and urban spaces. When built correctly, they improve drainage, increase root health, extend the growing season, and reduce weed pressure.But most DIY guides leave out the details that determine whether your planter box thrives for 8–10 years or warps and fails after two.
In this expert guide, you’ll learn how to build raised planter boxes that are structurally sound, properly drained, sized for root depth, and optimized for long-term productivity.
There’s something powerful about harvesting food from a planter you built yourself. The structure holds more than soil it holds intention. But success depends on more than stacking boards. Depth, drainage, soil structure, and sun exposure determine whether your raised planter box becomes a thriving mini-ecosystem or a frustrating project. Let’s build it correctly from day one.
Many gardeners turn to raised planter boxes because:
- Native soil is poor or compacted
- Space is limited
- Drainage is an issue
- They want a cleaner, more organized layout
However, common problems include:
- Shallow boxes that restrict roots
- Poor drainage leading to rot
- Cheap lumber that fails quickly
- Underestimating soil weight
This guide covers:
- Ideal dimensions based on crop type
- Best materials (budget vs premium)
- Proper drainage design
- Soil composition formulas
- Irrigation setup
- Beginner mistakes
- Cost breakdowns
Whether you’re gardening in USDA Zone 4 or Zone 10, these principles apply.
Step 1: Decide on Type Grounded vs Elevated Planter Boxes
1. Ground-Level Raised Planter Boxes
These sit directly on soil.
Best for:
- Yards
- Larger vegetable gardens
- Maximum root depth
Advantages:
- Excellent drainage
- Roots can extend into native soil
- Lower material cost
Maintenance impact: Lower watering frequency than elevated boxes.
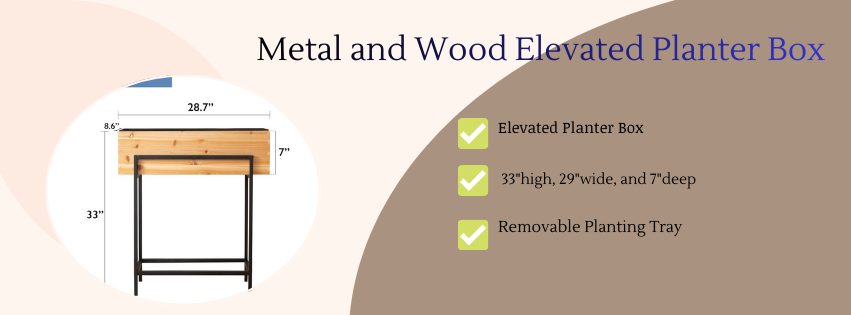
2. Elevated Planter Boxes (With Legs)
These are raised off the ground.
Best for:
- Patios
- Decks
- Balconies
- Mobility or accessibility needs
Advantages:
- Improved ergonomics
- Better pest control
- Clean containment
Critical caution: Drainage must be engineered correctly.
Soil weight consideration:
- Wet soil weighs ~75–100 lbs per cubic foot.
- Always confirm deck/balcony load limits.
Step 2: Choose the Right Dimensions (Depth Is Critical)
Minimum Depth Guidelines
| Depth | Suitable Crops |
| 8–10 inches | Lettuce, spinach, herbs |
| 12 inches | Peppers, bush beans, strawberries |
| 18 inches | Tomatoes, cucumbers, eggplant |
| 24 inches | Carrots, potatoes, root crops |
If building only one box, 18 inches offers maximum versatility.
Why depth matters:
- Deep soil regulates temperature
- Holds moisture longer
- Supports stronger root systems
- Increases yield
Shallow boxes dry quickly and limit productivity.
Step 3: Best Materials for Raised Planter Boxes
Budget Option: Untreated Pine
- Affordable
- Easy to work with
- Lifespan: 3–5 years
Best for beginners testing gardening long-term.
Mid-Range: Douglas Fir
- Stronger than pine
- Lasts 5–7 years
- Good balance of price and durability
Premium: Cedar or Redwood
- Naturally rot-resistant
- Lifespan: 8–12+ years
- Higher upfront cost
Cost impact: Cedar may cost 2–3x pine but reduces rebuild frequency.
Alternative: Corrugated Metal + Wood Frame
- Modern aesthetic
- 15–20+ year lifespan
- Excellent structural strength
- Higher upfront investment
Avoid These Materials
- Thin plywood (rots quickly)
- Interior-treated lumber
- Unknown recycled materials
Step 4: Assembly Basics (Structural Integrity First)
Standard Size Recommendation
4 ft wide maximum 8 ft long maximum
Why:
- Allows access from both sides
- Prevents stepping inside (avoids soil compaction)
Basic Assembly Steps
- Cut boards to desired length.
- Secure with 3” exterior-grade deck screws.
- Reinforce corners with 2×2 or 4×4 posts.
- Install cross-bracing if longer than 6 feet.
- Level base before filling.
Assembly time: 2–4 hours.
Step 5: Drainage The Most Overlooked Factor
For Grounded Boxes
Leave bottom open.
Benefits:
- Natural drainage
- Earthworm migration
- Deep root extension
If gophers or rodents are present, install hardware cloth underneath.
For Elevated Planter Boxes
Drainage holes are mandatory.
- Drill ½-inch holes every 6–8 inches
- Add landscape fabric to prevent soil loss
- Optional: 1-inch gravel layer
Why this matters: Without drainage, roots suffocate and fungal diseases develop.
Step 6: Soil Composition (The Real Engine of Growth)
Avoid filling planter boxes with cheap “garden soil” alone.
Ideal Raised Planter Mix
- 40% screened topsoil
- 40% finished compost
- 20% aeration material (perlite, pumice, coarse sand)
Why it works:
- Compost provides nutrients and microbes
- Topsoil adds mineral stability
- Aeration prevents compaction
Cost-Saving Strategy
For boxes 18”+ deep:
Fill bottom 6 inches with:
- Logs
- Branches
- Leaves
Then top with premium growing mix.
This reduces soil cost by 20–40%.
Step 7: Sunlight Placement
Vegetables need:
- 6–8 hours direct sunlight
- South-facing exposure preferred
- East-facing acceptable for leafy greens
- Avoid north-facing placement in Zones 4–7
Balcony note: Reflective walls increase heat. Monitor soil moisture more closely.
Step 8: Watering & Irrigation
Raised planter boxes dry faster than in-ground gardens.
Watering Frequency
- Spring: 1–2 times weekly
- Summer: 2–4 times weekly
- Hot Zones (8–10): possibly daily during peak heat
Water deeply to encourage strong root growth.
Irrigation Options
Soaker Hose (Budget)
- $20–$40
- Easy installation
Drip Irrigation Kit (Recommended)
- $40–$100
- Efficient water use
- Reduces disease risk
Self-Watering Systems
- Ideal for balconies
- Higher upfront cost
- Lower daily maintenance
Step 9: Mulching
Apply 2–3 inches of:
- Straw
- Shredded leaves
- Aged wood chips
Benefits:
- Reduces evaporation
- Stabilizes soil temperature
- Suppresses weeds
Low cost, high return.
Beginner Mistakes to Avoid
- Building too shallow
- Ignoring drainage holes in elevated boxes
- Using poor-quality soil
- Overcrowding plants
- Skipping structural bracing
- Underestimating soil weight on decks
Most planter box failures are structural or soil-related.
Budget vs Premium Setup Comparison
| Feature | Budget Build | Premium Build |
| Material | Pine | Cedar or metal |
| Lifespan | 3–5 years | 10–20+ years |
| Irrigation | Manual | Automated drip |
| Soil | DIY blend | Engineered raised-bed mix |
| Cost | $100–$200 | $400–$1,000+ |
Best Crops for Raised Planter Boxes
High performers:
- Tomatoes (18” depth)
- Peppers
- Lettuce
- Spinach
- Basil
- Kale
- Strawberries
Avoid large shrubs and fruit trees unless box depth exceeds 24 inches.
FAQ
How deep should a raised planter box be?
Minimum 12 inches. For tomatoes and root vegetables, 18–24 inches is ideal.
What wood lasts longest for planter boxes?
Cedar and redwood are naturally rot-resistant and last 8–12+ years.
Do raised planter boxes need drainage holes?
Only elevated boxes require drainage holes. Grounded boxes should remain open-bottomed.
What is the best soil for raised planter boxes?
40% compost, 40% topsoil, and 20% aeration material provides optimal drainage and fertility.
Are raised planter boxes better than in-ground gardens?
They improve drainage, soil control, and accessibility, especially in poor native soil.
How much does it cost to build a raised planter box?
Typically $100–$300 depending on size and material quality.
Conclusion
Building raised planter boxes isn’t complicated but building them correctly requires attention to depth, drainage, soil structure, and sun exposure.
If you:
- Choose durable materials
- Build at least 12–18 inches deep
- Use a balanced soil mix
- Install proper drainage
- Water consistently
You’ll create a productive growing system that lasts for years.
A well-built planter box transforms even the smallest space into a thriving garden and once you harvest from it, you’ll understand why proper construction makes all the difference